My blog is called "Creative Smiles" because my designs are the result of incorporating mistakes. With fumble fingers that drop whatever they are holding - repeatedly, it takes a lot of giggles, smiles and creative patience during my crafting process. xx

Showing posts with label DLArt. Show all posts

Monday, May 15, 2023

Flower Cart - Jan's Digi Stamps

 Hello! I'm so glad to see you!

Reminder Time for the Anything Goes Challenge at Jan's Digi Stamps!  If you use a JDS image in your card, please mention it. There is a 2nd draw specifically for those who use one of Jan's fun images.

Jan's Digi's now has a freebie section. Freebies will be left up for a short time, and new ones will be added periodically. Jan's newest sets are 25% off and this month's Father's Day sale, includes 10 sets.

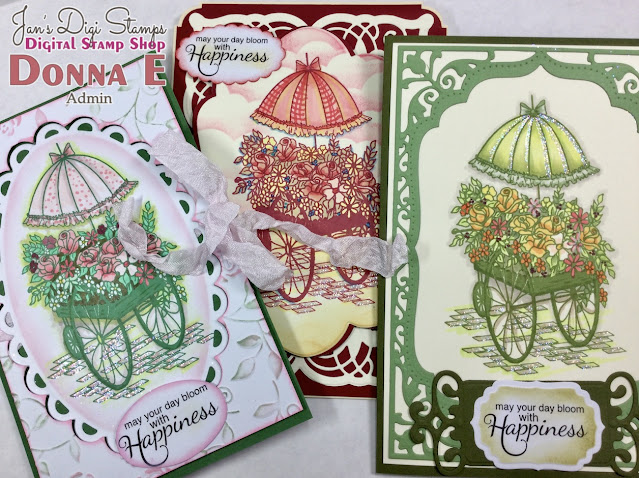
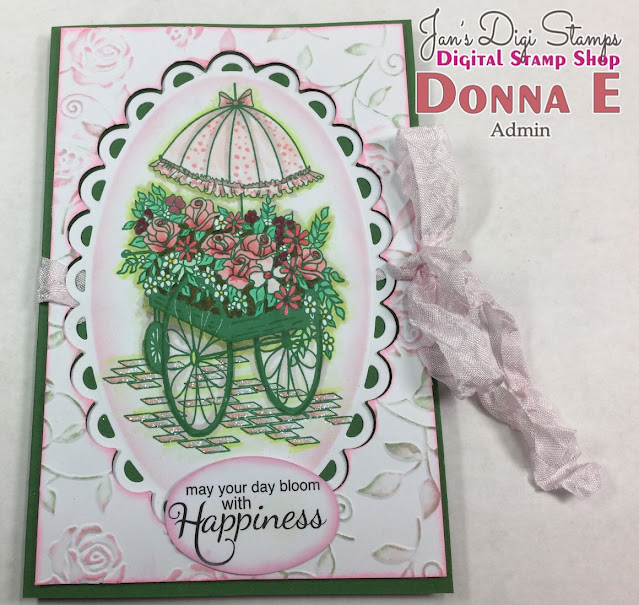
I admit it! These were in my "to be finished" box, and it was fun to finish them up and send them to people who will love them. Each card uses: Flower Cart 798Showers of Tulips 923, clear glitter and Copic Markers:

Flower Cart 798 10 images


Showers of Tulips 923

Like lots of bloggers, I am trying to use as many of my favorite (or unused) older products as possible in my creations. There is something happy and satisfying in doing that (at least for me!) 
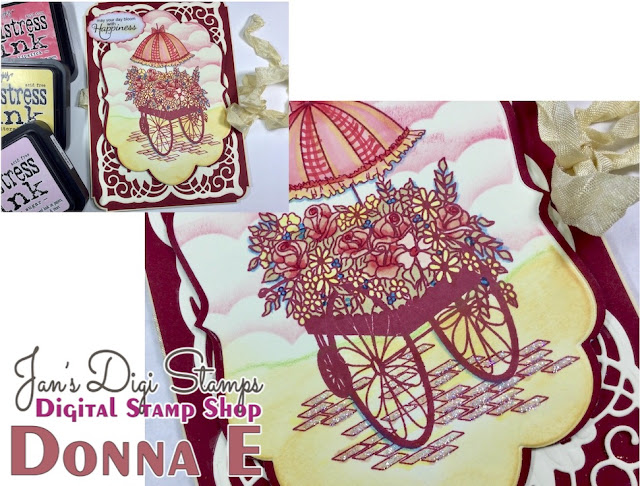
Cherry & Ivory Colored Card:  Dies- Spellbinders Cascading Grace 5x7, Marianne Design Creatables Anja's Large Ovals LR0236, EK Success corner punch, SU Scallop Punch, Distress Inks (Scattered Straw, Worn Lipstick, Spun Sugar), Ivory Neenah Cardstock, DLArt Ivory Ribbon, My Favorite Things cloud stencil, green and blue colored pencils, Freebie interior sentiments here.


Green & Ivory Card:  Dies: Grand Labels Four Nestabilities, SB 5x7 Elegant Labels Four, SB Fancy Tags One S4-235, Ivory Neenah Cardstock, Peeled Paint Distress Ink
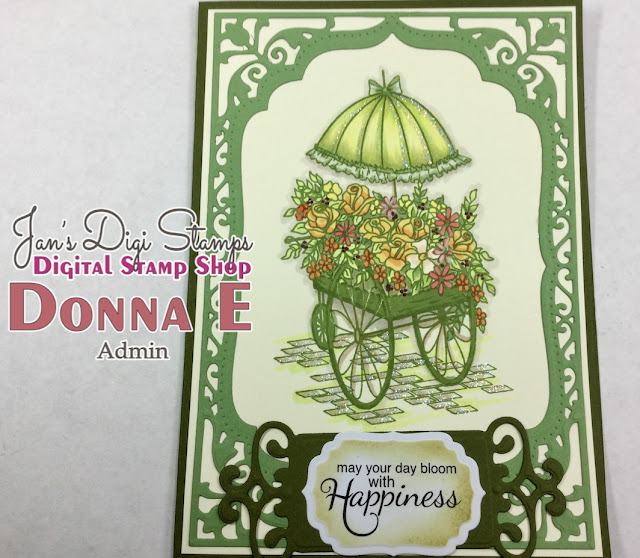

I find using pale gray and/or pale ivory as a card base is difficult to photograph without appearing rather dingy and dark. But like other supplies in my stash, crying out to be used, so is my Neenah Ivory for Copics asking to be used!

But I DID allow myself to color one with traditional white Express-It:

Pink & Green Card: Dies: LifeStyle Nesting Lace Ovals, Embossalicious Rose Vine embossing folder by Die'sire, EK Success Oval Punch, Distress Inks (Bundled Sage, Kitsch Flamingo, Spun Sugar) DLArt Pink Ribbon,

The interior is a freebie gift from me. You can download it here (scroll to the bottom of the post)


Don't forget to head on over and share your pretty projects with us at Jan's Digi Stamps!

Challenges I would like to play in please:
  1. Crafting Happiness Challenges # 142 Flowers 6/1
  2. Classic Design Challenge #5 AG 6/1
  3. A Perfect Time to Craft #5 AG (check 7/1)

Stamping Hugs,


Monday, July 01, 2019

2 Crafty Critter Crazies with A Day for Daisies digital stamps

Hi, everyone! I hope you are enjoying the summer weather and that all is well. Today I have a freebie sentiment for you, and an idea for how to change your digital images.
I also have a special BOO BOO edition today!
(giggle)


It's time for a new Challenge at Two Crafty Critter Crazies 
where we love to celebrate any project with a critter on it! Critters include mythical creatures, animal toys and everything alive (except humans and flora)!


Our very generous sponsor this month is:
A Day For Daisies Digital Stamps.
She has such a unique style and wonderful characters.
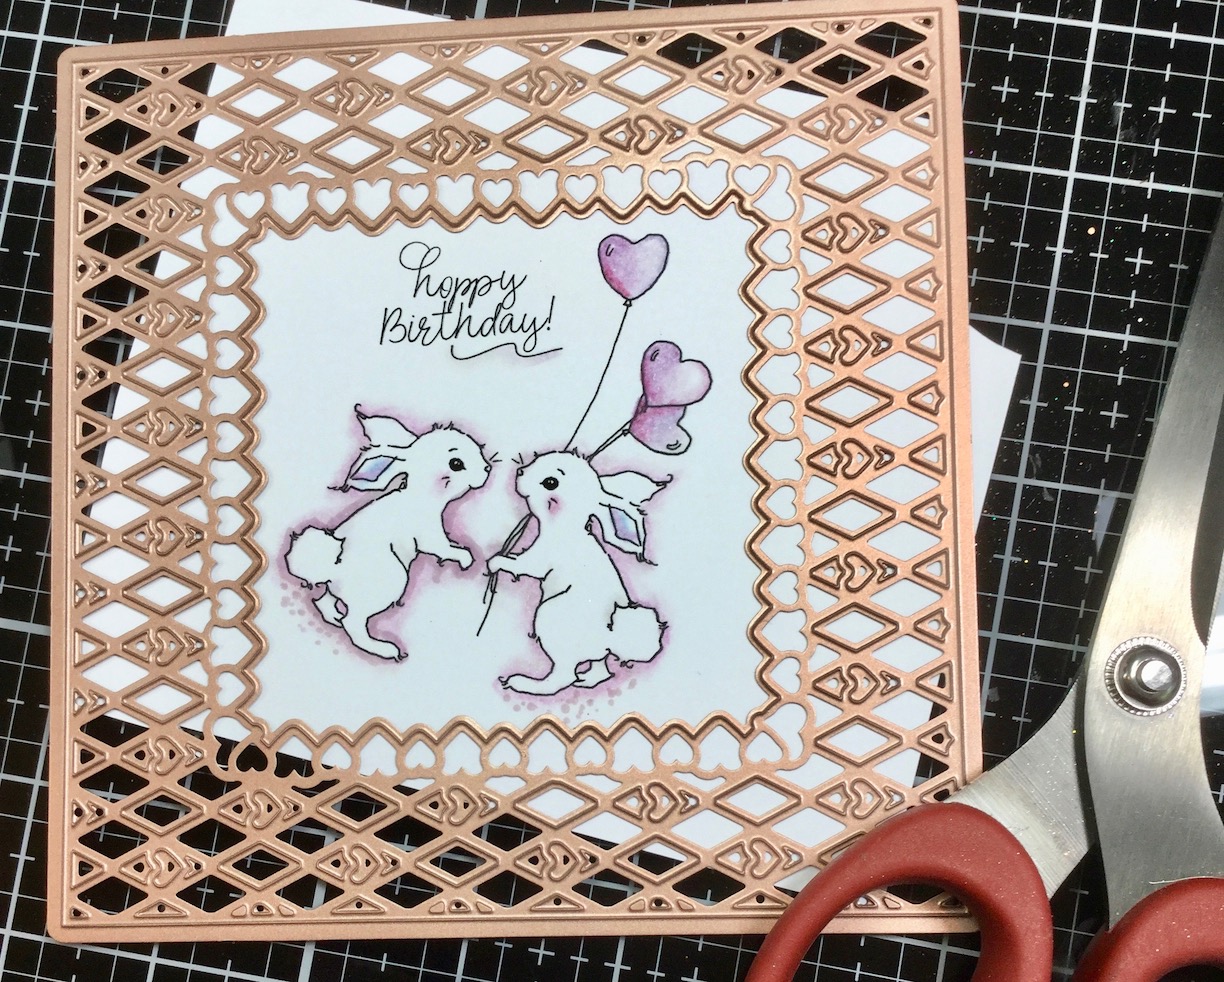
My card features the delightful "Happy Love Day" Bunny

For my project, I cropped the balloons off the bunny, flipped her vertically, and made a bunny conversation with one bunny handing her friend sweet birthday balloons!


To make the frame, SB Lovin' Diamonds die set was cut 4 times, with only the top layer being embossed and colored:

At this point, I still had not noticed that all the hearts in the background were facing a single direction. It had also not occurred to me that the interior heart frame was not symmetrical.

I then die cut the bunny panel - notice that I did not have the hearts in the background facing the correct direction:


After the bunnies were cut, they were inked and adhered to the center of the card - still not noticing that the hearts are facing a different direction and that the interior hearts are not symmetrical:

It was time to adhere the frame to the card.
It was THEN that I noticed my BLUNDER!
BOO BOO TIME!
In order for the interior hearts to line up with the incorrectly cut bunny panel, the hearts would have had to be adhered SIDEWAYS (as shown below). Too bad the bunnies were already ruggedly adhered. A 45 degree angle shift would have fixed the problem. Sooooooo.....

I just let the interior panel be off center, and NOT lined up!
What's a girl to do?
(see the white spaces around the interior panel?)


Still, it was fun glittering die cuts, adding flowers, and even a little dragonfly, to make things sweet. And now you know, some blunders simply cannot be hidden!


For those of you who love digital images, and have frogs, bunnies, grasshoppers, and other "hoppity" type critters, here is a cute digital sentiment. Click on the sentiment to make it full size. Then right click to download as a SAVE PNG. (not for commercial use). I hope you enjoy it!

A Freebie Gift PNG to my Followers-
NOT for commercial use:


Thanks for stopping by, and please upload your critter theme projects to our challenge! We love each one!


Products Used:

  • Stamps: A Day For Daisies "Happy Love Day" Bunny, Computer Generated "Hoppy Birthday" (freebie gift to my followers - not for commercial use)
  • Dies: SB Lovin' Diamonds die set, SB "Leaves So Very Gorgeous", Dee's Distinctively Flourish Sset 4, Sue Wilson Dandelion Clocks
  • Glitter: Purple, Green, Clear mixed with Pink
  • Ink: Adirondack Citron, Plum, Purple
  • DLArt Lavender ribbon, flowers

Challenges I would like to play in please:

  1. The Cutie Pie Challenge #136 Make it Cute and With Ribbons & Bows 7/7
  2. Penny's Challenges #436 Anything Goes (go to 2nd linky) 7/2
  3. Crafty Creations #393 Anything Goes 7/9
  4. Aud Sentiments #230 Anything Goes + a sentiment 7/9
  5. Crafty Friends #113 Things Beginning with B (bunnies, balloons, birthday and BOO-BOOs! giggle) 7/9 (lower part of post)
  6. World Wide Open DT Challenge #6 AG for a DT 7/15 
  7. DL.ART July Anything Goes challenge 8/1


Stamping Hugs,


Thursday, April 11, 2019

That Spring Feeling at Moving Along With The Times Challenge

Does it feel like Spring yet for all of you in the northern hemisphere?
We had about 2 weeks of Spring here in early March where everything bloomed ahead of schedule. (I wrote this post in mid-March). Even our May-June caladiums have been popping up since the first week of March! Especially the "Little Miss Muffets" have been popping up prolifically. Yikes! Still, it's a welcome site compared to frosted ice and too much snow...

That Spring Feeling is what I wish for you this week:


It's time to share a Project for the new Moving Along With The Times Challenge!


Challenge #95's theme is THAT SPRING FEELING - for the next 2 weeks upload your creations that feature Spring in some way!


My card features SheepSki Designs Wild Roses, colored with Copic and Prismacolor markersThe coral color from DLArt Spring Combo crinkled ribbon set was woven through Tonic Ribbons and Bow die set.
The green and Coral background layers were embossed and inked, with a little distressing on the coral done in Irish Spring Embossing Powder which contains a liberal amount of glitter:


The glittery leaves are bursting from the scene (as opposed to the seams).


Lastly, a coordinating corner was created for the inside of the card using the same image:


Some Products Used: Images: SheepSki Designs Wild Roses, SNS Ornate Greetings - Embossing Folders: Craftwell Delicate Dots, Craftwell Love Triangles OtherIrish Spring Embossing Powder (distressing edges), White Brilliance Ink, Mowed Lawn Distress Ink, Ribbon: DLArt Spring Combo, Dies: Tonic Ribbons and Bow set, Spellbinders Foliage Shapeabilities.

Challenges I'd like to play in please:

SheepSki Designs FB Challenges  (3-20 4-19)  AG Sheepski    5/1
ScrapyLand Challenges #111 AG SL dies (SB, TS) 4/24
Creative Craft Cottage #117 No Patterned Paper (my layers are inked and embossed) 5/5


Thanks for stopping by (like my impish smile below?)
Stamping Hugs,


Thursday, September 13, 2018

Use Ribbon {Moving Along With The Times}

Welcome, Blogging Friends! Hoping all is well with you.
For my friends along the Eastern Seaboard, I hope Florence's ferocities will be minimal and you will not suffer loss or serious damages from the storm.
Please be safe.


It's time to share a Project for the new Moving Along With The Times Challenge! Challenge #80's theme is RIBBON - for the next 2 weeks just make sure your project contains ribbon and upload it!


After coloring my impish fairy with Copic Markers, and die cutting her out, I applied a scrap of double sided Super Adhesive Sheets to my yellow cardstock, and die cut the shape out with the protective layer still in place.
TIP: when cutting double sided sticky tape, be sure remove the ultra glossy protective layer on the bottom first. The die will easily cut through the remaining protective layer, tape and cardstock.


The decorative border was cut to size, glued on the back of the panel, and then flipped over. I pulled off the protective layer from the yellow panel, applied the image, and then burnished with Velvet Micro Fine Glitter Butterscotch


I set the prepared panel aside to work on the card base. After dry embossing, Yellow Pearlescent Brilliance ink was moshed around the outer parts of the card.


I heat set it, and used a VersaMarker Pen around the edges and heat set with Buttercup Petal embossing powder. This color EP keep my yellow theme, rather than turning it gold. The added sparkly distressing brought more texture and a greater depth to the dry embossed area.


The greeting was also distressed with Buttercup Petal embossing powder. The close-up below shows the texture of this glittery EP on the edges of the card and greeting, and how shiny the velvety microfine glitter is:


FINISHED CARD:


On a Personal Note:

Early Mornings are often my favorite part of the day. In Florida, the past few mornings have treated us with a slightly lower morning temperature at 75F-24C so the ground is warmer than the air. A beautiful Stillness belies the cacophony of singing birds awakening - and my 2nd favorite thing - is when a special effect occurs after the night's thunderstorms, but before the sun has fully risen -- I marvel -- watching the warm ground releasing ribbons of dew rising from the pasture, creating a misty fog - caressing each blade of grass and every tiny leaf, in preparation for the heat of the day. It's like Nature lovingly kissing each of her children so they will have strength to stand tall in the humid heat once the sun rises. (If you are reading from my blog, click on the photos to enlarge).

The front gate is "down the hill" going left, and keep on going, past the fence, until you are nearly at that open space in the far right:


 The front and west pastures:
(already, the ribbons of fog have risen to feature a lush, green pasture from the previous night's thunderstorms). Isn't the Spanish Moss lovely hanging in the still morning air?


Thanks for stopping by, my friends! I sincerely appreciate your visits.

Products Used:


Challenges I'd like to play in please:

  1. Classic DT Open Challenge #9 AG DT 10/1 sep post
  2. Crafty Creations Challenges #374 AG 9/26
  3. Crafty Friends Challenge #92 Embossing Wet or Dry (two panels dry embossed. The back panel and sentiment are distressed with EP) 9/22
  4. Crafty Gals Corner #174 "3+ Layers" (6 layers) 9/25
  5. Crafty Girls Creations #50 AG 10/1
  6. Crafting by Designs (Sept 12) Offer Encouragement - my sentiment does that 9/19
  7. Pammie's Inky Pinkies Challenges #1836 AG 9/15
  8. Creative Craft Cottage Challenge #111 Use Ribbon or Lace 10/3
  9. Die Cut Divas (Sept 1) Use Yellow in Project (used 2 Tonic die sets) 10/3 (sep post)
  10. Do-A1 Creative #21 Bingo Card (diagonal dies and punches - stamp - ribbon) 10/1


Crafty hugs especially for you,


Sunday, June 10, 2018

Fairy Sweet {Sparkle N Sprinkle}

Hello, Blogging Friends! I hope you are doing well. In case this is showing up as a duplicate - it's because I accidentally deleted my post after uploading all my challenges! DUH!

It is hot here, and very humid, just as Florida should be, right?

Our air conditioner is always checked out professionally twice a year because without it, we would be "uncomfortable."

In contrast, I'm showcasing a sweet little fairy and die set called Cerys Hugging Teddyand using a sentiment stamp for its curlycue qualities, available at the Sparkle N Sprinkle store.

Love this cute stamp. Any color medium would do, but I played with Pearlescent PaintsNuance Watercolor Powers and Tombow Markers after heat embossing with Gold Detail EP168.


After spraying Nuance Watercolor Powers on watercolor paper, I spritzed with a little water and blended some Pearlescent Paints on top. Both the watercolor panel and some white fun foam were die cut. The foam was traced around the sides and edges with Prismacolor Marker in purple. The foam was then attached to the watercolor piece with 1.5" Tear-ific Tape for dimension. A larger white shape was cut. An application of Zig Two Way Squeeze Glue around the edges grabbed Lavender Iris Semi Transparent Ultrafine Glitter. This is a sparkly clear glitter with lavender highlights. A little Tear-ific Tape on the back of the fun foam, and the panel was attached to the white frame.


For some sparkly texture, I stamped the sentiment "grateful heart" from the Cardinal and Holly Rubber Stamp set, and heat set with Mulberry Star embossing powder:


The mulberry colored base card stock was folded in half. Using the "G" in "grateful," I randomly stamped the curlycue portion of sentiment, heat set with more Mulberry Star embossing powder, to create a frame:


I wish I had photographed the angel's wings before applying Pearlescent paint on top of the shading. In the following 2 photos, please see the change in the wings as the light hits them (you can also see a little of the indigo pearlescent paint in the background, and more of the white around the edges of the panel):


Such a cute little fairy! The DL.Art Store has beautiful, easy to use, crinkled ribbon. This pretty pink hue is part of a 3-color bundle named Vintage Vineyard.

Products Used:


Challenges I'm submitting this card to:


  1. Aud Sentiments #205 Anything Goes + a Sentiment 6/19
  2. A Bit More Time to Craft #69 Angything Goes 6/15 sep post
  3. A Perfect Time to Craft #6 Anything Goes 7/1
  4. The Fairy and Unicorn Challenge (June) Anything Mystical or Mythical 7/7
  5. World Wide Open DT Challenge #5 Anything for DT 6/15
  6. DL.Art Thankful Thursday #229 - Thankful/Grateful card 6/15
  7. Lil Patch of Crafty Friends #83 Anything Goes 6/17
  8. Love to Craft #23 Anything Goes 7/1 sep post
  9. Retro Rubber #88 Anything Goes with a Stamp Older than one Year (I was gifted with this cute stamp and die set in March 2017 and have only used it now) 6/15 sep post 


On A Personal Note:

Have you ever tried growing your own celery? Easy! Cut the bottom off your store-bought celery and place it in a pot with potting soil, keeping the soil most. Baby sprigs begin showing within a week. We planted four of these in February. There is one more left to harvest from these four:


after four weeks, I cut off leaves to use in salads.

6 weeks after planting (and yes, that is the same angel wing begonia as in the pot above):

We moved the pot because of some construction:

3 months after planting, 2 feet tall, ready to harvest some time this week:


We had to dig up the Chinese Lantern bush and all the caladiums for a generator being installed. Looks so ugly:


We have had an unusual amount of rain this winter, and way more than usual this Spring, so the mold and mildew is growing all over the sidewalk. The celery is on the left, and many of the gorgeous giant caladiums cover the Chinese Lantern further down.


Thanks for visiting today!
Love,

Thursday, May 24, 2018

DL.ART Thankful Thursday Challenge #229 Graduation


Hello, blogging friends!
Hoping you are doing well, and enjoying the precious gifts this day brings.

Today I have the pleasure of guest designing for Diana Larson (aka DL.ARTfor her
DL.ART Thankful Thursday Challenge #229. The theme is "Graduation."


Diana's new store is packed with colorful pretties. Check out all her crinkle ribbons here. Today I am using the "Creme Brulee" color from the Creamy Dreamy Bundle which contains 3 fabulously golden-hued ribbons.


My graduation card is done in a vintage style, signifying the end of an era - the old is now past, and a brand new beginning awaits with open arms.

The pretty, textured Creme Brulee ribbon has metallic highlights to bring out those "golden moments" in our lives that have become cherished memories.


That metallic sheen in the ribbon works exquisitely with the gold mirror cardstock.


Pop on over to DL.ART Thankful Thursday Challenge to see the beautiful design team projects, and link up your project as well. Looking forward to seeing your pretties!

Products Used:
Challenges I'd like to play in please:


  1. City Crafter Challenge Blog #413 "Graduation" 5/29 (sep post)
  2. Craft Rocket Challenges #48 "Use Embellishments" (crinkle ribbon, bronze flower with EP on it) (sep post) 6/7
  3. Creative Craft Cottage #107 Dies and/or Punches (2 layers punched edges, 2 layers die cut frame) 6/4 sep post
  4. Let's Craft and Create Challenge #137 AG + option Lace, Ribbon Twine 6/5 

stamping hugs,