My blog is called "Creative Smiles" because my designs are the result of incorporating mistakes. With fumble fingers that drop whatever they are holding - repeatedly, it takes a lot of giggles, smiles and creative patience during my crafting process. xx

Showing posts with label Die Cuts. Show all posts

Wednesday, November 16, 2011

Getting It Going Again

What a pleasure it has been learning how to use many of my "new" unused tools, and relearning techniques which have long been neglected.  :-)

At this time, may I especially thank Shirley, Marie and Connie for suggesting challenges? The challenges are enjoyable, and my puzzle-loving self is having fun combining the them.

Long-time stampers may remember this PSX botanical image. I stamped it with VersaMark on dark brown cardstock, heat embossed with clear detail embossing powder and set aside to cool.

Galaxy Gold Brilliance ink was smooshed over the embossed image.

Next Cosmic Copper and Crimson Copper Brilliance inks were smooshed to highlight certain areas. Finally, Twinkling H2Os highlight the remaining areas.

The technique is fast, easy, fun, and beautiful in real life.


TIP: distressing the edges of the cardstock with Brilliance inks carries the shiny look all the way.

This card is really as blingy-shiny and brilliant as the close-ups show. The vine-leaf die cut is from gold glossy cardstock, and it isn't nearly as showy as the Brilliance inks.

More details about the card can be seen in the challenges listed below:

Party Time Tuesdays #42 - Sketch
Mark's Finest Papers - Favorite Technique (embossing)
The Pink Elephant - embossing (dry and EP)
My Time To Craft - Take Two Challenge (leaves)
Heartsong Inspirations (gold)
Hooked on Craft Challenges (die cuts)

Thanks for visiting!
hugs,
Donna


Thursday, September 22, 2011

Magical Winter Moments Blog Hop & Blog Candy

You're here! The final blog in the Sparkle N Sprinkle Magical Winter Moments Hop! WELCOME! (((( hugs )))) How's that for an enthusiastic reception?

Did you hop here by way of Kim Jaime, our newest Shoppe Instructor? If so, you're right on track. Otherwise, you may wish to start from the beginning to become eligible for a fabulous grand prize and three "mystery" prizes!

Do you love glitter? Me, too. It's especially good if you are as"boo-boo" prone as I am in creating cards. Glitter covers a multitude of mistakes. :-)

How not to start a blog post: **apologizing**. I promise in real life this is a pretty card with all the sparkly glitter, shimmery embossing powder, and reflective mirror cardstock (CS). No matter what I did in photographing it, or what magic was used in my software, this card remained aloof and uncooperative. It just would not glisten, sparkle or reflect! (no squealing allowed) :-D

Mirror Cardstock creates phenomenal effects! Standing at an angle so the camera and my face didn't reflect in it was a bit difficult. In person, the ornament is very shiny and pretty. Sparkle N Sprinkle carries several colors of mirror card stock - available in individual sheets, or in packets.


To further torture you, here is another tragic photo which shows a little of the glistening Gold Tinsel EP used in the layer around what is supposed to be TRUE GREEN cardstock LOL. It's fun converting plain, inexpensive cardstock into amazing designer cardstock! Honest! it really is pretty in person LOL - just take a piece of cardstock decide how much will show as a mat or layer, apply VersaMark Ink in that area, pour on your EP and heat. The rest of the CS remains as it was. It also makes adhering the layers a little easier because the center is not "coated" with a resistant covering.


The panel background was created by randomly stamping and embossing with Gold Detail EP, the holly bunch from our brand new Christmas Basket Stampette set. With a Sakura Glue Pen, glitters Elegant Emerald, Cerise, and Fantasy Gold became my coloring medium of choice. 


OK, your torture is now complete LOL. Seriously, I cannot apologize enough for how poorly this card photographed. Hopefully you know me well enough to know that if I say it is absolutely, glisteningly pretty, you know it's true.

Thanks for withstanding the icky photos. Now that your maltreatment on my blog is complete, here comes the part you've been waiting for. To qualify for the Blog Candy drawing for a free Christmas Basket Stampette set, just leave a comment below and become a follower of my blog. To become eligible for the Hop's grand prize and 3 mystery prizes, leave the same comment below (LOL) and return to the SNS Home blog. When there, please leave your answer to the following question:

With Autumn festivities upon us, and Chanukah and Christmas soon here, what is your favorite holiday activity? 


Thursday, August 25, 2011

Autumn Inspirations Blog Hop - Celebrating Fall's Colors

Welcome to the Sparkle N Sprinkle Autumn Inspirations Blog Hop celebrating Fall’s Robust Colors and its Holidays!
If you hopped here by way of the very talented Shona Erlenborn, then you are in the right spot. But if you just happened here as your first stop, you may wish to start at the SNS Home Blog Page to become eligible for six prizes!
My inspiration comes from the muted cries emitting from the stamping closet's closed doors. You know, that place where all the "older" stuff gets put? Upon opening the doors, the muted cries became loud whines! My older tools and art supplies were feeling left out and wanted to come out for some play time. 

Having only made one other Halloweenie card in my stamping lifetime, I decided to try some of those images. 

First comes "Spooky Night", an EASY A2 size card using household bleach, black detail embossing powder, and Pearlescent Watercolors (mica paints). Here in rural Florida, it is common to enjoy a full moon, ribbons of fog or stringy clouds, and bats. (Bats are great for keeping the flying insects at bay!)
 Spooky Willow, Hocus Pocus, and a nickel were used to create this landscape.

Next is "My Haunt or Yours"? Those pesky Acrylic Paints were REALLY whining to be used. Drizzle paint on glossy card stock, and smoosh with another piece of glossy. Open the sandwich quickly from a single corner, and the result is a cool background. I used other neglected art supplies like pastels and colored pencils, two ribbons in a layer, and even old brads! LOL

Of course, I couldn't make cards without my Spellbinders Grand Callibur. Even here I used the oldest of my Spellbinders dies (the Petite ovals 140 & 141) BUT the new Grand Labels One created the shape of this card. (there had to be one new thing in play, after all!)

Your final destination is the SNS Blog! To become eligible for the prizes, please leave a comment on my blog below and return to the SNS blog and answer the following question. There are no right or wrong answers LOL
What styles of Autumn, Halloween and Thanksgiving stamps are you looking for? (ie: scenes, cute sayings, children, harvest time items, detailed stamps, simple images, elegant etc). We value knowing what you most like. (Not a difficult question at all, is it?) Answering that question back on the SNS Home Blog helps us, and makes you eligible for the Grand Prize!

hugs always,

Thursday, July 14, 2011

Sparkling Wintry Sensations Blog Hop

Welcome to the Sparkle N Sprinkle blog hop for all things Wintry, Sparkling and Sensational!
If you hopped here by way of the amazingly talented, Glitter-Addicted-Patti, then you are in the right place!  Otherwise, you might like starting from the beginning to become eligible for SIX great prizes. (Does my blog have one of the secret five prizes?)

Having your journey end here, (after seeing everyone's incredible cards), is a hard act to follow, but here come my contributions to the hop. :-)

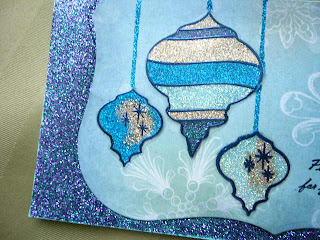
If you have Brushable Glue on hand, it's a great way of creating beautifully glittered cardstock to match whatever colors are in the card. It doesn't take long to dry, even in Florida's tropically moist summers. Images from our Nesties Ornament set were heat embossed on embossable acetate with Dark Night Cosmic Opaque EP because of its starry mother-of-pearl look. On the back side, Brushable Glue was painted on and coordinating glitter colors sprinkled on top. NOTE: When using dark EPs, apply lighter color glitters. When using light EPs, sprinkle on darker color glitters, so there is a contrast.

This was my first time using embossable acetate. I learned it is difficult to photograph LOL but is fantastic in real life!

This business size card was created running the Spellbinders Grand Labels One die through my Grand Calibur (cuts like butter!). This card is easy to create, but takes a little time to allow the glue to dry. For card directions, please visit my SNS Gallery here.


The next card was very easy, and fun, too! While Metallic cardstock does not photograph well, it is beautifully rich on any papercrafting project.

The Grand Scalloped Squares, Scalloped Ovals, and Fancy Tags Two Spellbinders dies were used to create this A7 size card with a wonderful text script "Christmas Full Of Love" from our same SNS Ornaments set. For directions to create a a card like this, just visit my SNS Gallery here.


To become eligible for the six prizes, please leave a comment on my blog below and return to your Final Destination - the SNS blog to answer the following question. There are no right or wrong answers LOL

How frequently do you take pleasure in viewing (or participating in) blog hops? We are working on our 2012 schedule, and value knowing what you most like. (Not a difficult question at all, is it?) Answering that question on the SNS Home Blog helps us, and makes you eligible for the Grand Prize! Good Luck!  


 Stamping hugs,

Sunday, February 13, 2011

Welcome to Sparkle N Sprinkle & Really Reasonable Ribbon's Fantastic Blog Hop!

   
Welcome to the February Sparkle N Sprinkle and Really Reasonable Ribbon Blog Hop! We are so excited to be pairing with Really Reasonable Ribbon today for some great new ideas and products. If you have been following along, you should have hopped here from the very talented Aphra Bolyer!  If you haven't, please please please pop over to the Really Reasonable Ribbon Blog and hop along. Both design teams have created some amazing projects, demonstrating how stamps, ribbons and glitter just naturally go hand in hand.


This month we all received the wonderful RRR February Ribbon Kit, filled with a gorgeous array of trims and ribbons for lovely Springtime projects. Lots of great pastels to match up with SNS's hand-blended glitters, embossing powders, flockings, and specialty stamps. If texture is something you enjoy adding to your crafting projects, SNS has the colors for you. The SNS glues are specially formulated to keep glitters and flockings where they belong. 

In addition to the coveted Really Reasonable Ribbon blog candy, Sparkle N Sprinkle is giving a stamp set to one lucky hopper!  Leaving a message on every blog increases your chances of winning, because it's a mystery which of the artists' blogs has been chosen to house the prize! On Tuesday February 15, a name will be drawn from the comments on the mystery blog. Winner gets to choose a stamp set of their choice from SparkleNSprinkle.com!"


My Spring time creation uses 3 of the hand-selected ribbons from RRR's inspirational February Ribbon Kit, SNS Starfire glitter, 3 images from the "My Rose Garden" set, colored pencils, Lime Pearlescent Brilliance ink, and a Cuttlebug embossing folder. Adhesives were dimensional Zots, SNS Brushable Glue, SNS Dimensional Glue, and SNS glue pen.


This closeup helps show the detail in the ribbons, and how a touch of sparkly glitter adds happiness and texture to any paper project. A toothpick dipped in SNS Dimensional Glue was placed over the stripes on the ribbon to add more cheerfulness.


It was great fun using RRR's spectacular ribbons with our quality SNS products. It's time for me to say good-bye. Thanks for hopping by. Let me know what you think about the card, and what other colors might create an even prettier version! Don't forget to leave comments along the way to qualify for the prizes! Now hop on over to view Kerri Michaud's marvelous designs!


Stamping Hugs,


Sunday, October 17, 2010

SNS Birthday Blog Hop!


The more visitors we have, the more prizes will be awarded, so tell your friends! To become eligible for a prize just leave a comment at each designer's blog about her card AND who you think has the Hidden Birthday Prizes. If you've only just arrived, please check the GAMES page at the SNS website, or the link above. Feel free to return to the SNS Home Blog if there is another comment you'd like to leave there. In the meantime, we hope you have enjoyed the hop and obtained some great technique ideas in the process.


My Fall Inspiration is a bit different over traditional Autumn Ideas. We live in Central West Florida. The colors are taken from an indigenous tree called the"Turkey Oak".  The vibrant colors only last a brief 3 or 4 days. Displaying a single stamp from the SNS "Frames and Borders Set #219" and two colors embossing powders, this project portrays a unique grasp on Autumn - the metallics reminiscent of icy-sparkly frost on the pumpkin, with golden leaves still waxy and dazzling in the Florida sunshine.
To show how much embossing powders can change the appearance of cardstock -- all the embossed images are stamped on the same color cardstock! What a difference the EP colors make! Cordial Red EP is very clear. Spiced Cider, one of the newest Essentials colors, creates the metallic look blended with glitter. Unfortunately, glitters and EPs don't show up well in photographs, but are amazing in person.


On a more traditional note, SNS Designer Barbara Bruder sent a surprise package containing blank die cuts just itching to be colored and used! One was a large pumpkin. I painted the pumpkin with regular acrylic paint, shaded with Createx translucent paint, and chalked in a reddish orange. Frosted with glitter, it appears to have frost on the pumpkin. 

The entire background has been coated in Black Ice Glitter. The vine and stalk have been coated with 3 colors of EP. The coats are thicker on the stalk to create dimension. VersaVine Onyx Black stamped "Wish" from our Fairy Dust set.

So... who do you think has the hidden birthday prize(s) on her blog? I'm interested in seeing what you say in the comments below. :-D The names of our winners will be placed on the SNS Home Blog October 20.

Thanks for stopping by, and good luck! 


Sparkle N Sprinkle images:

Flowers in the Square 0470-219V
Mirror Gold Cardstock 99570
Cordial Red Embossing Powder EP352
Spiced Cider Embossing Powder EP407
Brushable Glue #540
Dimensional Adhesive Dots
Cardstock: Red, Yellow Gold, Ivory, Gold Mirror
1/4” Tear-ific Tape SAT01
Grand Calibur
Spellbinders Standard Circle Sm S4 116
Spellbinders Petite Scallop Circle S4 117
Spellbinders In Spades Pendants S4 208
Corner punch
Scissors
Plain Tape

NOTES:
a) embossing powders can change the appearance of cardstock -- all the embossed images are stamped on the same color cardstock.

b) the base of this A8 card is actually the yellow gold CS (the background was for photographing)

1. With Yellow Gold CS, create A8 size card base. Corner punch red panel and adhere to card base. Set aside.

2. With VersaMark Ink, Stamp image twice on Ivory CS. Emboss one image with Cordial Red EP, and the other with Spiced Cider EP. Fussy cut image in manner pleasing for layering. Slip the two outer frames together to form an interlocking effect. Tape backs together so they don’t slip apart.

3. Cut dies for layering, adhering some with Tear-ific Tape, and others with Dimensionals, depending on the look you wish to achieve. Cut some of the dies in half, and piece together from the back side with plain tape.

4. When layers have been constructed to your liking, adhere to card base on the red panel. 


Pumpkin card:

Stamp Credits Sparkle N Sprinkle:
Wish 3131-394AA

Other Supplies:
Bullfrog EP404 
Bronze Rose EP335 
Butterscotch EP115 
Orange Crush Glitter G1092 
Black Ice Glitter G1020 
Brushable Glue 540 
VersaMark Ink 99702
VersaMarker 99561
1/4” Tear-ific Tape SAT01
cardstock (orange, black)
die cuts
optional border punch
heat tool
black ribbon


1. Paint die cuts (pumpkin, vine) with paints, inks, pencils or chalks. Apply a thick layer of VersaMark Ink (either with refill or VersaMarker on pumpkin stalk and vine. Sprinkle with the 3 colors of EP, as desired. Thicker application gives added texture and depth. Set vine aside.

2. With Brushable Glue, lightly “paint” a shaded area at the top of the pumpkin to resemble due or frost and sprinkle on Orange Crush Glitter.

3. Paint black background entirely with an even coat of Brushable Glue. Adhere pumpkin and sprinkle Black Ice glitter on the rest of the black cardstock. Allow 15 minutes to dry. Border punch if desired.

4. Adhere glitter black panel to an orange piece of cardstock. Attach embossed vine. Tape on the black bow.