My blog is called "Creative Smiles" because my designs are the result of incorporating mistakes. With fumble fingers that drop whatever they are holding - repeatedly, it takes a lot of giggles, smiles and creative patience during my crafting process. xx

Showing posts with label Vellum. Show all posts

Tuesday, January 13, 2026

"Friendship is Golden" Slim Line cards

 Happy New Year, friends! Before my six cards are shared, may I ask a big question?

Has anyone heard from Carol Hurlock? She is a fantastically gifted crafter/artist who is quite unique and prolific in her endeavors. She is awe-inspiring! Carol stopped posting in 2022 (during Pandemic). She is such a gracious, kind, beautiful soul who is wonderfully talented in every way, and I miss her. Please let me know if you have heard anything. Thanks!


Hoping your family is safe and healthy, enjoying all the good things Life has to offer. Yesterday at Dusk, we had several "dancing deer" skylarking across the front pasture. It's always fun watching them, especially when frolicking is the main activity at the moment! 😁

 Slow and steady eventually gets to the finish line, right? Today's share is six "skinny" cards 8.5" x 4", using Anna Griffin dies in the background and an assortment of patterned papers and vellums.

Three cards sport woven satin ribbon frames. This is one of my favorite techniques, especially if the ribbon is "puffy" and "imperfect" in its display of shiny fabric. I start in one corner, and slowly make my way around the frame:

Once the ribbon has traveled around the die cut, it is cut in the corner and "tucked under" to look finished:

The smaller, focal die images are mostly from Gold Glossy card stock, and shadowed with black card stock:


First, ink some of the background papers for better dimension and a more finished look:


For some of the shadows, I outlined the die with a light-colored pencil, and fussy cut them out. This made the black portion slightly larger than the die cut itself:


These two cards show off dimension and texture by using glitter on the leaves, dimension tape circles, and glitter behind the glossy card stock. The second card has three butterflies with three layers, each featuring vellum or patterned card stock. It also has printed vellum in the background.


The first card (also shown below) has glitter on the glossy card stock (in real life, it is quite shiny and sparkly). The "dots" are 1/8" high dimensional dots that have been dredged with glitter. Notice the butterfly on the right side has been dimensionalized a little differently, with the butterfly body glued flat to the base, puffed up in the middle, and then flattened again on the edges. Not sure how that will make it through the post office machines, so it may be hand delivered. 

sigh...


I long for the "olden days" post office when we could send anything through the mail as long as long as we put enough postage on for weight. (do you?).


Sometimes, less is more:


Alas, I decided MORE is more:
more sparkle
more glitz
more shine
more butterflies
more jewels...


This one escaped the glitter, but the vellum under the butterfly is shimmering gold with bejeweled brads, shiny ribbon, and a sentiment made on the label maker:


Layers include the base, printed Vellum card stock, gold Anna Griffin solid piece, an ivory filagree die cut, ribbon, Spellbinders glossy leaves, label maker sentiment, hand traced and cut black shadow, hand traced and cut sparkling vellum, and finally patterned paper, frilly butterfly die cut:


This card showcases textures:


The sixth card:


The interiors are just as unique:


The interior here is glittered on one side:


Thanks for wading through all the photos.

Thinking of you all, with gratitude. Thank you for your fabulous inspiration, and caring comments.

Products: Stamps A-Line Stamping F-487 (2000? or 2001?), Penny Black 1785E Lovely Day (2000),  Really Reasonable Satin Ribbon ButterCup 5/8", Dies: Anna Griffin AG-1239H-AS Slimline Concentric Die, IO Monarch DIE059-N, Cheery Lynn Butterfly, Tonic Studios Celebrate, Cardstock: pattern paper (REALLY OLD from a store in Tampa called "Tamp-a-Stamp" back in 2001.), Marcos Gold Glossy, Bright Ivory CS, Golden CS, Inks: Walnut Distress, VersaMark, Acorn VersaFine Clair, Other: (mixed gold and clear glitter). Dimensionals

Gratefully playing in the following fine challenges:
  1. A Perfect Time to Craft #1 (Jan 1) AG 2/1 (sep post 3/29)
  2. Crafts Galore Encore #143 (Jan 1) AG (sep post 2/1)
  3. Love to Craft Challenges #90 (Jan 1) AG 2/15 (nxt chal 3/1)
  4. Mix It Up Challenge #81 (Jan 1) AG with Ribbon  2/15 (nxt chal 3/1) 3 cards have ribbon woven in them.
  5. Moving Along With The Times #185 (Jan 1) AG us stencils and/or dies (several layers of dies on each card). 1/31 (sep post 1-2 weeks later)
  6. Paper Rocks Scissors Challenge #12 (Jan 2) AG using Paper and/or Scissors 1/31 (The shadows have been fussy cut, to make them slightly larger than the die itself. The Cheery Lynn butterfly die only had the frilly version, so the background vellum was fussy cut, then the shadow also had been fussy cut slightly larger. Several types of papers/card stock were used.
  7. A Cut Above (Jan 5) AG with die cuts (used multiple dies: Dies: Anna Griffin AG-1239H-AS three Slimline Concentric Dies, IO Monarch DIE059-N, Cheery Lynn Butterfly, Tonic Studios Celebrate 1/28 (sep post 2/1)
  8. Pammies Inky Pinkies Challenges #2602 AG 1/18
  9. Cut It Up Challenges #347 Favorite Dies 1/19 (Gosh! It was fun looking at everyone's favorites this time. My favorites are my butterfly dies, but I also love my Spellbinders foliage sets. Both are featured here. Are we allowed to have lots of faves? LOL Thank you for the fun challenge.
  10. Elliebelle's Garden Party #11 (Jan 8) Anything in or from a Garden 2/9

fondly,


Saturday, November 23, 2024

Poinsettia Square Triad Skinny Cards - freebie sentiment


 Hello, friends! I hope you are doing well, and gearing up with sweetness for the upcoming holidays and festivities.


Many MANY years ago, before unmounted and clear stamps were the norm, and during a mega Stamp Show in Orlando, I purchased this beautiful poinsettia stamp from Mitra at Impression Obsession. It's a virgin, I'm shamed to say. Two cards are embossed in silver EP on dark blue cardstock. Two cards are stamped with VersaFine Clair and heat embossed with clear detail EP. Interestingly, in person, the clear EP cards look more fantastic than the silver EP! But through the camera lens, the Silver looks more majestic! 


After fussy cutting the embossed images, I "painted" with bleach so the colored cardstock would show through. Add extra bleach in the areas you would like highlighted. Be sure to use either very cheap brushes, or nylon brushes for this technique.


The magenta colored card was dry embossed and inked with distress inks.


The silver embossed cards are layered with black squares for extra drama. The turquoise layer is actually colored vellum, with edges folded behind white layers.


Card Interiors:


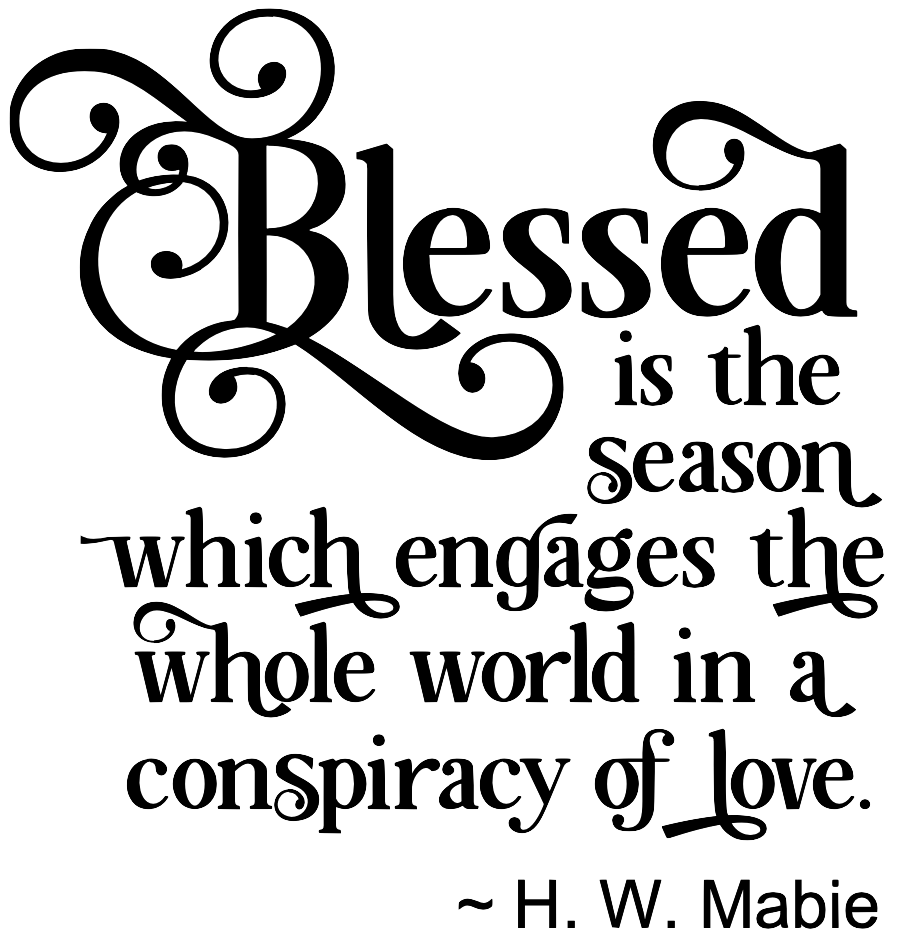
The digital sentiment is a freebie you can download in two versions.

My gift to you - Arrangements of the same sentiment for use on the inside or outside of your projects. Please do not sell these Sentiments. Use on any of your projects, including projects involving any design teams you might be on.

Click on the image to bring it to full size. Because of the changes Google Made with Blogger (June 2020), your image will appear to be solid black. Don’t panic. Right click and do a SAVE AS PNG. Once it is saved on your hard drive, you can open it and it will have a transparent background. I create PNGs instead of JPGs so they can be placed anywhere on a scene or project, and so backgrounds can be made using them. Please let me know if you have any problems. I hope they serve you well!

Enjoy!


Products: Stamps: Impression Obsession D4261 Poinsettia Square, IO Warmest Thoughts C5394 (interior of card), Colorado Craft Company Pine Cone and Branch BB264 (sentiment Merry Christmas), Silver & Clear EP, Bleach technique, Assorted colors of SU cardstock and TH distress inks, Turquoise and "white" vellum,  silver & turquoise glitter, Craft Essentials Diamond Tiles EF EFOB0013

Thank you for hosting challenges. I'd like to play in:

  1. Jingle Belles 11-22-24 "Banner Holiday" inspired by the poinsettias and sparkles in the fun banner Lauren made!) 12/4
  2. C.R.A.F.T. #741 Christmas - lovely poinsettias which are placed all over our home, and lots of sparkle for additional joy. (sep post) 11/27
  3. Beautiful Blossoms Challenge #23 (poinsettias) 12/12
  4. Christmas Bingo Challenges #10 Nov 1 - Using B COLUMN "Hand Colored with Bleaching Technique", "Slimline Cards", "Free" 

  5. Merry Little Christmas Challenges #59 12/15
Wishing you beauty!


Thursday, August 22, 2024

Dimensional Inchies on an Easel Card - and freebies


Hello, my friends! Hoping you are not uncomfortably dripping wet from the sweltering heat (here in the northern hemisphere) - I also hope that our friends Down Under are escaping the wrath of the current explosion of influenza cases. May you be well soon if the flu has come to your home.

Do you know what "inchies" are?

Before I became "house-bound", 20+ years ago, I had the pleasure of working in a brick and mortar store called THE PAPER PLAYHOUSE. There I taught classes and designed the free, weekly Make N Take, instructing about new products and how to use them. It was a great opportunity to meet people and enjoy our hobby!

Do you remember when...

In those days, designer paper was scarcely a "thing". So we stamped our own background papers, embellishing them with inks, glitters, embossing powders, etc. It was great fun cutting them for One Sheet Wonders or Inchies-Twinchies creations. 

 My card shares today involve some of the oldest designer papers of day - lovely K&Company designer paper, which was also VersaMark stamped with an Impression Obsession image and heat embossed with clear EP containing glitter, to give the paper some extra pizzazz. 


First up are some "Just A Note" cards - with die from Sue Wilson Script collection. Cut once on white cardstock, a lavender glitter layer was attached - it has been adhered to vellum for a bit of texture and mystique.


I was inspired by a friend recently who took an "Inchies Class" involving 3-D appearing shadows without actual dimensional adhesives:


The ribbon, also 25 years old, was fed through a slit in the vellum:


Has this ever happened to you? 

The "colored powder" of a die flaked off, onto the paper. It is deeply embedded in the white and is quite noticeable. It worsened with each pass through my Gemini Junior machine. If it happened to you, how did you remedy it? The folks at Creative Expressions told me to use wax paper, which Spellbinders always said not to do (at least when they were a new company) (you may have to click on the photo to enlarge it).


Two very special birthdays in blog land are soon coming! 

I'm all set for them:

flat for mailing:


Also a little sentiment on the card backs, which I've included as a gift to you below:


This project, while challenging for not-so-nimble fingers, was SO FUN, and brought back happy memories of laughter, fun and dear people in the classes!

Products: Die Sets: Sue Wilson Scripted Just a Note, Double Pierced Circles and Scripted Happy Birthday, Spellbinders Grand Nestabilities Scalloped Squares, SB Classic large scallop rectangles, Sizzis TH Garden Greens, Cottage Cutz Greenery 4x4, Papers: Lavender, Pacific Blue, White, Black, Purple, Green Glitter, Vellum, Lavender Glitter, K&C patterned papers, Inks: Pumice Stone DI, Fantasia VersaFine Clair, Versamark, Misc: EK Success 1-1/4" punch, Clear EP containing glitter, stamps: SU Elegant Greetings stamps, IO Alesa Baker Large Flourish Three E2036, my digital sentiment stamps

I'd like to play in the following challenges, please!

(many thanks to challenge owners and design team members who create fun for us!)

  1. The fabulous DOUBLE D CHALLENGES (Aug 21) Use Shapes (I used multiple 1.25" squares from an EK Success Punch, 1/2 circle scallop layers, circle sentiments on the back, and shaped rectangular layers) 9/1
  2. Darling "I Spy With My Little Eye" challenge #18 Something from the garden (flowers, leaves, dragonfly) 9/17
  3. Lovely Creative Inspirations Challenges #17 - Anything Goes 9/1
  4. Love Those Pretty Papers 8/3 Used the option anything goes 9/1
  5. Word Power #8 7-31 Sentiment is Focus of Card (words on front, sentiments on bottoms and backs) 9/1
  6. Paper Minutes #860 Birthday 8/27
  7. Creative Moments #261 Patterned Paper - inchies are punched from patterned paper. 9/5
  8. Creative Creases #89 Anything Goes with a Fun Fold Card 9/1

My gift to you - 


Arrangements of the same sentiment for use on the inside or outside of your projects. Please do not sell these Sentiments. Use on any of your projects, including projects involving any design teams you might be on.

Click on the image to bring it to full size. Because of the changes Google Made with Blogger (June 2020), your image will appear to be solid black. Don’t panic. Right click and do a SAVE AS PNG. Once it is saved on your hard drive, you can open it and it will have a transparent background. I create PNGs instead of JPGs so they can be placed anywhere on a scene or project, and so backgrounds can be made using them. Please let me know if you have any problems. I hope they serve you well!

Enjoy!


Sending you Joy,


Tuesday, July 20, 2021

Playing in CAS mix-up with alcohol ink and vellum


 Greetings, friends! I've always wanted to play in the CAS MIXUP Challenge Blog, but shy away from CAS cards because I just have trouble making them. So I took the time to make a card specifically using their displayed techniques. It's a great challenge because new technique tutorials are shared with links to an assortment of ways to play along. 

AND the design team shares absolutely fantastic samples!

This time the technique is alcohol inks on vellum. My AIs are a good 15-20 years old. I learned the hard way that even solvent products which have been carefully stored, may not have THAT long a self life! Still, where there is a will, there is a way.

CAS MIXUP Challenge Blog suggested Video Tutorials:

Alcohol Inks on Vellum using straws (Emelie Hessler - 6:34)
Alcohol Markers on Vellum (Melanie Muenchinger - 12:19)
Copic Coloring on Vellum (Jessica Frost-Ballas - 5:27)

To make my wonky frame out of glossy cardstock, I used two dies from Sue Wilson's Pierced Noble collection:


Then I used AIs (listed below) on PRINTED VELLUM (see the tiny white flowers showing through the alcohol inks?)


The die cut and frame are both from glossy white cardstock for a polished look. I hope this is considered CAS. It certainly is for me! (giggle)

The "Resting Butterfly" die is years old, but never used. So glad to play with it!


Products Used: Ranger AI: Sail Boat Blue, Citrus, Stream, Wild Plum, and Blender Solution - Dies: Die-namites "Resting Butterfly", Sue Wilson Noble Dies (Double Pierced Squares A & B - Stamps: Beccy's Place Cherry Blossom sentiment stamped with Warm Breeze VersaFine Clair with Clear EP - Paper: White Glossy Chromecoat, Pale off turquoise, Vellum


Challenges I would like to play in please:

  1. CAS Mix-Up Challenge (July) Alcohol Ink on Vellum 8/1 (sep post)
  2. Crafting Happiness #105 AG 7/26
  3. Pammie's Pinky Pinkies #2129 AG 7/26
  4. Paper Funday Challenges #31 AG 8/4
  5. NBUS #28 AG with virginal product (Die-namites "Resting Butterfly") 8/1
  6. Dies R Us Challenge #173 AG w/dies DRU sells (Die-namites "Resting Butterfly", Sue Wilson Noble Dies (Double Pierced Squares A & B) 8/1 (sep posts)


Stamping Hugs,


Thursday, July 18, 2019

Lavinia World - Light As a Feather

Greetings, Blogging Friends!
Hope this finds you well, and enjoying life.
I had a very difficult time photographing today's project, but hopefully you'll be able to see what I did.


IT'S TIME FOR ANOTHER Lavinia World Challenge!
Details of our challenge:
Challenges begin every other Thursday with an Anything-Goes theme for chances to win a $15 gift certificate to the store, and badges for your blog. Use ANY brand clear or rubber stamp - no digitals. If your project features Lavinia World stamps, your chances to win double.

While "our" Lavinia World store is located in the US, it ships worldwide. Buy $25 and get free shipping! Lavinia World carries other coordinating products for your convenience (like Brushos, inks, art supplies and dies).


Today's project is sparkly and full of shiny details. First, a background was created using watercolor pigments and metallics, and then stamped with Distress inks and Distress Oxide inks using the Feather stamp. This stamp's detail is exquisite!


I trimmed it down, die cut a frame from royal blue mirror cardstock to coordinate with the blue feather die cut. Various copper colored ribbons and twine were wrapped around the background paper:


The little Fairy Forager was stamped with Blue Belle Versafine Clair ink and heat set with clear detail embossing powder. Stamped on a little piece of left over background paper and loosely fussy cut, the fairy was placed on the slant, as though she is resting on the copper twine. 

The Feather, stamped in Warm Breeze Versafine Clair ink, was stamped once on turquoise vellum, and once on plain vellum, heat set with white detail powder containing glitter, and clear detail powder. The detail is extraordinary, and I apologize for the poor photography, unable to capture the crisp embossed images.


The vellum (with heat set feathers) is actually shiny and glistening, but when I photographed them, the camera picked up more shine than detail. Feathers were die cut from the blue mirror cardstock, and the copper glossy cardstock - each providing a complementary texture.

This photo was taken in the dark, without lights and no flash on the camera, to better show the stamp details:


The sentiment is PoppyStamps Fairy Loose Script, and was cut once from the blue mirror CS and once from white cardstock to help show it off. The "wings" portion was computer generated and lined with White Galaxy Opaque Marker.

I learned a lot making this project because it was full of new-to-me ingredients, and many unused items from my stash! Because I kept dropping things during my creative process, I deliberately adhered the framed panel on an angle:


Thanks for visiting! Hope I didn't write too much, but I also wanted to convey what was done to each layer.

Wishing you a lovely week-end, and many happy fairy days ahead!
Remember! ANY brand rubber or clear stamp is acceptable in the challenge, so hop on over and play!

Products:
Challenges I'd like to play in please:


  1. Joy of Sets Tic Tac Toe (JOSTTT007) Last Column Copper Twine--Die Cut--Heat Embossing 8/3
  2. Die Cuttin' Divas #429 Embossing Heat or Dry (dry embossed both SB feathers, heat embossed the two stamped feathers and the stamped fairy) 7/23 bottom of post
  3. Creative Fingers Challenge #168 Anything Goes 8/12 (check chal 170)
  4. Creative Crafters #17 Anything Goes 8/15
  5. A Perfect Time to Craft #7 Anything Goes 8/1
  6. ScrapyLand Challenge #117 Anything Goes SL dies (SB and PS listed above) 8/1
  7. World Wide Open DT Challenge #7 AG DT 8/15
  8. Dragonfly Dreams Challenge (July 7) Things With Wings 8/7


Stamping Hugs,