
Hello, my friends and followers!
The first of August fell on a Thursday, so I have three DT posts this morning.
Please click here for 2 Crafty Critter Crazies with Sheepski Designs
and
click here for Moving Along With the Times - Bee Theme
The first of August fell on a Thursday, so I have three DT posts this morning.
Please click here for 2 Crafty Critter Crazies with Sheepski Designs
and
click here for Moving Along With the Times - Bee Theme
My Lavinia World post today includes a little freebie digital gift to you,
and a PICTORIAL TUTORIAL.
and a PICTORIAL TUTORIAL.

Details of our Lavinia World Challenge: An ANYTHING GOES theme using ANY brand clear or rubber stamp - no digitals. Winner receives
a $15 gift certificate to the Lavinia World store.
a $15 gift certificate to the Lavinia World store.
While "our" Lavinia World store is located in the US, it ships worldwide. In the US, buy $25 and get free shipping! Lavinia World carries other crafting supplies for your convenience.

Because I've received a few comments/e-mails asking how to use these amazing stamps, I've taken a pictures during my creative process, and hope it will encourage others to try any or all of these techniques:
I began with Spellbound #1 6x6 underwater theme paper AND CUT IT to fit my frame. (for another sample where I cut the Lavinia paper, click here).
STEP 1
If you don't really know how to ink up a background, or maybe don't have inks in your stash, try using printed paper, embossing folders and the lovely, inexpensive LAVINIA PAPERS. I was very pleased with the quality of the papers - light-weight, yet sturdy; coated, yet regular dye Distress inks dried on them; any stamp ink works on them; they are embossable.I began with Spellbound #1 6x6 underwater theme paper AND CUT IT to fit my frame. (for another sample where I cut the Lavinia paper, click here).

2. Place your stamps on the panel to see what will fit, moving them until you have a pleasing scene:


3. Choose your colors (I used the one stringy stamp below to allow for more color options. You can see how fine the detail is in the stamps. At this point, a lovely sentiment would finish this card off perfectly!

4. Add Bubbles in two colors for texture and interest:

5. I use VersaFine Clair in all my embossing unless I need a translucent EP color.
Stamp and heat set sentiment:

6. Stamp Lavinia Guinevere Mermaid with VersaFine Clair Green Oasis. She has a lot of detail in her "scales" and hair.

7. I chose to heat emboss her with a highly glittered formula, and it covered up a little of the detail:

8. The coating on this paper does repel regular watercolor. I used Createx Pearlized Copper Acrylic Paint on the rocks, and lightly painted it so the outlines would still show. I also outlined some of the details with Uni-Ball Pen Signo Gel-white. Applying VersaMark to the edges, I heat set more EP the same color as the mermaid. This is where my boo-boo happened. I hadn't noticed that some stray EP heat set to the white "a and n" so I used my VersaMarker on those two letters, reapplied white detail EP, and heat set. Not perfect, but looks good:

9. Which to use? Black background or White? Straight panel, or make it crooked (crooked is my usual preference). Actually, this was a hard decision! giggle.


10. To pop up the mermaid panel, fun foam was used. Since I didn't have any black in my stash, a black alcohol marker was used to color the edges:
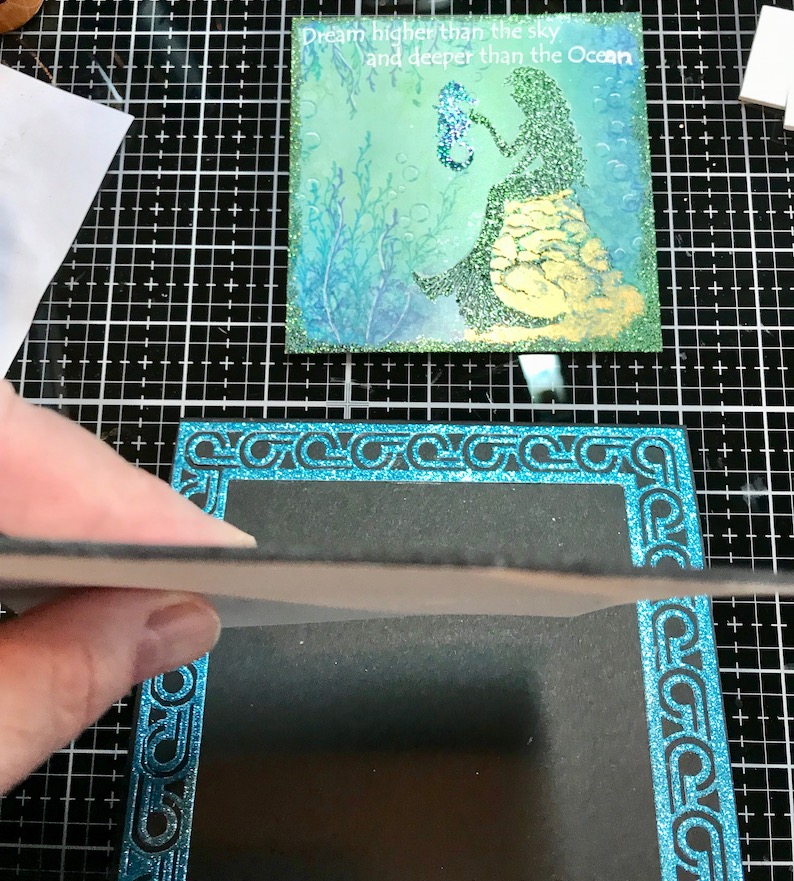
11. Place Double Sided tape on both sides of the fun foam. Adhere frame and fun foam to 6x6 black card base:

12. Emboss a scrap of card stock for die cut grass:


13. Add grass to the sides of the panel:

14. Add top panel and a few more grassy details:

Notice that there are white highlights and heat embossed areas in the rocks:

Showing a little of the glitter on this project:

Muting the glitter a bit so you can see detail:

Interior heat embossed and stamped with same colors:

And a little Humor:
Volcano Goddess - keeping a lid on the volcano so the rest of us are safe (giggle). Talk about a HOT SEAT! (more silly giggling) (photo taken without any lights)
Please scroll to the bottom for your digital gift.

Products Used:
- Lavinia World Product: Lavinia Spanish Moss Foliage
- Lavinia World Product: Lavinia Guinevere Mermaid
- Lavinia World Product: Deeper Than The Ocean
- Lavinia World Product: Spellbound #1 6x6 underwater theme paper
- Lavinia World Product: Sea Creatures
- Lavinia World Product: Sea Bubbles
- Lavinia World Product: Uni-Ball Pen Signo Gel-white
- Lavinia World Product: VersaFine Clair inks: Green Oasis and Cheerful Yellow
- Dies: Tonic 1524E Greek Temple, IO Small Grass DIE-178C
- Assorted Glitters and Embossing Powders (that contain Glitter), White Detail EP
- Distress Inks: Blueprint Sketch, Mermaid Lagoon, Peacock Feathers
- Assorted: Createx Pearlized Copper Paint, VersaMark Embossing Ink (edging around the scene for the Green Moss Glittered EP)
Challenges I'd like to play in please:
- ScrapyLand Challenge #118 AG SL dies (IO and Tonic) 8/7
- Country View Challenges (Aug) Texture 9/1 (check 9/14)
- Classic DT Challenge #8 AG DT 9/1
- Craft Rocket Challenges #62 - Anything Goes 9/1
- Creative Fingers #168 8/8
- Love to Craft Challenge #37 Anything Goes 9/1 (check 9/5)
- World Wide Open DT Challenge #7 AG DT 8/15
A Digital Gift for You
It's a bit ornate, but here's a fun mermaid digital sentiment to use on your mermaid projects. This is for personal use only, and may be used on your design team creations. Click on the sentiment to make it full size. Then right click to download as a SAVE PNG. (not for commercial use). Enjoy!
A Freebie Gift PNG to my Followers-
NOT for commercial use:

PS - one of my followers said when she right clicked on the image to save it, the entire image was black except for the starfish and shell. But once you have the saved item on your hard drive, I promise the letters are black and the background is transparent.
Stamping Hugs,
de


