Happy April Fool's Day to my crafting friends,
and
Welcome to the Sparkle N Sprinkle April Stamp Reveal!
(if you have arrived here by way of artsy Jess, you're in the right place!)
As Guest Designer, I'd like to reveal my glitter-ific project AND invite you to the SNS Blog Hop.
Check out my talented Teamies' beautiful creations,
AND
earn a chance to win the grand prize!


Diane
Chris
Shona
Eret
Belinda
Corner Garden surprise
Jess
Donna (you're here!)
Anne


Now it is time to hop on over to the very gifted Anne!
Sparkle N Sprinkle Products:
Images: Girlfriend Support Set 2
Super Adhesive Sheets (double sided sticky)
Full Line of beautiful Microfine "Velvety" Glitter Colors
Cloud Nine (white) Microfine Velvet Glitter
Orchid Rose (dark pink) Microfine Velvet Glitter
Hyacinth (medium purple) Microfine Velvet Glitter
Bubblegum Ultrafine (super sparkly) Semi-Transparent Glitter
Morning Glory Cosmic (sparkly) embossing powder
Beach Cruiser embossing powder (with a little glitter added manually)
Stamping Hugs to you!

and
Welcome to the Sparkle N Sprinkle April Stamp Reveal!
(if you have arrived here by way of artsy Jess, you're in the right place!)
As Guest Designer, I'd like to reveal my glitter-ific project AND invite you to the SNS Blog Hop.
Check out my talented Teamies' beautiful creations,
AND
earn a chance to win the grand prize!

NEW STORE - NEW BLOG - NEW PRODUCT LINES!
IT IS ALL ABOUT FUN WITH DEMO DONNA!

It's Demo Donna on the SNS YouTube Channel!
Subscribe today to REVEL IN all the latest Demo Donna tips and techniques - AND - great entertainment! Each week a new technique is shared, and each month, a new video kit is revealed!

It's Demo Donna on the SNS YouTube Channel!
Subscribe today to REVEL IN all the latest Demo Donna tips and techniques - AND - great entertainment! Each week a new technique is shared, and each month, a new video kit is revealed!
The new sets are 20% off until April 3, 2017, so after the blog hop, hop on over to the NEW STORE and have fun shopping! Be sure to check out the OTHER amazing new products as well! With names like TONIC and NUVO and STAMPENDOUS and HOUSE MOUSE, you're sure to fill that cart up quickly!
There are FOUR new rubber stamp sets being released this month with their digital counterparts (one has a mega bundle), plus a new Digi Papers set.
The new SNS sets are:

- Girlfriend Support Set 2 #839
- Digital Version DIGI839BG
- Christmas Holly Blessings #841 **LIMITED EDITION**
- Digital Version DIGI841B - includes extra sentiment - **LIMITED EDITION**
- Corner Garden #842
- Digi Version DIGI842FS - mega bundle includes extra images, decoupage sheets and digital papers.
- Proudly Patriotic #843
- Digital Version DIGI843J
- Vibrant Watercolor Digital Papers DIGI4001FS
The blog hop order is:
Chris
Shona
Eret
Belinda
Corner Garden surprise
Jess
Donna (you're here!)
Anne
Thanks for joining us and remember to comment on each of the Designers' blogs to be eligible for the Grand Prize. Wonder who the Mystery Host will be this month?
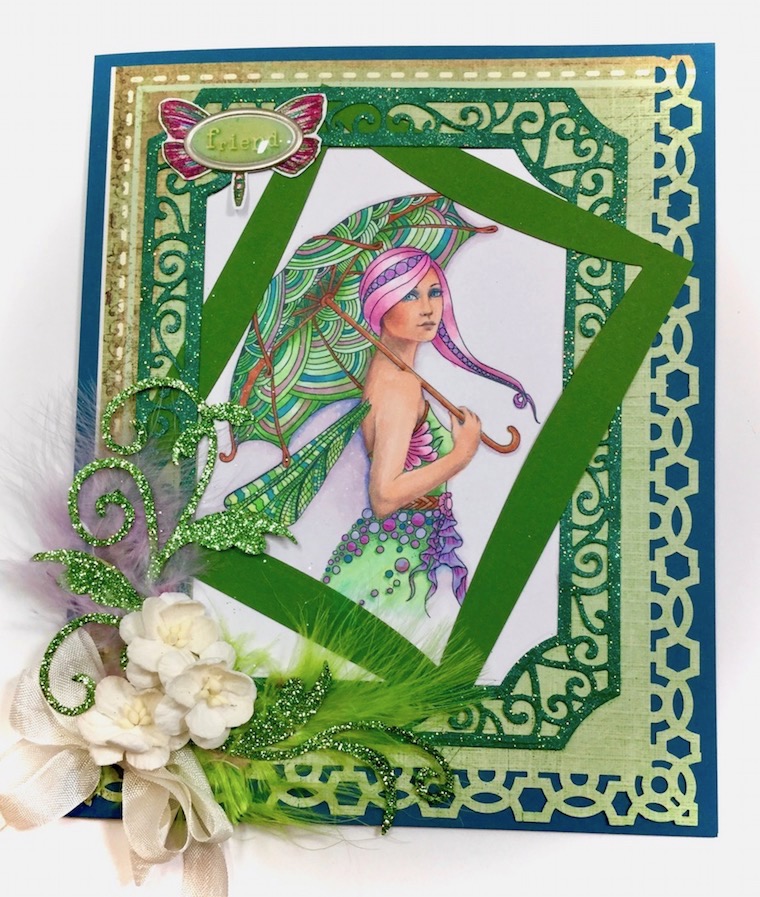
Today's share is a GLITTER LADEN project using the Girlfriend Support Set 2 .
It's a perfect little giggle, or even a pick-me-up.
Here's how to stamp on glitter:


How to Dry Emboss with Glitter:

The photos with the card standing up show the darker aspect of the glitter:

The photos of the card laying down show the lighter aspect of the glitter:

Flowers made with the scraps of Super Adhesive Sheets and glitters. The brads are heat embossed, and the flowers are distressed with the same color embossing powder:

Silly little sentiment - also slightly distressed with embossing powder:

I wish you could see this card in person! It sparkles all over:

Thanks for stopping by! Be sure to leave a comment for a chance to become the grand prize winner!
Sparkle N Sprinkle Products:
Images: Girlfriend Support Set 2
Super Adhesive Sheets (double sided sticky)
Full Line of beautiful Microfine "Velvety" Glitter Colors
Cloud Nine (white) Microfine Velvet Glitter
Orchid Rose (dark pink) Microfine Velvet Glitter
Hyacinth (medium purple) Microfine Velvet Glitter
Bubblegum Ultrafine (super sparkly) Semi-Transparent Glitter
Morning Glory Cosmic (sparkly) embossing powder
Beach Cruiser embossing powder (with a little glitter added manually)
Challenges I'd like to play in please:
- Classic DT Open Challenge #13 (stamping and coloring on velvet glitter, dry embossing in velvet glitter, making flower embellishments with velvet glitter, ultrafine glitter, embossing powder.) 5/1
- Colour Crazy Challenge #13 Anything Goes using Coloring Medium of Choice (Copics and Distress Inks on Microfine Glitter) 4/14
- Creative Fingers Challenges #127 Anything goes 4/14
- Tuesday Throwdown #336 SPARKLES (stamping and coloring on velvet glitter, dry embossing in velvet glitter, making flower embellishments with velvet glitter, ultrafine glitter, embossing powder.) 4/5
- World Wide Open DT Challenge #20 (stamping and coloring on velvet glitter, dry embossing in velvet glitter, making flower embellishments with velvet glitter, ultrafine glitter, embossing powder.) 4/15