My blog is called "Creative Smiles" because my designs are the result of incorporating mistakes. With fumble fingers that drop whatever they are holding - repeatedly, it takes a lot of giggles, smiles and creative patience during my crafting process. xx

Showing posts with label Medallions. Show all posts

Tuesday, January 16, 2018

White on White with Retro Rubber!

Welcome, blogging friends! Hope you and yours are healthy and safe.
Today's card share is one of my all time favorites I think!
(are we allowed to say that about our own cards? giggle)


I am swooning in delight to guest design for:
Loving those old stamps!


It's always a pleasure seeing new twists put to old rubber.
This is one of my favorite challenges because my old rubber finally sees the light of day and emerges very HAPPILY! Try new techniques with your old rubber.

The theme this time is "White Out!"


I am featuring an old, old wood stamp that was gifted to me (but has never seen ink) circa 2002 by a friend whose last name is Berry! So cute since the name of the company is Holly Berry - here is their Facebook Page, and another link to the stamp image called "Garden Maze Medallion" which is available in cling or wood (and a sample from their website).


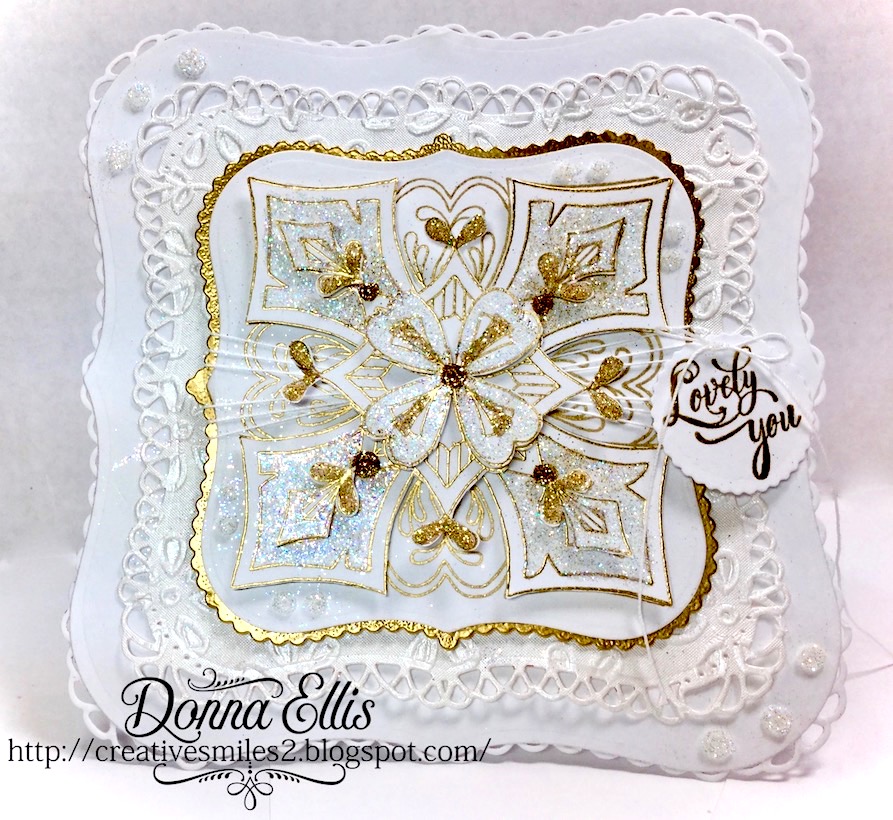
image close up of my card:


Since the theme is WHITE OUT, I dug out something "new" - English Lace Handmade Paper - this cottony paper boasts deeply embossed imagery so detailed, that you can see the stitching of the eyelet lace. It also has a nice sheen giving the appearance of fabric. In addition, the back side of the paper is absorbent for mixed media applications. Even after running it through the die cut machine a few times for the detailed die cut, you can see how deeply embossed it still is:


The image was stamped with VersaMark Ink, heat embossed with Gold Detail embossing powder, and cut out for dimension.
Check out the sheen on the embossed paper:


Lots of layers:


Dimension to show off the pretty shapes:


Gold Detail embossing powder also frames the base image, while Celestial Glitter (gold with transparent highlights) accents the gold frame. Nuvo Medium Tip Glue Pen was applied to various parts of the image and dredged with either Celestial Glitter or Starfire Ultrafine Transparent Glitter.

Nuvo Glitter Accents (Aztec Gold and Fresh Snowfall) were applied in the small gold areas and as large dots on two of the layers.

Here's a peek at the texture:


A pretty gold-embossed sentiment from the Botanical Orchids Rubber Stamp Set (also available digitally) helps personalize the creation, tied with white twine to continue the White Out effect:


The Finished Creation:


Thanks for stopping by. How about inking up one of your beloved Oldie but Goodies and playing along? White on White is an easy way to bring an old stamp to life!

Products Used:

Challenges I'm playing in:
  1. Card Mania Challenges #100 Monochromatic Theme 2/1
  2. Classic DT Open Challenge #21 Anything Goes for a DT 2/1
  3. Crafty Cardmakers #203 "Bling's The Thing" 1/26 (1-28) C15
  4. Dragonfly Dreams (Jan) Anything Goes 2/4
  5. Pammie's Inky Pinkies #1802 Anything Goes 1/22
  6. Simpy Create Too Challenge #134 Embossing (I have used both wet and dry) 2/2 #2
  7. Sisterhood of Crafters (Jan 10) "Frame It" 1/23
  8. Sweet Stampin' (Jan 13) Lots of Layers (9 layers plus the tag) 1/20
  9. Use Your Stuff Challenge #295 Monochromatic 1/22
  10. World Wide Open Design Team Challenge #30 (Anything for a DT) 2/15  #2


Stamping Hugs,


Sunday, November 13, 2011

The Third Card :-)

This is the third card for the Card Gift Box and also my first on-line challenge! 


Inspired by the Sparkle N Sprinkle Sketch Challenge and the Party Time Tuesday's "Bling It On" Challenge, the third of the gift cards was especially enjoyable to make. 

And yes, glitter is everywhere! All products are from SNS

For step-by-step directions in creating this card, please click here.


The olive background is stamped with "Lotus Flower Plant" and Gold Coast embossing powder


Two Spellbinders Nestabilities Fleur De Lis Squares S4-318 were used to create a frame, made sparkly by Green Nugget glitter, then replaced like a puzzle piece. 


The flower is the middle of "Flowers in a Frame" medallion, embossed with creamy, deep Dark Night EP, and more bling with Green Iris glitter


The "Seeds of Kindness" stamp is also embossed with Dark Night EP. This was a fun card to make! "Bling it On!"

Thanks for stopping by,


Thursday, November 10, 2011

"It's A Cultural Thing" Blog Hop with Prizes!

Welcome to the Sparkle N Sprinkle "It's A Cultural Thing" Blog Hop! If you hopped here by way of artsy Dawn Thomas, then you're in the right place! If you're just beginning here, you might enjoy starting at the SNS Home Blog, to become eligible for a grand prize and three "mystery" prizes! This is my last blog hop as a Sparkle Staff Member - so thanks for stopping by. SNS has such a diverse selection of images, we decided to combine many of the stamps featuring themes which create American culture. 

I was very fortunate to have been raised on the West Coast, then in New England, and finally to the Gulf Coast of Florida. My parents were very open to interesting ideas. Growing up my siblings and I always enjoyed the influences of Asian, European and Latin customs - in our meals, celebrations and home decor. My fondest memories include those earliest childhood years which were in southern California. Horticulturally and architecturally, we thrived with Asian influence. So my projects today are reminiscent of Asian filigree and an Asian garden.


Today I'm showing a "card gift box" which will hold an assortment of coordinating and beautiful cards. These will become a Christmas Gift for a dear person (no names - don't want to give anything away LOL). This idea came from a wonderful mother and daughter team on The Craftiblog.

8.5" x 11" card stock was used.

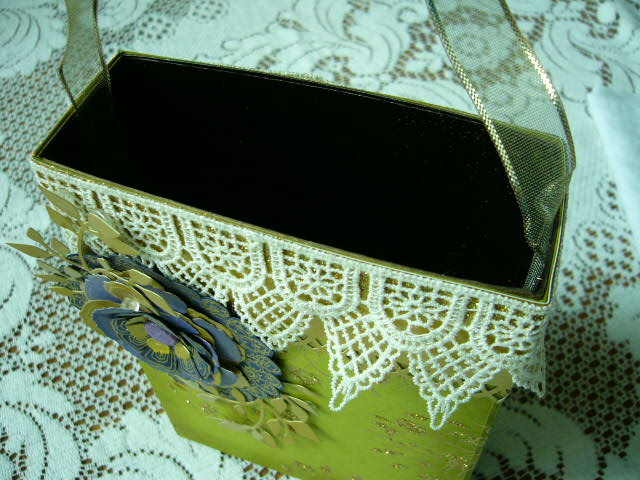
The gift box is actually a repurposed cake mix box, top cut off, carefully opened flat, spray paint on the printed side, and reassembled with the kraft side out. Just click on the photos below to see how to create the gift box or visit my Gallery at the SNS site (one last time) here.


A Martha Stewart border punch cut gold glossy card stock to provide additional stability and to show off  the lace, which has been attached with 1/2 Tear-ific Tape, and then burnished with one of my favorite glitter colors -  Fantasy Gold, also on special this month!

The card stock was randomly stamped with the Lotus Flower Plant image from the Oriental set 181, embossed with rich Gold Coast Cosmic embossing powder, and highlighted with more Fantasy Gold glitter.


The medallion flower was created with Flowers in the Square image, fussy cut, and combined with purple, navy, and gold glossy layers created from Spellbinders Rose and Carnation Creations sets, cut on their Grand Calibur.

The gold glossy leaves are cut from a Sizzix Sizzlet die.

The box is the perfect size for 5x7 (A7) size cards.

The coordinating A7 card below uses the same background creation, Spellbinders "In Spades" borderabilities die, Butterflies Two shapeabilities die, and the Flowers in the Square image cut from navy and olive, embossed with Gold Coast and Dark Night Cosmic embossing powders. (Cosmics are my favorite EPs - so rich and creamy). The butterfly is embossed with Gold Tinsel EP. The recipe for my card is available on the SNS Art Gallery.


Thanks for stopping by!

Your final destination is the SNS Blog! To become eligible for the Grand Prize and three mystery prizes, please leave a comment on my blog below and return to the SNS blog and answer one or both of the following questions. There are no right or wrong answers LOL
What is your favorite tradition which was “brought over” by another culture? Does your family celebrate this? If that’s too ambiguous, how about what special thing do you especially enjoy about American Culture? Answering these questions back on the SNS Home Blog makes you eligible for the Grand Prize and 3 other secondary prizes! Good Luck!


Stamping Hugs,

Sunday, October 17, 2010

SNS Birthday Blog Hop!


The more visitors we have, the more prizes will be awarded, so tell your friends! To become eligible for a prize just leave a comment at each designer's blog about her card AND who you think has the Hidden Birthday Prizes. If you've only just arrived, please check the GAMES page at the SNS website, or the link above. Feel free to return to the SNS Home Blog if there is another comment you'd like to leave there. In the meantime, we hope you have enjoyed the hop and obtained some great technique ideas in the process.


My Fall Inspiration is a bit different over traditional Autumn Ideas. We live in Central West Florida. The colors are taken from an indigenous tree called the"Turkey Oak".  The vibrant colors only last a brief 3 or 4 days. Displaying a single stamp from the SNS "Frames and Borders Set #219" and two colors embossing powders, this project portrays a unique grasp on Autumn - the metallics reminiscent of icy-sparkly frost on the pumpkin, with golden leaves still waxy and dazzling in the Florida sunshine.
To show how much embossing powders can change the appearance of cardstock -- all the embossed images are stamped on the same color cardstock! What a difference the EP colors make! Cordial Red EP is very clear. Spiced Cider, one of the newest Essentials colors, creates the metallic look blended with glitter. Unfortunately, glitters and EPs don't show up well in photographs, but are amazing in person.


On a more traditional note, SNS Designer Barbara Bruder sent a surprise package containing blank die cuts just itching to be colored and used! One was a large pumpkin. I painted the pumpkin with regular acrylic paint, shaded with Createx translucent paint, and chalked in a reddish orange. Frosted with glitter, it appears to have frost on the pumpkin. 

The entire background has been coated in Black Ice Glitter. The vine and stalk have been coated with 3 colors of EP. The coats are thicker on the stalk to create dimension. VersaVine Onyx Black stamped "Wish" from our Fairy Dust set.

So... who do you think has the hidden birthday prize(s) on her blog? I'm interested in seeing what you say in the comments below. :-D The names of our winners will be placed on the SNS Home Blog October 20.

Thanks for stopping by, and good luck! 


Sparkle N Sprinkle images:

Flowers in the Square 0470-219V
Mirror Gold Cardstock 99570
Cordial Red Embossing Powder EP352
Spiced Cider Embossing Powder EP407
Brushable Glue #540
Dimensional Adhesive Dots
Cardstock: Red, Yellow Gold, Ivory, Gold Mirror
1/4” Tear-ific Tape SAT01
Grand Calibur
Spellbinders Standard Circle Sm S4 116
Spellbinders Petite Scallop Circle S4 117
Spellbinders In Spades Pendants S4 208
Corner punch
Scissors
Plain Tape

NOTES:
a) embossing powders can change the appearance of cardstock -- all the embossed images are stamped on the same color cardstock.

b) the base of this A8 card is actually the yellow gold CS (the background was for photographing)

1. With Yellow Gold CS, create A8 size card base. Corner punch red panel and adhere to card base. Set aside.

2. With VersaMark Ink, Stamp image twice on Ivory CS. Emboss one image with Cordial Red EP, and the other with Spiced Cider EP. Fussy cut image in manner pleasing for layering. Slip the two outer frames together to form an interlocking effect. Tape backs together so they don’t slip apart.

3. Cut dies for layering, adhering some with Tear-ific Tape, and others with Dimensionals, depending on the look you wish to achieve. Cut some of the dies in half, and piece together from the back side with plain tape.

4. When layers have been constructed to your liking, adhere to card base on the red panel. 


Pumpkin card:

Stamp Credits Sparkle N Sprinkle:
Wish 3131-394AA

Other Supplies:
Bullfrog EP404 
Bronze Rose EP335 
Butterscotch EP115 
Orange Crush Glitter G1092 
Black Ice Glitter G1020 
Brushable Glue 540 
VersaMark Ink 99702
VersaMarker 99561
1/4” Tear-ific Tape SAT01
cardstock (orange, black)
die cuts
optional border punch
heat tool
black ribbon


1. Paint die cuts (pumpkin, vine) with paints, inks, pencils or chalks. Apply a thick layer of VersaMark Ink (either with refill or VersaMarker on pumpkin stalk and vine. Sprinkle with the 3 colors of EP, as desired. Thicker application gives added texture and depth. Set vine aside.

2. With Brushable Glue, lightly “paint” a shaded area at the top of the pumpkin to resemble due or frost and sprinkle on Orange Crush Glitter.

3. Paint black background entirely with an even coat of Brushable Glue. Adhere pumpkin and sprinkle Black Ice glitter on the rest of the black cardstock. Allow 15 minutes to dry. Border punch if desired.

4. Adhere glitter black panel to an orange piece of cardstock. Attach embossed vine. Tape on the black bow.