My blog is called "Creative Smiles" because my designs are the result of incorporating mistakes. With fumble fingers that drop whatever they are holding - repeatedly, it takes a lot of giggles, smiles and creative patience during my crafting process. xx

Wednesday, September 19, 2018

Hooting it Up With Inky Backgrounds

Greetings, Wonderful Blogging Friends!
It's time for a brand new Back to Basics and Beyond Challenge!


For the next two weeks, join us by uploading an "Anything-Goes" project as long as an inky background is used. The team has all kinds of inspiration and a variety of styles to view, so take a look! Hope to see yours there.

My inky rendition depicts that period of time just after dusk. I can hear softly hooting owls in the trees talking to one another, the chirping of happy insects announcing the full moon, croaking toads and frogs in search of goodies, and perhaps even some "night owls" doing their crafting!


I printed out The Great Horned Owl digital set TWICE. (Psst! This is my very own set, and I hope you enjoy the sentiments that accompany it!)

One owl was fussy cut to make a mask. The other was colored with Copic Markers. This is one of the colored images you will receive in the digital set.
After die cutting a circle and placing it on top of the owl mask, I used distress inks in Black Soot, Blueprint, and Stormy Sky to create a night sky.


The frame process:
(if you are reading this on my personal blog, click on the photos to enlarge)


  1. Applied Super Adhesive Sheet to black cardstock, leaving "rough" protective layer in place.
  2. After die cutting shape, I removed the protective layer and burnished in Black Diamond Microfine Glitter. (if you prefer, use black glittery EP instead)
  3. I distressed with VersaMark Ink here and there and applied Fleur de Lis Chunky Opaque embossing powder.  After the fact and Because I'd forgotten how golden it is, I added a bit of Super Thick Black embossing powder on top of the Fleur de Lis color, to tone down the gold. Glittery Radiant Moss Green embossing powder was also used in the distressing process. Heat a little at a time so it does not melt the super adhesive sheet.
  4. I die cut some white fun foam in the same shape, and edged it with a black Sharpie marker. The black frame was then adhered to the fun foam for dimension, using 1/4" Double Sided Tear-ific Tape.


I thoroughly enjoy "distressing" with glitters and embossing powders!
frame close up:

The set comes with a leafy twig - great for framing or using around the branch. Here I used it in rubber, embossing with more Radiant Moss Green embossing powder to give the leaves a night time appearance. 

The sentiment was stamped with Nocturne VersaFine Clair and heat set with Black Detail embossing powder. It was distressed with the same colors as the sky background.


The Tonic Handmade paper was distressed with 3 colors of mousse.


Finished Card:


Products Used:


Challenges I'd like to participate in please:


  1. Tuesday Throwdown #410 Add Some Texture (background paper, layers of glitter and embossing powders) 9/25
  2. Always Fun Challenges #76 Fall Colors 9/24
  3. Pammie's Inky Pinkies #1837 Anything Goes 9/24
  4. Crafty Cardmakers #218 Autumn Colors (C15) 10/2
  5. International Art and Soul #42 Nature 10/1
  6. Crafty Animals #18 Anything Goes with an Animal 10/1
  7. Crafty Gals Corner #174 "3 or more layers" (6 layers of paper plus the frame which also has a die cut piece of fun foam under it) 9/26
  8. Crafty Girls Creations #50 AG 10/1
  9. Morgans Artworld Open Challenge #9 AG 10/1
  10. World Wide Open DT Challenge #9 AG DT 10/15 (used special effects in frame and paper)


Stamping Hugs,


Thursday, September 13, 2018

Use Ribbon {Moving Along With The Times}

Welcome, Blogging Friends! Hoping all is well with you.
For my friends along the Eastern Seaboard, I hope Florence's ferocities will be minimal and you will not suffer loss or serious damages from the storm.
Please be safe.


It's time to share a Project for the new Moving Along With The Times Challenge! Challenge #80's theme is RIBBON - for the next 2 weeks just make sure your project contains ribbon and upload it!


After coloring my impish fairy with Copic Markers, and die cutting her out, I applied a scrap of double sided Super Adhesive Sheets to my yellow cardstock, and die cut the shape out with the protective layer still in place.
TIP: when cutting double sided sticky tape, be sure remove the ultra glossy protective layer on the bottom first. The die will easily cut through the remaining protective layer, tape and cardstock.


The decorative border was cut to size, glued on the back of the panel, and then flipped over. I pulled off the protective layer from the yellow panel, applied the image, and then burnished with Velvet Micro Fine Glitter Butterscotch


I set the prepared panel aside to work on the card base. After dry embossing, Yellow Pearlescent Brilliance ink was moshed around the outer parts of the card.


I heat set it, and used a VersaMarker Pen around the edges and heat set with Buttercup Petal embossing powder. This color EP keep my yellow theme, rather than turning it gold. The added sparkly distressing brought more texture and a greater depth to the dry embossed area.


The greeting was also distressed with Buttercup Petal embossing powder. The close-up below shows the texture of this glittery EP on the edges of the card and greeting, and how shiny the velvety microfine glitter is:


FINISHED CARD:


On a Personal Note:

Early Mornings are often my favorite part of the day. In Florida, the past few mornings have treated us with a slightly lower morning temperature at 75F-24C so the ground is warmer than the air. A beautiful Stillness belies the cacophony of singing birds awakening - and my 2nd favorite thing - is when a special effect occurs after the night's thunderstorms, but before the sun has fully risen -- I marvel -- watching the warm ground releasing ribbons of dew rising from the pasture, creating a misty fog - caressing each blade of grass and every tiny leaf, in preparation for the heat of the day. It's like Nature lovingly kissing each of her children so they will have strength to stand tall in the humid heat once the sun rises. (If you are reading from my blog, click on the photos to enlarge).

The front gate is "down the hill" going left, and keep on going, past the fence, until you are nearly at that open space in the far right:


 The front and west pastures:
(already, the ribbons of fog have risen to feature a lush, green pasture from the previous night's thunderstorms). Isn't the Spanish Moss lovely hanging in the still morning air?


Thanks for stopping by, my friends! I sincerely appreciate your visits.

Products Used:


Challenges I'd like to play in please:

  1. Classic DT Open Challenge #9 AG DT 10/1 sep post
  2. Crafty Creations Challenges #374 AG 9/26
  3. Crafty Friends Challenge #92 Embossing Wet or Dry (two panels dry embossed. The back panel and sentiment are distressed with EP) 9/22
  4. Crafty Gals Corner #174 "3+ Layers" (6 layers) 9/25
  5. Crafty Girls Creations #50 AG 10/1
  6. Crafting by Designs (Sept 12) Offer Encouragement - my sentiment does that 9/19
  7. Pammie's Inky Pinkies Challenges #1836 AG 9/15
  8. Creative Craft Cottage Challenge #111 Use Ribbon or Lace 10/3
  9. Die Cut Divas (Sept 1) Use Yellow in Project (used 2 Tonic die sets) 10/3 (sep post)
  10. Do-A1 Creative #21 Bingo Card (diagonal dies and punches - stamp - ribbon) 10/1


Crafty hugs especially for you,


Thursday, September 06, 2018

Decoupage for the Birds! {Back to the Basics and Beyond}

Hello, Blogging Friends! Please join me today for the Back to Basics and Beyond Challenge. It's all about decoupage. This is my first ever decoupage card, and I hope it's done correctly!

For the next two weeks, join us by uploading an "Anything-Goes" challenge as long as decoupage is used. The team has all kinds of inspiration and a variety of styles to view, so take a look! Hope to see yours there.


It was pure joy working with Linda's quality products. My cards feature the "Les Beaux Oiseaux Designer Ephemera" - Beautiful Birds - I've done an Asian style card from the travel postcard.

Linda's products are available by leaving a comment on her blog or emailing her at lasimpson60@gmail.com


The designer paper is from one of Linda's digital paper packs containing green, tan and brown papers.

TIP:
I used a sepia setting on my computer and changed the green paper to become a bit more "olive" to match the bird, before printing it out.

I printed 4 copies of the bird topper, cutting out flowers, butterflies, and various parts of the bird, with the largest layers on the bottom, and the smallest on top. But first, each piece was inked around the edges for a crisper appearance.


Customizing the Martha Stewart punch set, I cut the white cardstock to 5.5" x 4". Notice the middle sides have been left "unpunched", and then were manually fussy cut with scissors. On the top and bottom, I punched 2 corners, and one border, then left the "odd" size "unpunched". This was also fussy cut. But this piece was flipped to the opposite sides on top and bottom to bring about a little symmetry. I hope this makes sense. (An easier thing to do would have been to size the digitals to fit the punches, rather than manipulate the punches after the fact - giggle). 


The white frame was smooshed with VersaMark ink, dredged with Opaline embossing powder and heat set:


The edges of the base topper were "distressed" with a Large Glue Pen, allowed to sit for about 15 minutes, and then Sunkissed Copper Gilding Flakes were applied to the edges:


After brushing away the excess gilding flakes, I added more texture by "distressing" with a VersaMarker, dredging with Copper EP and Glitter, and heat setting:


More of the embossing formula adorns the coordinating digital paper:


There were three textures of copper on the card:


Thanks for dropping by, and hope to see your decoupage project at
Back to Basics and Beyond Challenge


Products Used:
Challenges I am supporting with this card:

  1. Crafty Cardmakers #217 "All Creatures Great and Small" 9/17 sep post
  2. Get Creative Challenge #73 "Lots of Bling and Sparkle" 10/1 (I used lots of gilding flakes and the embossing powder contains sparkly glitter)
  3. We Love 2 Create #12 "Anything Goes Mixed Media" 2 kinds of embossing powders (one hand blended), gilding flakes, metal accessory distressed)


Stamping Hugs,

Sunday, September 02, 2018

The Impossible Christmas Card

Hello, Blogging Friends! Merry... Merry... Merrrrrrry...
sigh - I just can't bring myself to say it! We're still in the mid 90s here. How can I possibly say Merry Christmas in that heat? Unless I was living in Oz, then I could do it. LOL


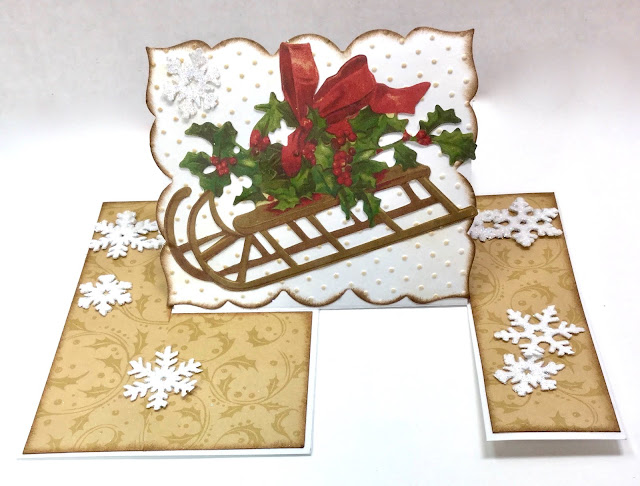
Today I'm featuring "The Impossible Card" fold. Our swap group decided to make the fold, and this is my exchange card. Having been especially inspired by Sandy's Video and samples, I gave it a try. 

After creating the 5x7" base, I trimmed and distressed some vintage Christmas DP. I stamped the Happy Holidays sentiment with VersaFine Clair Pinecone (dark brown) and heat set with Gold Detail embossing powder. Set it aside to cool before die cutting with Mixed Edge Rectangles die set, and distressing with gold ink. 

Using one of my favorite old dies (SB Labels Twenty-three), I cut out two white panels. One is heat embossed with Gold Detail embossing powder, the other is dry embossed with CB Swiss Dot folder. They were both adhered to the little "pop up" portion of the card, and then adhered to each other with dimensional tape (back to back).


Each of the snowflakes (and border) are coated with Starfire Ultrafine Glitter.
The snowflake border was cut out 4 times and glued together for stability.


The sentiment is pretty as a focal point, or on the hidden side.


Products Used:

Challenges I'm supporting:


  1. Crafty Calendar Challenge "Unusual Folds" (the impossible card fold) 10/1
  2. My Time to Craft "Christmas in August" 9/8
  3. Merry Little Christmas #2 Anything Christmas Goes 10/5 sep post
  4. Merry Christmas Challenge #Aug15 Anything Christmas Goes 9/15
  5. The Twisted Challenges #4 Celebrations + Monochrome (front side of card is gold and white)(1 mo behind in sep post) aft10/1
  6. Jingle Belles (Aug24) "Shape-Up for the Holidays" - Shaped card 9/6
  7. Winter Wonderland (Aug 31) "Christmas Joy" (my stamp includes GLADNESS and CHEER) 9/14 (sep post)
  8. Holly and Ivy Christmas #35 "Anything Christmas Goes" 9/8 sep post


impossible hugs,