My blog is called "Creative Smiles" because my designs are the result of incorporating mistakes. With fumble fingers that drop whatever they are holding - repeatedly, it takes a lot of giggles, smiles and creative patience during my crafting process. xx

Showing posts with label Crafter's Companion. Show all posts

Sunday, March 14, 2021

3-D Embossing Folder and Freebies

 Hello, dear Blogging Friends!

These cards are dedicated to my cherished friend CLARA, who passed away unexpectedly last month. 

I was recently inspired by a brand new blogger Shandy at MERMAIDS AND PAPER HEARTS, and blogging friends Leslie Miller and Connie Griffin, in making the following cards. Shandy inspired me via our conversation about colors and flowers, Leslie via Stencil Embossing (even though mine is with embossing folders instead), and Connie because she is always sharing techniques with us. So I've used VIRGINAL PRODUCTS from my stash! 


Having been hidden away in my stash for years, my Crafters Companion Ornate Lace 3D embossing folder finally felt paper!

After dry embossing, VIRGINAL Encore pigment ink was applied. Each card involves different Encore ink colors:

first, dry emboss:


Then smoosh with pad and/or fingers:


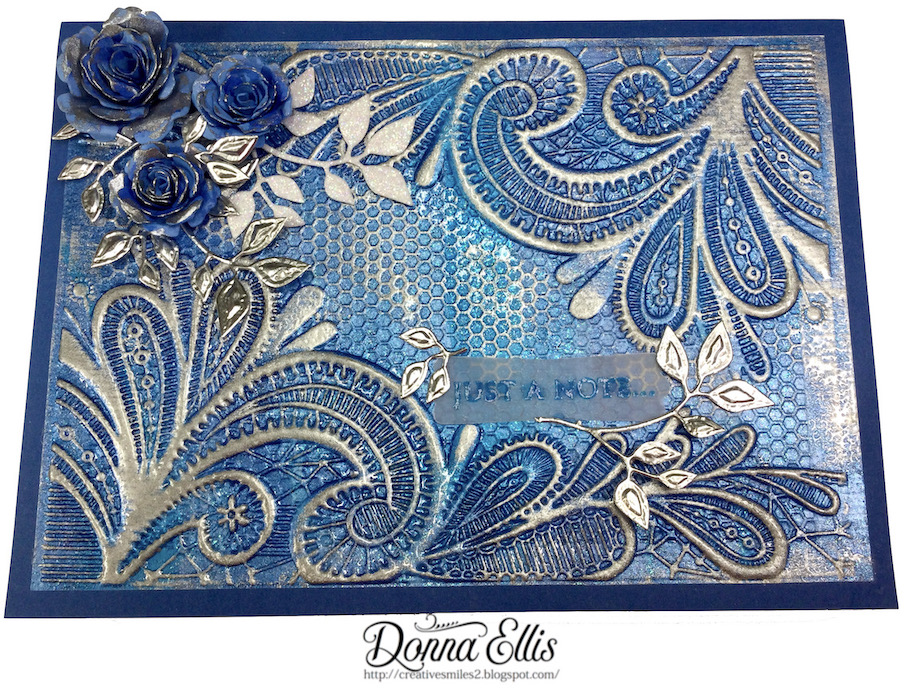
In this case, Encore Ultimate Metallic Teal was rubbed on the raised areas, and then coated with a clear detail embossing powder that contained microfine glitter. The Spellbinders Bitty Blossoms were rolled in the same cardstock as the 3D folder, however, distress ink and platinum pearlescent paints were applied for visual interest. The Silver leaves are from upcycled can lid of Whey Protein Powder LOL. If you're on my blog, click on the photo to enlarge to better see the details:


Whole card:

Black cardstock, VIRGINAL Encore Ultimate Metallic Gold was rubbed on the most raised areas. In the lesser raised areas, I finger rubbed Encore Ultimate Metallic Pink in order to provide a tiny bit of visual dimension. The roses were colored in the same fashion:


This bold blue background was fun and messy! On cardstock made for acrylics, I smooshed various acrylic paints up and down. With a very light brushing of wet glue, I then added tiny bits of blue and silver glitters into some areas. When the finished background was dry embossed, it looked pretty just as it was, but after adding VIRGINAL Encore Ultimate Metallic Silver to the top of the raised areas, it really brought out the glitz! 

TIP:

There are two coats of clear detail embossing powder on top of the silver ink. Her Virginal Inkiness was so wet, that it took two coats. I learned that highly metallic pigment inks retain their metallic qualities when used with CLEAR embossing powder, because the metallic components IN the ink rise to the surface of the clear embossing powder.


The next card uses the same aqua paper, but with VIRGINAL Encore Ultimate Metallic Silver applied to the top of the raised areas. This card was also "distressed" with the silver ink. How different it looks in comparison to the card using the Teal ink!


This card front was dredged with clear embossing powder, heat set, and then dredged again with clear detail EP mixed with microfine glitter. It's my favorite! Which is your favorite?


Lastly, is the card inspired by and made for Shandy. She likes the color turquoise (reminds her of mermaids) and she likes layered flowers. It was distressed and embossed with clear detail EP:


Thanks for stopping by! It was fun playing with goodies from my stash!

Products: Dies: Cottage Cutz Greenery 4x4, SU Modern Label Punch, TH Garden Greens, SB Carnations, SB Bitty Blossoms, Stamps: Hero Arts CL342 sentiment Inks: INKS & Mediums: assorted pearlescent acrylic paints, assorted pearlescent watercolors, assorted Encore Metallic inks, assorted distress and VFC inks, assorted embossing powders, Cardstock: acrylic paint paper, lavender, deep blue, pale blue, aqua, black, EMBOSSING FOLDER: Crafters Companion Ornate Lace 3D

Challenges I'd like to play in please:


  1. Just Us Girls Challenge #575 Trend Week Use An Embossing Folder 5/19 sep post
  2. Simply Create Too Challenge #168 Wet or Dry Embossing (I dry embossed the background, applied ink to the the dry embossed areas, then embossing powder and heat set. The sentiments are also heat embossed. 4/2
  3. Frilly and Funky (March 6) Something Vintage 3/17 sep post
  4. The Corrosive Challenge #3 Anything Goes 4/2
  5. A Bit More Time to Craft #135 AG 4/1
  6. A Perfect Time to Craft #3 AG 4/1
  7. Stamping Sensations Challenge (March) Monochromatic 4/5 (each card is monochromatic)

FREEBIE SENTIMENTS - my gift to you


My gift to you - Arrangements of the same sentiment for use on the inside or outside of your projects. Please do not sell the Sentiments. Use on any of your projects, including projects involving any design teams you might be on. Different shapes of sentiments work well for landscape or portrait shape cards.

Click on the image to bring it to full size. Because of the changes Google Made with Blogger in June 2020, your image will appear to be solid black. Don’t panic. Right click and do a SAVE. Once it is saved on your hard drive, you can open it and it will have a transparent background. I create PNGs instead of JPGs so they can be placed anywhere on a scene or project, and so backgrounds can be made using them. Please let me know if you have any problems. I hope they serve you well!

Enjoy!


Sympathy Verse:


Stamping hugs,

Monday, April 01, 2019

2 Crafty Critter Crazies with Digi Doodle Love Birds

Hello, sweet blogging friends!
Thanks for stopping by today.


It's time for a new Challenge at Two Crafty Critter Crazies 
where we love to celebrate any project with a critter on it! Critters include mythical creatures, animal toys and everything alive (except humans and flora)! Our very generous sponsor this month is:
Digi Doodle Studios.
My project features this darling Little Love Birds image.
They could not be tweeter, could they?

I especially like the little hearts cascading from the sweet little girl birdie.

Revealing the steps below shows how this image is pretty without much embellishment:

After dry embossing my card and adhering the sweet Little Love Birds image (colored with Caran d'Ache Luminance 6901 Color Pencils with Gamsol, Distress Oxides (Broken China, Cracked Pistachio) with water, I stamped the sentiment with Warm Breeze Versafine Clair ink and heat embossed with Clear Detail Powder:


Spellbinders Scalloped Edge Frame was woven with shiny Really Reasonable Ribbon's double faced satin ribbon in aqua:


Then I added some foliage (Cottage Cutz Greenery 4x4) in turquoise vellum, flowers and a handmade bow.


Such a sweet, texture-laden card which was fun to make start to finish!
Yikes! No glitter! (giggle)

Hope to see your critter entries in the challenge!

Some Products Used: 
ImagesLittle Love Birds, Hero Arts Mini Sentiments, Dies: SB S5-011 Scalloped Edge Frame (one of the very first SB dies ever!), Spellbinders Bow Elegance, Cottage Cutz Greenery 4x4,  Colored with Caran d'Ache Luminance 6901 Color Pencils with Gamsol, Distress Oxides (Broken China, Cracked Pistachio) with water, Warm Breeze Versafine Clair ink, Embossing: Dry Stone Wall by Crafter's Companion and Clear Detail Embossing Powder, Really Reasonable Ribbon Double Faced Satin in Aqua.

Challenges I'd like to Play in Please:
  1. Crafty Gals Corner #188 "Spring Is Here" 4/7
  2. The Sisterhood of Crafters (March 27) "Let's Celebrate Spring" 4/10
  3. The Alphabet Challenge (Mar 29) "A is for Animals" (birds) 4/11
  4. Creative Fingers Challenge #160 Anything Goes 4/6 (check #162)
  5. Crafty Friends #106 "Use Spring Colors" 4/3
  6. World Wide Open DT Challenge #3 (AG DT) 4/15 
  7. Classic DT THIRD BIRTHDAY Challenge (AG DT) 5/1 
  8. Craft-Dee BowZ (April) AG with handmade bow 5/1
  9. Digi Doodle Studios #15 AG with Digi Doodle 5/1
  10. Digi Doodle Studios FB Challenge 5/1


On a Personal Note
What does your family do with Easter Eggs?
I have some tips on my Recipes Blog here.


Happy April to you!
hugs,

Wednesday, July 25, 2018

Embossing Folder - Back to Basics and Beyond Challenges

Welcome crafty blogging friends!
Hope this finds you doing well, and playing with your artsy supplies.

It's very hot, humid and wet here. Typical Florida Summer! And quite conducive to indoor meanderings in my craft room.

Hey!
It's time for another
Back to Basics and Beyond Challenge!


It's a challenge blog dedicated to... you guessed it... getting back to the basics.


For the next two weeks, join us by uploading an "Anything-Goes" challenge as long as an embossing folder is used.


I'm showing a modern-take on a vintage tag.


Is that an oxymoronic description?


The tag is for a very special on-line friend, who is always so generous with her cards and love.


It all started with a 5x7 embossing folder and Chrome Silver mirror cardstock (Apologies for the poor lighting):


After dry embossing I decided it would look fantastic to add blue coloring to the debossed areas (yes, I did that backwards, deciding to color AFTER embossing the cardstock - lack of planning on my part). To keep the ink in place on this non-porous surface, Clear Detail Embossing Powder was dredged on top of the dry embossed tag, and heat set:


TIP: this was a great lesson because I learned that the Clear Detail Embossing Powder anchored the ink in place AND kept the shininess, but refracted the light enough to help with taking photos!


The die cut leaves were covered with Brushable Glue and dredged with two monochromatic "blue tone" ultrafine glitters: 

Fascination G1030 (mixture of blues and other hues to bring out some silveriness) 

and

Blue Lightning G1008 (bright bold blue that sparkles gorgeously)


Sentiment is from Pretty Blooms Rubber Stamp Set 873
(also in digital format).


The glue for the glitter dried in the time it took to assemble the ribbon and die cut the sentiment, even on a rainy day.


A slate blue background was punched with an old edge punch and adhered to the tag. Everything else was adhered with 1/2" Tear-ific Double Sided Tape.


Hoping to see your projects at 
Back to Basics and Beyond Challenge!


A few products used:


Products Used:


Challenges I'd like to play in please:

  1. Craft-Dee BowZ (July) AG with handmade bow 8/1
  2. Create and Inspire #76  AG 8/10
  3. Mix it Up Challenge #15 Mix it Up More than one medium (mediums listed above) 8/1 (sep post)
  4. Monochrome Magic #13 AG Monochrome 8/15
  5. Not Just Cards Challenges (Jul 11) "AG" 8/11
  6. That's Crafty Challenge Blog (Jul 4) "Close To Nature" 8/1
  7. Pammie's Inky Pinkies #1829 Anything Goes  7/31
  8. World Wide Open DT Challenge #7 AG DT 8/15
  9. A Bit More Time to Craft #72 Anything Goes 7/29

Thanks for visiting!
Stamping hugs,


Wednesday, November 30, 2016

Ewe're So Wonderful

Greetings, my friends!

Hope this finds you well, and enjoying the holiday preparations in your special corner of the planet.

Today I have the pleasure of guest designing for Sparkle N Sprinkle during their December Reveal!
If you arrived here from Diane's fabulous blog, then you are in the right place!


Sparkle N Sprinkle has six new stamp sets to share with you today.  I am using:


These new sets are 20% off until the 3rd of the month; so once you finish the blog hop, head on over to the store and start shopping!  Five of the new sets are available on cling-mounted rubber and digitally. One of the new offerings is available digitally only.  

The sets are:


Build A Flower Set #811  (digi version DIGI811)
  Will Ewe Be Mine Set #813  (digi version DIGI813)
   Light Up My Life Set #814  (digi version DIGI814)
Rustic Flowers-Snapdragons Set #816  (digi version DIGI816)
Spring Bunny Set #819  (digi version DIGI819)
Build A Wreath (Digi Only)  DIGI3128B
   
On Dec 3rd, ONE GRAND PRIZE WINNER will be selected from one of the comments left on ALL the Designers' blogs listed below. So leave a comment with each Designer in order to be eligible for the Grand Prize. The Winner, who will be announced on the SNS Facebook page and on the SNS Blog, will receive ALL of the new stamp sets released this month (or the digi versions, if preferred).

My super talented teamies have some wonderful ideas waiting 
JUST FOR YOU on their blogs! 
The Blog Hop order this month is:
Donna (that's me!)

(*Tip: if you have difficulty with a particular link, 
try clicking on the Designer's blog title to send you to their Home page.)

We hope you enjoy the stamp sets as much as we do.  Thanks for joining us and remember to comment on each of the Designers' blogs to be eligible for the Grand Prize. Wonder who the Mystery Host will be this month?


BEGINNING TODAY: The easy-peasy Sparkle N Sprinkle Creative Challenge

There are lots of prizes and recognition badges.  We would love for you to be a SNS Featured Artist as well.  The theme is always Anything Goes using Loose Glitter, Embossing Powder, and/or Flock.


IT IS ALL ABOUT FUN AS YOU HAVE NEVER ENJOYED IT!
It's Demo Donna on the SNS YouTube Channel!

Subscribe today to REVEL IN all the latest Demo Donna tips and techniques! But even more - PREPARE TO BE ENTERTAINED! I usually giggle and laugh at Donna's comments throughout her demonstrations - 
She is...

     The Informative, 
          The Talented,
               The Fully Entertaining...

DEMO DONNA!


Now, let's get down to business (giggling)


Today's cards use:

      the same image, 

          the same border punch and
                    the same Sue Wilson oval die. 

However, they look completely different!


I love the cute, silly images from Bugaboo. Jodie (the artist) captures emotions so beautifully in her delightful drawings. I can't help but smile at these three crazy ewes!

TIP:

On both cards, the sentiments have been cut apart to mix and match the words:


If you are thinking they look a little "fuzzy" in the photo, you would be correct! Each ewe has been hand painted with Brushable Glue. Around the outer edges Swanky Gray Sparkle N Soft was applied.  It contains a little glitter. The interior portions are covered with Snow White Flocking.

My ewes LONG to show off their soft wool, hoping someone will simply pet them!
It makes for a fun card!

Here's a close-up of their cuddly softness:


This set comes with lots of sentiments. I cut them up to mix and match the words from "a Wonderful day" and "Wishing ewe".
It's cute to say "Wonderful ewe".

(right?)

I've also used a little Nuvo Mother Of Pearl Embellishment Mousse on the embossed back panel to bring out the flowers from the embossing folder:


BOO BOO TIME!

This was my first application of the Embellishment Mousse. It's wonderful to work with.
AND GUESS WHAT? You can distress with ink on top of the mousse! BUT BUT BUT,
if you do use dye-base inks for distressing on top of the mousse, clean off the applicator because some of the creamy mousse ends up on the applicator, making the ink rather smooshie and dark the next time you use the applicator (see the blue coloring around the sentiment? It's suppose to be like the distressed blue in the ewe panel).

Just sayin'...
😄😄😄
The grass began as a piece of Sticker Paper. Peeling off the protective layer, I burnished Parisian Mist Ultrafine Glitter G1037 into it. Then cut the blades of grass. Finally, with the help of Brushable Glue, I added more grassy detail to highlight the greens with Spirited Green Ultrafine Glitter G1070.

You can see the lighter color green glitter atop the darker color below:


Happiness is... WONDERFUL EWE!

Tip:

Create the illusion that there are more layers on your card by carefully using glitter or unheated embossing powder. Apply double-sided Tear-ific Tape around the back side of your punched or die cut shape. Leave the protective coating in place on the backside. Turn the panel face up, so your tape is sticky-side up. Burnish the glitter (Misty Blue Ultrafine Glitter) into the small openings as shown in the frame below:


My next card:

(Wahhhhh! my dry embossed hearts don't show on the bottom part!)


TIP:

Make a single layer look like two:


The new background paper gives a little glitter pizzazz to the lacy front.
The glitter trick from the first card was used again; and burnished Misty Blue Ultrafine Glitter is around the interior edges of the lacy frame:


Burgundy Glitz Ultrafine Glitter G1047 was burnished into a piece of Sticker Paper, and then die cut using the SW Oval die, and the SB wavy border die. Before adhering the silly ewes panel, I die cut the SW leaves from the glittered section. There are a few punched hearts as well from the left over areas of the glittered shape. Again, the sentiment has been cut apart to mix and match:


Lots of sparkle in the custom background panel, the lacy edge, the middle panels, the extra tiny hearts and the leaves:


IT IS FLAT FOR MAILING!

Thanks for dropping by today, and for hopping in SNS's December Release!
Be sure to check back to see who won the grand prize!

Sparkle N Sprinkle Products:
Other Products:
  • Dies: SB A2 Curved Borders One, SB Mega Scallop Long Rectangles, SB Petite Scallop Ovals, SW Double Pierced Ovals, SW Faux Quilled Leaves
  • Punches: MS Lacy Heart Border (for the glittered hearts), and the Vintage Floral PATP, EKSuccess Rounded Scallop Corners
  • Embossing Folders: We R Memory Keepers Dotted 2 hearts, Embossalicious Crafter's Comp Floral Wonder
  • assorted inks, papers
Challenges I'd like to support:
  1. 613 Avenue Create #191 ANYTHING GOES! 12/4
  2. Aud Sentiments Challenges #169 ANYTHING GOES + A SENTIMENT 12/5 (both cards contain sentiments where the rubber has been cut apart and pieced together)
  3. Craft Your Passion #340 Anything Goes 12/5
  4. Crafting by Designs (11-30) Anything Goes 12/7 
  5. Crafting from the Heart #138 Anything Goes 12/5
  6. Crafty Gals Corner #100 Anything Goes 12/7
  7. Creative Fingers Challenge Blog #121 12/9
  8. Creative Moments Challenges #107 Anything Goes 12/7
  9. Die Cuttin' Divas #294 Make It Sparkle (the EP has glitter in it for background, the layers around the frame are glitter, the leaves are glitter, the gray flocking has sparkle and glitter, hearts are glittered, the grass is die cut with scallop rectangle and glittered, the embossing has shiny embellishment mousse) 12/4
  10. Get Creative Challenges #53 Birthday (my easel card) 12/12
  11. Lil Patch of Crafty Friends #46 ANYTHING GOES! 12/4
  12. World Wide Open Design Team Challenge #16 ANYTHING GOES! 12/15

December hugs,