My blog is called "Creative Smiles" because my designs are the result of incorporating mistakes. With fumble fingers that drop whatever they are holding - repeatedly, it takes a lot of giggles, smiles and creative patience during my crafting process. xx

Showing posts with label Digital Papers. Show all posts

Monday, May 01, 2023

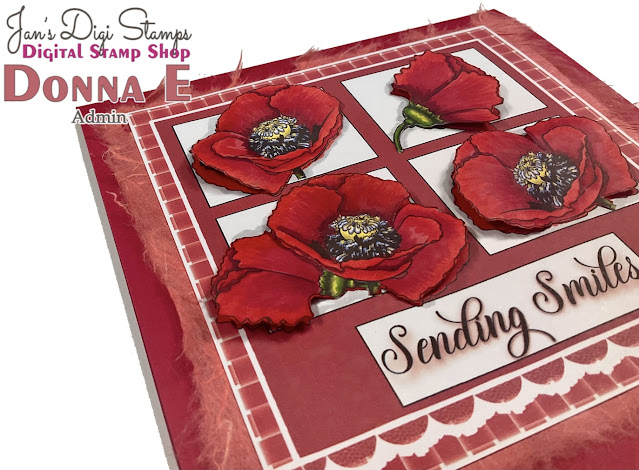
Patriotic Poppies {Jan's Digi Stamps}

Happy May, dear blogging friends! 

Today is the kickoff for May's Anything Goes Challenge at Jan's Digi Stamps!  If you use a JDS image in your card, please mention it. There is a 2nd draw specifically for those who use one of Jan's fun images. Jan's newest sets are 25% off and this month's Father's Day sale, includes 10 sets, also on sale 25% off.

I've blended some other papers with Jan's pretty, Patriotic Poppies set, in honor of those who have fought for our freedom, and the freedom of others. The poppy was established as a symbol for that reason globally after World War 1. 

Patriotic Poppies on sale 33% off for $2.00

Sentiment is from:

Botanical Orchids 874


I digitally created a red 4.5 x 4.5 inch background, placing 4 small rectangles and cropped poppies in each. Then a larger rectangle accommodates the sentiment. Each rectangle is framed digitally in black, with a shadow effect for the sentiment, all in my free, trusty Pages word processor. I copy-and-pasted the flowers in each rectangle to be colored and layered. The images are colored with Copic markers. Even the lace is a digital addition.

Instead of "popping up" the whole flower, the bases of each flower (near the stem) have been glued flat atop the flower underneath, with black dimensional tape under portions of the flower petals on the upper layer:


A shadow affect was used on the sentiment digitally:


The card interior uses my handmade sentiment with one of Jan's pre-colored images:


We love seeing your projects at Challenge at Jan's Digi Stamps!

Products: Jan's Digi ImagesPatriotic Poppies 4095,  Botanical Orchids 874, also digital: Digital Lace Borders by Angie Makes at Creative Market, Lozzy T's Papers "Checkout #30", regular papers, Coral Mulberry Paper, Copic Markers

I'd like to play in the following fine challenges please:

  1. Outlawz Twisted Thursday AG with theme COLOR IT (colored with Copic Markers 5/4 (4 of 5 allowed entries) 5/4
  2. Crafting Happiness Challenges # 142 Flowers 6/1
  3. Creative Knockouts #493 Flower Power (1st of 3 allowable entries) 5/13 OE10
  4. A Perfect Time to Craft #5 AG (check 7/1)

  5. Make My Monday Challenge #199 Flowers 5/6

  6. Classic Design Challenge #5 AG 6/1

  7. Pammie's Inky Pinkies #2317 AG 5/8

  8. CD Sunday Plus #109  5/1 ( I used digital items: Lozzy T's Papers "Checkout #30" and layered Creative Market's Lace border onto it and printed. On my word processor, I then digitally applied red square layer framed in white with 4 white "windows" framed in black. The digital image was also placed in the "windows". A window was created for the sentiment, also a digital image from JDS and highlighted with red on the computer. This was printed out. I also printed more of the poppies separately. These were all colored with Copics and layered atop. Several digital layers, and several "paper" layers. 5/15


Stamping Hugs,


Friday, November 01, 2019

That Vintage Look at The Paper Shelter - 2 Crafty Critter Crazies

Is it REALLY November 1st already?
So glad I can share it with you - and thanks for dropping by today.

It's time for a new Challenge at Two Crafty Critter Crazies 
where we love to celebrate any project with a critter on it! Critters include mythical creatures, animal toys and everything alive (except humans and flora)!


Our very generous sponsor this month is:
TPS The Paper Shelter
Her wonderful characters exhibit such a kindness and sweetness to them.
My card features the darling "Holy Night" digital set, including background.


I felt like doing something in a Vintage Style.


After dragging the focal image onto the background in the word processor, I flipped the entire thing horizontally so they were facing the opposite direction.


The sentiment is one I made, and am gifting it to my followers below.


In addition, I duplicated the focal image and sentiment so they could be fussy cut separately, and popped up for dimension.

Above, on a separate word processing document, I dragged 2 of the backgrounds to it, and sized them to be slightly taller than the scene on the first page. To elongate the card (making it 5x7), simply "overlay" one of the backgrounds onto the other, matching up the borders so they look continuous.

The Vintage frame needed a little help with the busy background, so I die cut a larger piece, embossed it with a very pale gold EP containing mica powder, and heat set:


Next came the assembly:
  1. Adhere Decorative frame to embossed panel.
  2. Adhere die cut image to framed panel.
  3. Adhere die cut inner frame on top of image panel.
  4. The card probably would be beautiful just like the bottom photo!


The background would be lovely all by itself with a sentiment.
or
Fussy cut one of those trees, make an extended background, pop up the fussy cut tree where the border overlaps, and put a sentiment or the lovely girl on the right.

But I placed the framed focal image panel on the background:


After inking the edges of the fussy cut pieces, the sentiment and focal image were popped up:


Gold Wink of Stella was placed around the dark card base. Clear Wink of Stella was placed on the white trees in the back ground, and more Pale Gold EP edges the background panel:


Wishing you all the joys of November!

FREEBIE SENTIMENT

I have made a simple freebie digital sentiment in two formats for my followers. NOT for commercial use, please. Use it on any of your projects, including projects involving any design teams you might be on.
Click on the image to bring it to full size, then right click and do a SAVE.

Enjoy!


Products:
  • TPS The Paper Shelter "Holy Night" digital set, including background
  • Other: White Cardstock, Chocolate Brown Cardstock, Clear and Gold Wink of Stella, Tea Dye Distress Ink, Pale Gold Embossing Powder


Challenges I'd like to play in please:

  1. The Holly and Ivy Christmas Challenge #59 AG Christmas 11/9 (sep post)
  2. Crafty Catz Challenge #481 AG-Snow 11/8 
  3. A Bit More Time To Craft #103 AG (sep post) 11-16
  4. Merry Little Christmas Challenge #16 AG Christmas 12/1 (sep post 12/5)
  5. Animal Friends Challenge #80 (Nov) Reindeer 12/1
  6. Pearly Sparkles Challenge #46 Christmas 12/1


Critter Hugs,


Thursday, July 06, 2017

Butterfly Challenge {Fred She Said} {Cardz 4 Galz}


Welcome, friends and visitors! It's great to see you this morning, and I hope you are doing well.


Time for a new challenge at Cardz 4 Galz Challenges today!

Badges are awarded for the Spotlight Winner and Top Picks.
Challenge #51 is chosen by teamie Babs -and the theme is:

  BUTTERFLIES  

Show us your projects using any technique and medium!
All paper-crafting projects are welcome.
Challenge ends on July 19.


My cards today feature Fred She Said's fabulous new Butterfly and Background sets.
The colors are so brilliantly happy, that I chose the artist's amazing precolored images, and simply could not limit myself to one card - but tried using the same images in different ways, with the same color schemes. Not too much glitter, though, so that the artist's pretty coloring shows through.

Buy Now

Each card is a 5"x7" design. The sentiments are also available at the FSS store (Fred She Said "Butterfly Dreams" Sentiment Set).

While the same color butterfly is used on each card, 
the backgrounds are an assortment from the many being offered at Fred She Said's collection.

First, an oval with blue and green, using one of the pretty watercolor backgrounds:


Next, a pretty blue garden with a less detailed background. The backgrounds are also available preformatted in an oval and look fantastic cut in an A2 rectangle shape:


I added a touch of orange to the pretty precolored images. this sentiment comes in solid black as well as blue highlights. The butterfly also is available in a magical rainbow color scheme!


A simple green card with some gems. flowers have been added to the background. The flowers are available in a number of colors, and can be used with or without the backgrounds! (click on the image below for a better view):


And LASTLY, a fun pocket card - using glossy card stock on the pocket.
A belly band accompanies pocket card "just because":


Click on the image below for the dimensions to make a pocket 5" x 7":


Tag is inside, and the belly band adorns the outside:


Back side of the tag:


Front side of the tag uses the pretty very detailed distressed watercolor sketch background with added flowers. The butterfly, bottom left leafy twig, and the right flower are all popped up for dimension::


Don't forget to upload your Butterfly Creations to the
Cardz 4 Galz Challenge.


Products Used:

ON A PERSONAL NOTE:

The weeds are abundant during our hot and steamy summer weather in Florida - mulching helps, but certain tiny seeds have a way of making big plants everywhere!

I suppose it is like that in our lives, too. We try to keep unwanted "weeds" from taking root, but they are always finding new ways to sneak in.
On the plus side, that gives us lots of opportunities for personal growth, right?
Your encouragment helps me pull those "weeds" out and plant beautiful "flowers".
Hopefully, I do the same for you (smile).

Our pool area, with caladiums (they are our summer color in the humid heat).
Jack's barn and workshop is in the background:


Part of the old cow corral (we have retired from the cow business LOL). All the cross fencing is gone, too:


The hummingbirds, butterflies, and all sorts of bees and wasps cherish the blooms from the lowly coleus - again, one of the few colorful plants that grow in the humid heat. In the background is our front yard, front pasture. To the far left is our driveway:


The front grew crazily with the colorful caladiums and coleus. A few volunteer pentas and periwinkles help feed the hummers, but it quickly became an overgrown jungle:


Challenges I'd like to Support:


  • Crafty Card Makers #192 Tic Tac Toe (SHOWN BELOW) 7/16 (diagonally gems-digital stamps-die cuts) 


hugs,


Tuesday, January 31, 2017

Beautiful Pansies - Sparkle N Sprinkle February Reveal

Hello, marvelous blogging buddies! I hope 2017 has been good to you.
Thank you for joining me today!

Welcome to the ALL NEW Sparkle N Sprinkle
 February Reveal Blog Hop!


NEW STORE - NEW BLOG - NEW PRODUCT LINES!


We have another HUGE reveal for you this month, plus something new!
The new sets are 20% off until February 3, 2017, so after the blog hop, hop on over to the NEW STORE and have fun shopping - be sure to check out the OTHER amazing new products as well! With names like TONIC and STAMPENDOUS and HOUSE MOUSE, you're sure to fill that cart up quickly!

SNS also has a brand new blog, which can be found here!

On February 3, ONE GRAND PRIZE WINNER will be selected from the comments left on all the Designers' blogs listed below. Please leave a comment with each designer to be eligible for the Grand Prize. It's always a mystery which designer has the winning comment! The Grand Prize Winner will be announced on the SNS Facebook page and the SNS New Blog.

 There are SEVEN new fantastically-eclectic rubber stamp sets being released this month, 

a Digi Only Bundle set full of extras, including the papers! 

Also, when you purchase the digi versions of any of the SNS rubber sets, you are getting lots of extras that aren't available otherwise.  These extras include a cut file set to work with the rubber or digi image, may include additional images or sentiments not available with the rubber version, and occasionally digi papers! (NOTE: Cut files work with electronic cutting machines).

You're definitely going to want both the rubber versions as well as the digi versions of all our new releases.


IT IS ALL ABOUT FUN AS YOU HAVE NEVER ENJOYED IT!
It's Demo Donna on the SNS YouTube Channel!

Subscribe today to REVEL IN all the latest Demo Donna tips and techniques! But even more - PREPARE TO BE ENTERTAINED!  Each week a new technique is shared, and each month, a new video kit is revealed!


The supporting cast of stamp sets:


  *815 Leafy Flower Spring Wreath  
            Leafy Flower Spring Wreath digi version DIGI815B
  *826 Pansies (set one) 
           Pansies mini digi set DIGI826833FS
           Pansies fabulous digi bundle version including papers DIGI826-833FS
  *832 Girlfriend Support Set 1 
           Girlfriend Support Set 1 digi version DIGI832
  *833 Pansies in Teacup (set two)
           Pansies mini digi set DIGI826833FS
           Pansies fabulous digi bundle version including papers DIGI826-833FS
  *835 Sitting Pretty Kitty  
           Sitting Pretty Kitty digi version DIGI835LS)
  *836 Luck of the Irish Enchantress - St. Patrick's Day
           Luck of the Irish Enchantress digi version DIGI836LS
 * 837 Rory's Lucky Clover - St. Patrick's Day 
           Rory's Lucky Clover digi version DIGI837LS)
  * Eleven Watercolor Papers - Purple Pink (to coordinate with the pansies) DIGI4003FS 

My Terrifically Talented Teamies in blog hop order:

Chris
Diane
Shona
Belinda
Anne
Donna (you're here)
Eret
Jess

(*Tip: if you have difficulty with a particular link, try clicking on the Designer's blog title to send you to their Home page.)


I am featuring the incredible new Pansies Digital Bundle, including decoupage sheets, black and white images, colored images, 4 lovely sentiments, cut file set, PNG and JPG images, and 11 beautifully coordinated digi papers! It's a great value, especially if purchased at 20% off!

During a recent "girly" luncheon, artist Tracey-Lynn Miller provided these beautiful pansies which are featured on a gift bag, make-and-take cards, name place cards, and napkin rings! The guests loved these, and took them home to enjoy.

First -- easy, beautiful NAME PLACE CARDS:


Arrange four of the PRECOLORED teacup images on an inexpensive white piece of card stock. I used the JPG color versions because these do not have transparent backgrounds. They have a lovely, soft, water color effect around the teacup. Type the names prior to printing, or die cut teacups and then hand print/write the guests' names:


Next:

Next -- NAPKIN RINGS

(boo boo time!)


Arrange several of the PNG colored pansies on inexpensive card stock, leaving enough room for an electronic cutter or for your own dear hand fussy cutting (shown at left).


Use coordinating colored cardstock, or print your own from this set - or even make your own coordinating designer paper (shown further below in this post). Cut it into strips, and "double wrap" the circles to give them a little more strength to hold the napkin in place (see photo below).

Place the cut out elements as desired. NOTE: I wasn't thinking correctly, and placed the 3 pansy heads in perfect spacing on the ring, however, I forgot to turn them "sideways" so that they would be facing each guest vertically, instead of horizontally (sideways). So keep that in mind when creating your napkin rings, or any other similar projects.

I also used some punched leaves for visual interest. As much as I wanted to add glitter, I thought the colors were pretty enough without it, and maybe glitter on the dining room table was not such a good idea (giggle).

This photo shows both the inside of the rings, as well as other angles:


Creating beautiful, easy cards, using traditional methods with digital images:

Recipe is for 12 cards:
  • 1 white card stock for printing out all the digital sentiments, spaced apart for the die cut.
  • 3 white card stock for printing interior sentiment
  • 2 white card stocks for the precolored digital pansies in teacup image, spaced apart for the round die cut.
  • 3 green card stock for layers, run through the embossing folder, and distressed with ink.
  • 3 pink card stock for layers.
  • 6 artichoke green papers for the folded card base.

This is an example of using digital products in a traditional method:


The pretty sentiment is die cut from two directions,
so half the cards are a little different from the first half.
(Don't ask me where that line came in on the photo below - it's not in my Photos anywhere else except on the blog LOL)


I used 1/4" Tear-ific Tape to adhere the panels.

There are now 8 great sizes of Tear-ific Double Sided Tape to accommodate a number of Crafting Mediums and papers.


Making the GIFT BAG

Making your own designer papers is easy if you have the right tools and images.

In this case, the green splattered digi paper was selected. Place it on any word processing document.

Then I randomly placed the leafy pansy heads on top of the green paper, tilting them so they are at various angles. I did the same with the various leaves, and plain pansy heads. There are two sizes of the plain pansy heads on the paper.

Print out 3 sheets of the paper and assemble the bag. Before adhering the front and back panels, I added the white cardstock which was punched with a border punch.

Next, lace and pom poms were added with a larger leaf vine and another leafy pansy head.

I will make a lot more of these papers! It was fun!

Here are some better instructions, and other samples:


Quick Sample Ideas for creating fully digital projects:


The REALLY GREAT THING about Digital Papers:

  1. You can print them out AS THEY ARE NEEDED, so that there is no stock piling of papers in a craft room.
  2. Using your word processor, (or a more sophisticated app), you may customize them using any properly-created PNG images.
  3. They can be sized to your specific requirement.
  4. For EASY FINDING, save them by name on your hard drive OR on "secret" Pinterest Boards so only you can see them (we discourage digital piracy). A simple scroll through the board locates the grouping you want.
  5. Or use your PHOTOS app on any computer, or mobile device.
  6. Create a book of samples and file according to your needs.
  7. Create traditional projects with lots of paper layers, or a completely digital project with lots of digital layers for lower postage rates.

Sparkle N Sprinkle Products:


Other Products:

  • MS Vintage Floral Punch
  • Memory Box Pinpoint Scallop Circles
  • SB Classic Circles
  • Sizzix Sizzlet leafy branch
  • SW Pierced Flags
  • Deco Art Glamour Dust Paint (Ice Crystal)
  • CB Swiss Dot EF


On a Personal Note:

Our Tulip Tree, azaleas and camellias are blooming!
(tulip trees are actually a part of the Magnolia family)
They bloom before leaves are present. 
Ours is only about 20 feet (6.1 meters) tall.
The blooms are a bit larger than my open hand.

Challenges I'd like to play in:
  1. Come and Get it Challenges (Jan 27) 3 or More Layers 2/5 (my card has 5 layers plus the base card, the napkin rings have 5 layers of cuts
  2. Classic Design Team Open Challenge Blog #11 Anything for a DT goes 3/1
  3. Crafting from the Heart #145 Anything Goes 2/5
  4. World Wide Open Design Team Challenge #18 Anything for a DT goes 2/15
Thanks for visiting today!
Stamping Hugs,