My blog is called "Creative Smiles" because my designs are the result of incorporating mistakes. With fumble fingers that drop whatever they are holding - repeatedly, it takes a lot of giggles, smiles and creative patience during my crafting process. xx

Showing posts with label Dies R Us. Show all posts

Thursday, September 15, 2016

Tis the Season!

Waving a hearty welcome to you, lovely crafting friends!

Hoping you and your special loved ones are doing well.
Alas, this is my final post for the DRU team - I'm sad to leave my very talented teamies,
but... 

looking forward to sharing wonderful news with you next month!
(It is always difficult to sit on a secret for several months, don'tcha think?)


Let's do a little Christmas Dies R Us Inspiration today!

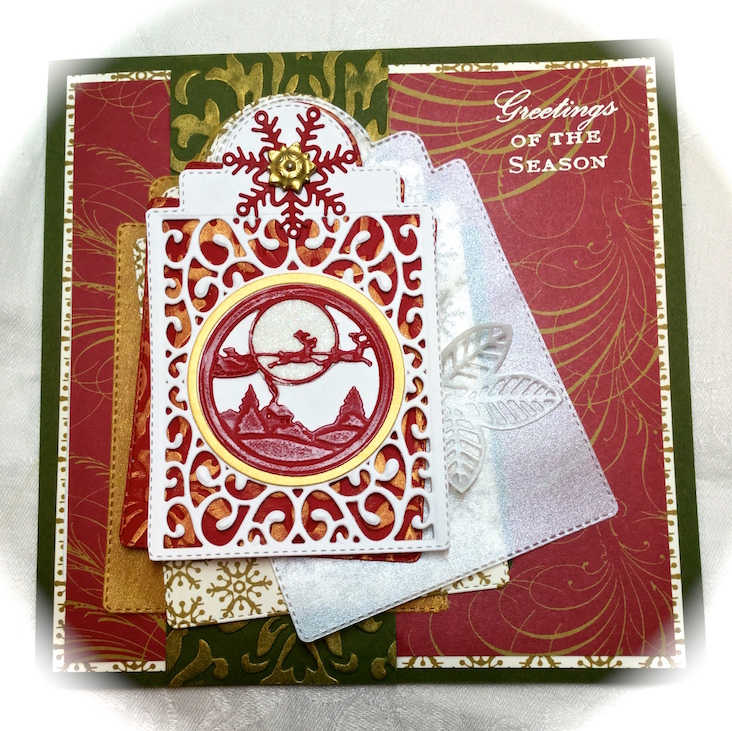
Several layers of the same die cut can achieve texture, richness and color.
Here's what I did:
click below for:
STORE
The following Dies R Us Products were used:

Die Versions "Snow Flurries" DWP-004 (I love these snowflakes!)

The glittery full moon has a piece of sticker paper behind (hand cut after adhering it).
The glitter is sparkly in person, but on camera, Velvet (Microfine) glitter is more like a velvety with only a little glitter showing.

TIP:

The larger the glitter grain size, the more area for the light to reflect the sparkle.
The smaller the glitter, the more "movement" of the card is needed to show the glitter.
In this instance, I wanted the reindeer details to show up clearly, and not be covered up with the sparkly glitter to which we are all accustomed. SO--
I HAVE  LEARNED--
The larger the glitter grain, the more likely to get a blurry photo, or have part of the card elements/details covered up by the grains.
Hence, SNS Cloud Nine Velvet Microfine glitter was my choice:


The square card sports a timeless white embossed Anna Griffin sentiment:

Tip:

To grace your projects with unexpected elegance and use the "left-overs" in your stash:

1. Use opulent scraps of paper in the layers.
2. Wet emboss sentiments, background panels, or layer edges.
3. Find that odd, left-over brad, eyelet (remember those?) or other metal embellishment. Heat it up, dip it into your embossing powder, and make it new for your current project:

Love the detailed stitching on the Poppy Stamps Main Street Stitched Tags:


The Pearly Vellum in gold and white lends an unexpected elegance!
Wishing the photos showed it better (sigh):


Tip:

Use tones of the same color that work well together, without clashing.
In this case, it was all about the golds:
  • The heavier pearlescent circular frame is beautifully crisp - it was made by using the round die that came with the Sue Wilson Mini Christmas Scene Background set, and a Spellbinders Classic Circle that was just a tad larger.
  • The intricate brad has been heated and dipped into Detail Gold embossing powder.
  • Non-metallic, true-gold-hue printed in the pretty in the Anna Griffin papers sets the stage for the other golds, not taking away from their textures.
  • The Gold Galaxy Brilliance Ink accentuates the dry embossed green panel, and red tag under the white.
NOTE: to answer Becky's comment question below - the EP will usually not completely melt into the container. The brad gets very hot, so use tweezers, of course. When you dip it, the EP will not completely melt. It mostly sticks to the brad head like glitter on glue. Seldom does it actually melt all the way. Most of the time, I have to use the heat tool on it again to finish the melting process. I hope that helps explain it a little better!


Hope you enjoyed today's ideas. 
If you did not notice, I have a little gift offering for my followers.
Just click on the link under the "tabs" of my blog photo for details.


Products:
My card is supporting the following challenges:

  1. A Snowflake's Promise #28 "Anything Christmas Goes" 9/21
  2. Christmas Card Challenges #40 "Anything Christmas" (hanging head in shame that I did not use the optional challenge). 9/18
  3. Christmas at Sweet Stampin' Challenges  (Sept 14) Christmas Dies 10/15
  4. Classic Design Team Open Challenge #6 (Sept) Anything from a DT 10/1
  5. Crafty Gals Corner Challenges #89 - Freestyle! 9/21
  6. Crafty Hazelnut's Christmas Extra (Sept) Anything christmas 10/1
  7. Crafty Hazelnut's Patterned Paper (Sept) Anything with PP (my background) 10/1
  8. Merry Monday Christmas Challenge #213 Inspiration Board - I was inspired by the red and white color combination, the snowflakes, the opulent setting, the magical decor for the meal) 9/19 (sep post)
  9. Paper Creators Crafts Challenges #51 Christmas 10/1
  10. ScrapyLand #49 Anything Goes with dies 9/19
  11. The Twelve Months of Christmas Link Up #21 Anything Goes with Optional Theme Nature of Christmas - I'm not sure if the icy white leaves count as flora or not LOL 10/1 (sep post later)
  12. World Wide Open Design Team Challenge Blog #14 (Sept 15th-Oct 15th) Anything from a DT
happy hugs,


Thursday, September 08, 2016

Autumn Butterflies

Welcome, sweet crafting friends!
So glad you could make it for a little Dies R Us Inspiration today!

Those of us in hot, steamy Florida are longing for Autumn weather.
Autumn in Florida means decreased temperatures and BLESSEDLY decreased humidity!
That won't happen until the end of October. (wry laughing)
So in the meantime, I will 

Dream of Autumn on Butterfly Wings!

Hoping you will enjoy a few hidden tricks I've shared below...


click below for:
STORE
The following Dies R Us Products are being used:

Memory Box Delia Butterfly #98353
Memory Box Finn Butterfly #98351
Spellbinders Classic Scallop Rectangles lg
Cheery Lynn Tropical Flourish B127

Both cards are "U.S. Business Size" cards.
The first card uses Memory Box Delia Butterfly #98353 and Finn Butterfly #98351.


How to make your butterfly "self-fluffing".


Finished Butterfly on card (it automatically "fluffs" itself up):


Inside of the cards:

This idea would be beautifully done using any dies!


Tip: 

Use unheated embossing powder. 
The Sparkle N Sprinkle Brown Fizz has a blend of brown tones and a dash of autumn colored glitter in it. It is heat set on the filagree portion of the butterfly. 

However...

Because I don't care for the reflection of the double-stick adhesive behind the rhinestones, I sprinkled the same EP atop the rhinestone stickers. The EP around the rhinestones is not heat set. It affords a matching shadow for cohesiveness with rest of the card, and it gets rid of that pesky "shine" from the clear adhesive. Depending which EP you elect to use, the effect will change the appearance of your card! Here is a close up:


My designer paper is old, old, OLD. My mother-in-law and I purchased it back in 2003 at a quaint little stamp store in South Tampa. Being a butterfly enthusiast, she would love the cards!

Fun second card using the Cheery Lynn Large Lace Faerie Queen DL160 die set. It is a 2-piece set (the white background is cut with the 2nd, solid die). Beautifully frilly and delicate!


I die cut the golden pearlescent vellum first, then the brown layer. The brown layer is thick cardstock because I only wanted the tops of the wings to cut out. The rest is "embossed" or taped back into place (see view below) in order to show off the beautiful filagree of the gold vellum layer:


The Cheery Lynn Tropical Flourish B127 is coated with beautiful SNS Florida Beach glitter!


Hope you enjoyed today's ideas.

QUESTION PLEASE!

What is your favorite brand of White Pigment ink?
When embossing with white detail EP, I prefer using white pigment ink to VersaMark.
I used SU white on one card, and VersaMark on the other card. There is a big difference.
But I'm disappointed that my seldom-used SU pad is so concave! It is difficult to get a clean inking with it. So am in the market for another. What do you use?
Thanks for your input!

Products Used:


Playing in the Following Challenges please:
  1. 613 Avenue Create #189 Anything Goes with Optional Twist -  Colors of Fall (check weekly, 10/2)
  2. Craft Your Passion Challenges #328 Anything Goes 9/12
  3. Die Cut Divas September challenge "Fall Theme" 10/1 (sep post 10/2)
  4. Dragonfly Dreams (Sept 4) Monochrome 10/2
  5. Dragonfly Journeys #73 Social Butterfly 9/11
  6. Dream Valley Challenges #139 Monochrome 9/10
  7. Eclectic Ellapu Purple Challenge (Sept) "New Beginnings" 10/2 (the cards' interiors have a story about creating yourself - it is something new happening all the time - and a butterfly makes itself new) 10/1
  8. Inspiration Destination #102 Anything Goes 9/14
  9. Love to Craft Challenge Blog #2 Anything Goes 10/1
  10. Scrapy Land Challenges (Sept #49) Anything Goes with Dies 9/21(listed above)
  11. Sparkle N Sprinkle Creative Challenges (Sept) Use EP or Loose Glitter) both cards use white EP in the sentiment, One card uses EP in the butterfly body and frill layer, one butterfly flourish uses glitter, the card interiors use glitter on the die cuts) 10/1
  12. The Corrosive Challenge (Sept #9) Anything Goes 10/2
  13. World Wide Open DT Challenge (Sept) 9/15
Stamping hugs, and best wishes for good health to everyone -

Thursday, August 11, 2016

It's all about the "B"s!

Welcome, sweet crafting friends!
Can you see me waving all the way from Florida, USA?
The children in our area returned to school on August 10!

Thanks for stopping by for a little Dies R Us Inspiration today!

Today's post is all about The "B"s!

Birds, Blues, Birthdays, Browns, Blooms, BFFs.
*
This birthday card is for a very special, dear friend!

click below for:
STORE

Let's begin by building a flat, but dimensional birdhouse:


After putting the tape on so the sticky side faces down...


To create flat flowers:


Pretty Pearly Vellum clouds were cut using the Cheery Lynn B320 Clouds and Rain set.


Side view of the center card set - it also folds flat for mailing:


Finally, the back is just as pretty as the front! 


It looks slightly different than the front, but the card could be shown either way!


Hope you enjoyed today's ideas.

On a personal note:

Time for Missy's annual immunizations, so off to the vet we go!

First, she needed to get weighed:


Notice the red basket in the corner, how tightly it hugs the walls:


With the weighing done, the vet left the room briefly.
Normally, I hold her, and reassure her that everything will be ok. But this time, before I could get up...
We heard a funny rustling noise, and I knew Missy was digging a hole:


Jack asked, "Where did she go?"
Missy made herself as small as possible:


As the vet re-entered the room, she looked in all the usual places kitties hide. 
We finally pointed out where she was. It was a first for the vet!


Products used:

Challenges I'd like to support:

  1. Artistic Inspirations Challenges #162 Anything goes 8/13
  2. Craft Your Passion #324 Anything Goes 8/13
  3. Crafting By Designs (Aug3) Anything Goes 8/26
  4. Crafty Sentiments Designs Challenges (Aug 9) "Use Dies" 8/17
  5. Inspiration Destination Challenges #98 Anything Goes 8/17
  6. The Paper Shelter  #259 "Punches and Dies" 8/17


Thank you for visiting me today!
hugs,

Thursday, August 04, 2016

Pretty in Pink

Hello, sweet blogging friends!
I have missed you all very much, and hope to resume leaving more comments soon!

Today I'm sharing a little Dies R Us Inspiration,
featuring the same die to create two different style cards!


click below for:
STORE
The following Dies R Us Products are being used:

Taylored Expressions Banner Stackets #1
Spellbinders Labels Five, Labels Four

Some tips for the square card:

TIP: embossing folders with the same design as the die cuts can be used together to create interesting background, such as the flourishes shown in the first card:


TIP:

I tried a tip that many bloggers have shared - and what a difference! Several blogging friends have suggested wetting the die cuts and papers before trying to shape them. That's what I did with these flowers! Not only is it much easier (and lots of fun), but when the shape dries, it is somewhat hardened into that contour. I'm sorry it took so long to experiment with this technique, because it really does work! The flowers were inked first, and then spritzed with water and shaped. After drying, they retained their shape beautifully!


For a shaped card, choose a shape that will accommodate the pretty flourish of the die:


Not wanting Black for the sentiment, but desiring something bright and dark, I combined Crimson Red VersaFine ink with a semi-transparent Cosmic embossing powder from Sparkle N Sprinkle. The resulting color came out just right, and is bold and creamy in texture. I used it on both cards:


Check out this find from my Mom-and-Great-Aunt-Agnes stash! Do you see the price on it? Too cute!  The pink was a little pale, so I gently inked it with Wild Plum distress ink:


Thanks for visiting today!


Products Used:

  • Taylored Expressions Banner Stackets #1
  • Tutti Designs Poppy Edge
  • Die'sire Embossalicious Regency Swirls embossing folder
  • Spellbinders Labels Five, Labels Four
  • Cuttlebug Swiss Dot embossing folder
  • Craftwell Delicate Dots embossing folder
  • WRM Next Level Dots embossing folder (large hearts)
  • Life Style Quickutz Hearts
  • Sentiment: Hero Arts "You Sparkle" stamp set, American Art Stamp KC6015B
  • Sparkle N Sprinkle: Dandy Dandelion Sparkly embossing powder (on brads for flower centers), Strawberry Sherbet Cosmic embossing powder (for sentiment)
  • Ink: Pink Sherbet Distress, Wild Plum Distress, Crimson Red VersaFine


Challenges I'd like to support:
  1. Cards 4 Galz - #28 Monochrome 8/18
  2. Sisters of Craft August Challenge "Anything Goes" 9/1
  3. Through the Purple Haze #105 Monochrome 8/10
  4. Tinker Dream Bastel-Dream #43 Anything Goes 8/15
  5. World Wide Open Design Team Challenge #12  "Anything Goes" 8/15

Stamping Hugs,