My blog is called "Creative Smiles" because my designs are the result of incorporating mistakes. With fumble fingers that drop whatever they are holding - repeatedly, it takes a lot of giggles, smiles and creative patience during my crafting process. xx

Showing posts with label Fairy. Show all posts

Thursday, October 15, 2020

Turner Syndrome Awareness Set

 Hello, my friends! Hope this finds you well. 

HAVE YOU NOTICED?! 

Google re-instated the ability to click on photos and drag them into your draft post! YIPPEE! So much easier!


Artist Jan Mahew has created a sweet digital release for the 2021 Turner Syndrome Awareness blog hop and challenge, supporting Lori's goal of reaching out to women and girls globally. 

This darling set features 22 versatile images and sentiments for a mere $3.00

One Hundred Percent of the moneys goes to Lori's TSA chapter.


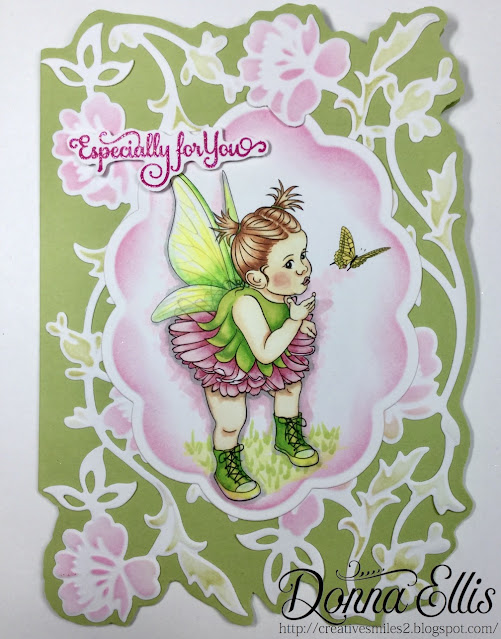
Such sweetness with this little cherub of a fairy blowing magical wishes of encouragement, I couldn't help but use the gorgeously precolored image done by Jan herself, and just add a few more coloring details.


First,  I flipped the image and created a scene by adding the "butterfly wishes" surrounding the fairy. With a Copic Multi Liner, the butterfly bodies were enhanced.  I colored her wings  to match those cute hi-top sneakers. A Sue Wilson die from her Frames & Tags Collection (Daisy Circles CED4238) was cut in half and placed behind the scalloped circle. Then it was framed with SB Decorative Labels Eight die set.

The card is 4.5" x 6"


Happiness is a green and pink creation. The Card is 5" x 7" with the Anna Griffin Flower Bramble background die. I dry embossed it and colored the die cut while it was still in the die itself. 


Her wings were also colored to match those cute hi-tops. The card was cut to the shape of the Flower Bramble background.


f

Products: Dies: SB Grand Scalloped Ovals, Anna Griffin Flower Bramble, SB Decorative Labels Eight, SB Scallop Circles, SW Daisy Circle set - Images Jan's Digi's Turner Foundation Awareness Fairy. Other coloring done with Copic Markers, Distress Inks and colored pencils with gamsol.

Challenges I'd like to support:

  1. A Bit More Time to Craft #126 Anything Goes 11/1
  2. QKR Stampede Challenge #406 Anything Goes 11/1
  3. Pammie's Inky Pinkies #2041 Anything Goes 10/19
  4. Incy Wincy Designs (10/5-17) Anything Magical Fairytales 10/19
  5. Path of Positivity #84 (10/5 - 11/1) Anything Positive Opt GIRL POWER 11/1
  6. All Fun Challenges #17 Anything Goes 10/24

ON A PERSONAL NOTE:

In the beginning of the Covid Misadventure, Jacky decided to 1) build a green house 2) raise traditionally grown veggies in "growth bags", 3) grow others hydroponically in a vertical manner. I will publish these endeavors in a tab in the future.

Unfortunately, I have experienced a faster progression of the Fascia issues, and the disease is now fully attacking my organs. So while I am passionate about gardening of any kind, I'm limited in what I can enjoy. so it's fun seeing photos from my blogging friends.

We also began raising Milkweed for Monarchs, and learned quickly a completely different type of "eco-system" develops from that adventure. It was fun!

These imposters, I believe, are called QUEEN BUTTERFLIES. Hundreds of Oleander Aphids attach themselves to the new growth, but they don't spread to other plants. The caterpillars munch down the new growth so quickly, that the aphids cannot live very long:


So I am constantly pruning the stalks down to 2 or 3 inches high, and the plants replenish their leaves to a height of about 3-4 feet in just a few weeks. These 2 photos were taken on overcast days. Below is a bush with two visible Queen Butterflies (as opposed to Monarchs) and two visible Queen Caterpillars. Did you know there were "imposter monarchs"?:


Wishing you all the best,


Thursday, March 26, 2020

Lavinia World 23 - Help Finding Home?

Finding A Safe Place?
Wishing you all the very best as we experience an unusual Life Event globally.
My heart is with each one of you.
In the meantime...


It is time for a new
Lavinia World Challenge!


Play in our Anything Lavinia Facebook Challenge
and/or our Anything Goes Challenge Blog

Today's story 

Three Woodland Mice are scared and worried about getting home - to their Safe Place. Eden Fairy explains that Home is not a specific place but wherever they are, no matter what the circumstances, no matter what the hardships, as long as Love is in their hearts. If they will cherish their own dear lives and cherish the lives of their families and friends, they can find themselves SAFELY home.
And so, the mice carefully cross over the River of Misfortune, facing their fear head-on, learning that they are INDEED resilient in the face of adversity.

My cards today depict a night-time excursion, so they are darker than user. The Lavender Water Mist Paper was inked up and altered. I felt like experimenting, and learned a lot in the process.


The first card has a stenciled backdrop, using Distress Inks and Versafine Clair ink:


Then another stencil was placed on the blue stencil, and swiped with Nuvo Mousse:


I learned that the Mousse is impervious to any ink, and acts as a resist.


Maybe I should have tried VersaMark and embossing powder when stamping the fairy? As it happened, I had to restamp the fairy, and heat set her wings with glittery black embossing powder, and FUSSY CUT her! giggle


The periwinkle colored scene uses the 
Vine image inked with French Blue chalk ink. It was stamped randomly all over the background, and then coated with a white pearlescent mica powder:


These were full of product lessons (for me) and I look forward to playing a little more knowledgeably next time!


Come join the challenge for a chance to win the $15 store credit!


Products:
Challenges I would like to play in pretty-please:


hugs,

Thursday, March 12, 2020

Lavinia World #22 - A Hare-Raising Conversation

QUESTION: 
are the fonts on my blog large enough for your tablets and computers?


Hello, Blogging Friends!
Today I'm sharing two "hare-raising" cards.
Hope they don't scare you away!
(giggle)


It is time for a new
Lavinia World Challenge!


Play in our Anything Lavinia Facebook Challenge
and/or our Anything Goes Challenge Blog

Today's story 

Spellbound Fairy is having a "hare-raising" conversation with Whimsical Hare. Whimsical Hare does not want to leave her rabbit-hole home today because she is having a BAD HARE DAY. She had been cleaning house all day yesterday, getting ready for company, and now, she complained, she looks like a DUST BUNNY!

Ok - I'm stopping with the story silliness - laughing.

Both cards use identical die cuts and colors. First Spellbound Fairy and Whimsical Hare were stamped with Fantasia Purple VersaFine Clair. The fairy wings were heat set with a purple embossing powder that has clear and lavender glitter in it.

I like to make sure that my stamp images will fit inside the die cut shapes:


Make sure that all the colors will work:


The Out-of-the-Box die cutting technique was used here to accommodate her wings. Split Coast Stampers has a free pictorial tutorial and a free YouTube tutorial for the technique:


My uncoordinated fingers don't "free-lance" very well. To make a double-sided banner, I flipped my die:


I'm proud of my poor ole faithful die cut plate. That plate is well over 10 years old, and is still perfectly flat and works superbly. Probably only twice a year it gets a good scrubbing to become almost white again.


Why I take multiple photos - I cannot capture the details on a single photo. Notice how different the two fairies' wings look even though they were created exactly the same. It's that little bit of difference in the lighting. You can really see the difference if you click on the photo to enlarge it:


after the main images were inked, I distressed the backgrounds while the dies were still in place. Then applied a stencil, and inked some more.


For the two background shapes, I used the "inlay" technique. The blue halo around the fairy and hare were done with 
Caran d'Ache Luminance 6901 Color Pencils and Gamsol.


After stenciling, the ground and circle were masked and inked more:

The glitter in the circle is adhered with a Quickie glue pen and loose periwinkle colored glitter:


Thanks for stopping by today!


Lavinia World Products:


Products Used:

  1. Stamps: Lavinia World Stars Mini LAV152, Toadstool Mini LAV216, Slender Mushrooms Mini LAV151, Forest Mushroom LAV565, Spellbound Fairy LAV434, Whimsical Hares LAV482, Fairy Dust is like Love LAV024
  2. Inks: Fantasia Purple VersaFine Clair, Distress Oxide in Worn Lipstick, Distress Inks in Spun Sugar, Chipped Sapphire, Wilted Violet
  3. Caran d'Ache Luminance 6901 Color Pencils and Gamsol
  4. Uniball Pen in White
  5. Dies: Taylored Expressions Banner Stacklets 1, SB Grand Labels One, SB Grand Big Scallop Circle, 
  6. Glitter: Periwinkle Purple
  7. Embossing Powder: Purple with lavender, purple and clear glitter in it.


Challenges I would like to support:


Fairy Magic being sent your way,

Thursday, February 27, 2020

Lavinia World #21 - It's a Beautiful Day!

Greetings, blogging friends!
As soon as I saw blogging friend Donna Thielker's THTSB creation, I knew I wanted to get my Oxides out and finally experiment. There is a bit of a learning curve with them (in my opinion), but here is my first attempt. Donna, thank you for inspiring me!


It is time for a new
Lavinia World Challenge!

Details of our Lavinia World ChallengeWinner receives
a $15 gift certificate to the Lavinia World store. Submissions can be placed either on our Lavinia World Challenge blog which has an ANYTHING GOES theme using ANY brand clear or rubber stamp - no digitals. Or you may play in our friendly Facebook Group called Anything Lavinia if using ANY Lavinia Product in your creationEither way, we enjoy seeing your artwork!

Today's fairy story 


Today's Make-A-Wish Fairy reminds us that we need to occasionally take ourselves "away", allowing our dreams to bloom from deep in our hearts, and shed seeds along our Life's journey, to come to life in their own way. But first, we have to begin a quiet odyssey allowing those beginnings to come to Light.

Have you ever noticed how many of our dreams have "come true" but not in the ways we had originally anticipated?

Onward... to my little card...
I used Distress Ink foam applicators to apply my inks, which was part of my "learning curve". Next time, I'll use my brushes (which I had forgotten about LOL). After inking my 5x7 panel, I spritzed with water and added kosher salt crystals to make a little texture:


After this dried, the salt was brushed off, and a Heidi Swap stencil was lightly inked with Distress Ink in Pumice Stone. The Sparkle sentiment was also inked with Pumice Stone and added to the background. All the images were inked with VersaFine Clair Rain Forest Green and heat set with clear embossing powder.


Wink of Stella Clear and Uni-Ball Pen Signo Gel White were both used, first on the fairy's wings and then on the other stamped elements. Diamond Dust (textured glitter) was also added:


Here's a final look at the card on an angle to capture it without the glitter and shine. After trimming the original white panel, the card size is 4.25" x 6.5":


Thanks for visiting today!
My Lavinia World Products:


Products Used:

Challenges I'd like to play in please:
  1. My Time to Craft #426 No Digi's Allowed this week 3/7
  2. Creative Moments #185 AG + "for the girls" 3/5
  3. World Wide Open DT Challenge #2 AG DT 3/15
  4. *New* Classic Crafty FB Challenge (Feb)  AG 3/1
  5. Creative Knockouts Challenge #339 Die Cuts and Punches (IO Small Grass 178C, MS Geometric Frames Punch) 3/5
Stamping Hugs to you, my dear blogging friends...


Thursday, February 13, 2020

It's a Beautiful Day to Embrace Love - Lavinia World #20

Welcome, friends, to my humble blog.
It is my sincerest hope that you are each doing well, and that your families are enjoying good health.

Today's post includes a project "outside" my normal creative-style box, using new-to-me techniques, so I'm going to point out my boo-boo that I did not fix. Maybe you will learn from me, so you won't do the silly thing I did.


It is time for a new
Lavinia World Challenge!

Details of our Lavinia World ChallengeWinner receives
a $15 gift certificate to the Lavinia World store. Submissions can be placed either on our Lavinia World Challenge blog which has an ANYTHING GOES theme using ANY brand clear or rubber stamp - no digitals. Or you may play in our friendly Facebook Group called Anything Lavinia if using ANY Lavinia Product in your creationEither way, we enjoy seeing your artwork!

Today's story 


It's time for all creation to re-awaken to Love's own song! 
Trinity Fairy says we are to bring the Color of Caring to all the inhabitants of our precious planet!

I started by die cutting my own masks. To do this I used NON-HEATABLE-NON-EMBOSSABLE acetate sheets. These are much easier to die cut than the more durable acetate. The detailed stencil on the right is from my stash.


Sorry, I did not take photos.

My boo-boo's.

  1. Next, I applied the circle mask to my 6.75" x 4.75" white panel and put the stencil on top, distressing here and there with Antique Linen ink, and a bit more with Scattered Straw ink.
  2. Using Fairy Spells stamp, I randomly stamped with Walnut ink. HINT: Next time, I will leave more open space by stamping the background fewer times.
  3. With Walnut ink and a finger dauber, I pulled color from the center off the round mask outward. HINT: Next time, I will make the color more intense and pull it out slightly more, for more drama.
  4. Using another finger dauber and Spun Sugar Pink ink, I brought out more color from the center of the mask, in a starburst fashion, so some areas extend further out than other areas. HINT: Next time, I will make a greater fluctuation of the colored areas.
  5. After Removing the round stencil/mask, I applied the negative stencil/mask on top. Line up the circle. I placed another mask on top of that open circle. With Spun Sugar ink, I created detail on the magical "moon" and pulled Scattered Straw color INWARD toward the center of the circle.
  6. Finally I stamped the fairy with Pinecone Versafine Clair ink. Immediately, I realized my mistake. Do you see it?


I SHOULD HAVE:

Probably many of you know better than I - because my Logic works "backwards" when it comes to figuring things out. But it seems to me that once I figured out where I wanted the moon, I should have stamped the fairy FIRST, THEN applied the moon mask and carefully pulled colors around the fairy, so the moon would not show through her hair. Our should I have simply colored her white hair a darker color than the moon? What is the correct answer for remedying this design error? Thanks for your feedback.

Close up of the boo-boo:


With Pinecone Versafine Clair ink, I stamped the sentiment on vellum, and heat set with clear embossing powder. The sentiment is already distressed around the letters. Also, please notice the little stars floating to the heavens from her horn, reaching out to the universe for anyone who will listen to the Call:


The dragonfly brad was made hot with my heat tool and then dipped into a bottle of EP to change the color from hot yellow to bronze. I especially like embossing powders that contain mica powder for this technique. A Sakura Quickie Glue Pen added glitter to her wings. The edges of the card are distressed with Golden Meadow Versafine Clair ink and heat set with a champagne colored EP that has lots of light glitter colors in it.


Thanks for stopping by today. I hope you will upload at least one submission to our challenge for an opportunity to win a $15 store credit. AND IF YOU KNOW THE ANSWER TO MY QUESTION ABOVE, will you please let me know either via email or in a comment below? Thanks.


Products Used:

Challenges I would like to support please:

  1. Addicted to Stamps and More #376 Anything Goes 2/19
  2. Wednesday's Creative Inspirations Challenge (Feb 5) Anything Goes 3/4
  3. Unicorn Challenge #51 Anything Goes 2/28
  4. Classic Design Challenge #2 Anything Goes 3/1
  5. Love to Craft Challenge #43 Anything Goes 3/1
  6. Pammie's Inky Pinkies #2006 AG 2/16


Fairy Kisses,


Thursday, January 02, 2020

Lavinia World - Let Your Spirit Take Flight 2020

It's a brand new year, and a brand new decade! I'm looking forward to my new journey in 2020 which involves many changes.
It is my greatest wish that 2020 is promising for you as well,
and that good health and love meet you in your endeavors.


Today's FAIRY STORY:

Appropriate to my New Years Promises,
these scenes reveal the act of letting go of the old ways (of being-ness), and grasping new ways as our spirits take flight!

Wanna come fly with me?


And now you know it is time for a new
Lavinia World Challenge!

Details of our Lavinia World ChallengeWinner receives
a $15 gift certificate to the Lavinia World store. Submissions can be placed either on our Lavinia World Challenge blog which has an ANYTHING GOES theme using ANY brand clear or rubber stamp - no digitals. Or you may play in our friendly Facebook Group called Anything Lavinia if using ANY Lavinia Product in your creationEither way, we enjoy seeing your artwork!

Today's story revolves around Josie Fairy who is setting herself free from old impositions and thoughts.

By The Way - these cards were planned as Clean and Simple - HA! 
Foiled again!

First, we need to create a scene. this involved cutting the sentiment into three pieces. Now it can be used in different ways:


The images were inked up with Medieval Blue VersaFine Clair and heat set with white detail embossing powder. A before and after is shown below where Faded Jeans Oxide was applied to the background stamp using a blending tool to make the edges softer:


Boo-Boo Time!

Not caring for the soft color, I decided to use something darker, and forgot to use with the applicator - so YOU GUESSED IT - it came out with the square edge showing! I learned for the other two cards. Ink the background up, and then use the applicator to soften the edges:


I also wanted the fairies to have more dimension. Using a finger dauber and the same ink colors but with Distress Ink only, the images were highlighted:


It really does make a difference. While it may appear to be too dark, it looks pretty after the backgrounds are stamped:


The sentiment is naturally distressed with "fairy dust" (those are not embossing powder messes - giggle). Because I wanted the details of Josie's wings to show, a Sakura Quickie Glue Pen was used to adhere transparent pink glitter to them. The pen was also used to make dots on the dark leaves of the floral spray with the same pink glitter. The little "spirit" taking flight is also highlighted with pink glitter:

The next card does not have the images highlighted with ink, so there is not the same dimension. This one has a blue frame. My die-cutting errors are covered up with a floral spray - no one can see the mistake:


Her wings were "painted" with glue instead of the glue pen, so the glitter is heavier and masks some of the image detail. Other elements are glittered, too, because who can pass up glitter? More is DEFINITELY more here. While you can see that "rigid" straight line, you likely would not have noticed it had I not mentioned it as a boo-boo in the beginning:


This one is my favorite with those amazing pink leaves and darker halo around the images. The photography is a little funky (dark) but it is a lovely card:


If you are making a card that has a rubber or clear stamp on it, please upload it to the BLOG Challenge site for a great opportunity to win a gift card to the store! The members in our Anything Lavinia Facebook Group are very helpful and supportive, so check it out for more ideas.

Thanks for stopping by!

Products:

Challenges I'd like to support please:

  1. **NEW**Classic DT Open Challenge was hacked so the DT created a new Challenge blog called Classic Design Challenge. With the new blog, the team has decided to make it Open to ALL CRAFTERS, not just design team members (lucky for me since it is one of my favorite challenges, and I am resigning from all but one DT next month). The new Challenge has the same wonderful designers, the same caring recognition of crafters, and same talented inspiration. Please visit them and become their follower so we can return the favor for their hard work.  Challenge #1 Anything Goes 2/1
  2. ScrapyLand #129 AG using SL dies (please see my list of dies above) 1/14
  3. A Bit More Time to Craft #107 Anything Goes 1/15
  4. Dies R Us #136 AG using DRU dies (please see my list of dies above) 1/15
Fairy Hugs,