My blog is called "Creative Smiles" because my designs are the result of incorporating mistakes. With fumble fingers that drop whatever they are holding - repeatedly, it takes a lot of giggles, smiles and creative patience during my crafting process. xx

Wednesday, July 25, 2018

Embossing Folder - Back to Basics and Beyond Challenges

Welcome crafty blogging friends!
Hope this finds you doing well, and playing with your artsy supplies.

It's very hot, humid and wet here. Typical Florida Summer! And quite conducive to indoor meanderings in my craft room.

Hey!
It's time for another
Back to Basics and Beyond Challenge!


It's a challenge blog dedicated to... you guessed it... getting back to the basics.


For the next two weeks, join us by uploading an "Anything-Goes" challenge as long as an embossing folder is used.


I'm showing a modern-take on a vintage tag.


Is that an oxymoronic description?


The tag is for a very special on-line friend, who is always so generous with her cards and love.


It all started with a 5x7 embossing folder and Chrome Silver mirror cardstock (Apologies for the poor lighting):


After dry embossing I decided it would look fantastic to add blue coloring to the debossed areas (yes, I did that backwards, deciding to color AFTER embossing the cardstock - lack of planning on my part). To keep the ink in place on this non-porous surface, Clear Detail Embossing Powder was dredged on top of the dry embossed tag, and heat set:


TIP: this was a great lesson because I learned that the Clear Detail Embossing Powder anchored the ink in place AND kept the shininess, but refracted the light enough to help with taking photos!


The die cut leaves were covered with Brushable Glue and dredged with two monochromatic "blue tone" ultrafine glitters: 

Fascination G1030 (mixture of blues and other hues to bring out some silveriness) 

and

Blue Lightning G1008 (bright bold blue that sparkles gorgeously)


Sentiment is from Pretty Blooms Rubber Stamp Set 873
(also in digital format).


The glue for the glitter dried in the time it took to assemble the ribbon and die cut the sentiment, even on a rainy day.


A slate blue background was punched with an old edge punch and adhered to the tag. Everything else was adhered with 1/2" Tear-ific Double Sided Tape.


Hoping to see your projects at 
Back to Basics and Beyond Challenge!


A few products used:


Products Used:


Challenges I'd like to play in please:

  1. Craft-Dee BowZ (July) AG with handmade bow 8/1
  2. Create and Inspire #76  AG 8/10
  3. Mix it Up Challenge #15 Mix it Up More than one medium (mediums listed above) 8/1 (sep post)
  4. Monochrome Magic #13 AG Monochrome 8/15
  5. Not Just Cards Challenges (Jul 11) "AG" 8/11
  6. That's Crafty Challenge Blog (Jul 4) "Close To Nature" 8/1
  7. Pammie's Inky Pinkies #1829 Anything Goes  7/31
  8. World Wide Open DT Challenge #7 AG DT 8/15
  9. A Bit More Time to Craft #72 Anything Goes 7/29

Thanks for visiting!
Stamping hugs,


Thursday, July 19, 2018

Wild Animals and Friends Like You (giggle) - Digi Tutorial

YAAAAYYYYYYY! You're here!
I have lots of tips today ANNNNNNNND....

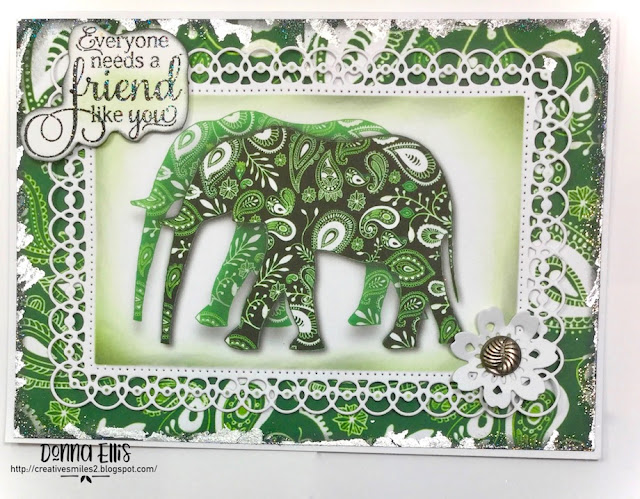
It's time to share a sweet friendship card using WILD ANIMALS for the new Moving Along With The Times Challenge!
How's that for a combination -- sweet AND wild?

We hope you can play along. Challenge #76's theme is WILD ANIMALS - just make sure your card's focal image has at least one wild animal and share your card!


My cards are made entirely from white card stock. If you are new to digital images, several tips are included below:

TIP:
Don't have a special app for your digitals? Use your word processor:

Most word processors have options for creating scenes. Play with yours to see what it can do. They may have a STYLE or FORMATTING option for things like OPACITY, SHADOWS, COLORS for you to create dimension, shadows, and color intensities:


TIP: 

CREATE CUSTOM PAPER FROM  YOUR IMAGE:

I saved a duplicate of the elephant image, and cropped off the head, tail and legs.
Then I put it on the word processor sheet, and sized it.
For the larger images, I simply increased the size of the image in the word processor:


to make the images smaller, I copy and pasted the image 3 times on my sheet and cut to size:


Both these options were used on my cards. Can you identify which card used the smaller print, and which used the larger?

1. Spellbinders Detailed Scallops (frame) card 5.5" x 7.5":
The card looks beautiful before adhering the layers:


After distressing with Black Soot dye ink, I applied Nuvo Glue Pen in the Large size around the distressing, waited a few moments for the glue to set, and then applied Gilding Flakes in Silver Bullion. They are so brilliantly silver, that it was difficult to capture on camera:


Using VersaMark ink, I further distressed, and heat set with Shimmer Semi Transparent EP. The edge is now dimensionally distressed with ink, shimmering EP and gilding flakes:


Midnight Madness Detail Opaque EP #252 has lots of sparkle, and was used on the sentiment from Happy Flowers Rubber Stamp Set. Because it is a detail embossing powder, it features sentiments well:


When embossing black, I prefer using a black pigment ink. But I don't have colored pigment inks these days, so....

TIP: 

"making COLORED embossable ink"


I did not have a black pigment ink on hand, and I wanted the black background for the sentiment before heat setting with Midnight Madness Detail Opaque EP. Here's how: Ink your stamp with VersaMark (or other clear embossing fluid). Then tap on the dye base ink in the color of your choice on top of the VersaMark inked stamp. Stamp on your paper.  Apply your embossing powder. Because the VersaMark was applied on the stamp first, when the image was stamped, the VersaMark ends up being on the "top layer" of your paper. Dredge with EP and heat set. Works for me every time.

The cute flower is from Tonic Woodland Aster Die Set #1285E.

Finished Card:


2. Sue Wilson die framed card 6" x 7.5":

Layered panel was distressed with Black Soot dye ink and VersaMark
Super Thick Silver EP467 (ultra glossy) was place on the inky areas and heat FROM UNDER THE PAPER. More VersaMark was applied and Midnight Madness Detail Opaque EP was heat set, creating a shiny, dimensional, sparkling panel:

With scraps of sticker paper and the Tonic Autumnal Oak Die Set #1431E, the large leafy branch was partially cut out twice. After pulling off the protective layer, exposing the sticky substance, Aqua Marine Semi-transparent Ultrafine G1062 glitter was applied and burnished in. I did the same thing with Tonic Beautiful Brambles Die Set #586E using Pistachio Ultrafine Opaque G1053 (one of my all time favorite colors). 


TIP: color your glitter


Because I wanted to shade the leaves a little, Prismacolor Alcohol Markers were lightly used on top of the glitter.

Before and After:


Finished Card:


TIP: To make this card with the rubber stamp set:
  1. Make an elephant mask from text weight paper.
  2. Stamp the front elephant in your inky-color of choice.
  3. Place the mask on top of the stamped elephant (adhere lightly if desired).
  4. Stamp the back elephant in your inky-color of choice.
  5. Remove mask and color your images.

Products Used:


Challenges these cards are gratefully submitted to:

  1. 613 Avenue Create #211 Create your own Designer Paper (see tutorial above) 8/1
  2. Classic Design Team Challenge Blog #27 AG DT 8/1
  3. Crafting with Dragonflies #108 Animals 7/20
  4. Crafty Animals #16 AG with Animals 8/1 (sep post)
  5. Creative Craft Cottage Digi Challenge #94 Monochrome 8/3 
  6. Lil Patch of Crafty Friends #86 Anything Goes 8/1 (sep 8/4)
  7. Scrapy Land Challenges #94 AG w/SL dies (Spellbinders, Sue Wilson, Tonic)
  8. Sunny Day Crafting (7/15-8/15) Add an Animal 8/15
  9. World Wide Open DT #7  AG for DT 8/15


Thanks for stopping by!
Crafty hugs,

Wednesday, July 11, 2018

Step Card with Back to Basics and Beyond Challenge

Hello, Blogging Friends and a warm welcome to my newest followers.


Today is my first post as a design team member for

Back to Basics and Beyond Challenges.

It's a challenge blog dedicated to... you guessed it... getting back to the basics.


For the next two weeks, join us by uploading an "Anything-Goes" challenge as long as a step card - center step or side step - is shown.

Mine is a vintage A7 size Center Step Christmas Card.

TIP: To make an enlarged step card, make the height 5 to 5.5 inches, and the width to whatever you like: 6 - 8.5 inches. You can also adjust the side panels (steps), but I recommend one inch, with the side panels at least one inch as well.


For an additional 10% off your SNS orders, please use the code during checkout:
DonnaDT10

Some products used on my card:

Often, I don't have a die that perfectly fits the layers in my card. That's when I pull out my punches and custom fit the borders. There are 3 pieces of punched border, like this on the back:


On the front, it looks like this:


The back of a step card is a great place to add a note or other sentiment. One of my favorite sentiments for the year from the Happy Holidays rubber stamp set, it was stamped in Acorn Brown Hybrid Ink to match the cardstock. Not just another pretty set of letters, the sentiment is just as lovely for the inside of a card, as well as a card front:
   
The snowflake was cut out 4 times in white cardstock. Two of the flakes were coated with Fantasy Gold Ultrafine Glitter. When dry, the white layers were adhered to the glittery layers, slightly offset. Vintage colors were used on the Christmas Skate Digital Stamp:


Side View:
Looking forward to seeing your step creations!


Products Used:

On a Personal Note:

We stepped outside early one morning to water the plants in the front, when several deer in the front pasture leapt away to a neighboring pasture. In front of the gate was a brown lump, and we worried it was an injured deer. Upon closer scrutiny, we noticed it was a newborn fawn, who did what came natural - be still in a down position until his mother returns. So we marched back up the hill and waited. Just a few minutes later, the mom came back and they left together.


Challenges I'd like to play in please:

  1. Crafter's Castle Challenges #7 AG + option Christmas 8/4
  2. Twelve Months of Christmas #43 Anything Christmas Goes 8/4
  3. The Merry Christmas Challenge #26 Anything Christmas Goes
  4. Christmas at Sweet Stampin' #? Anything Goes Christmas 8/11
  5. Pile It On Challenges #144 Vintage 8/5 (sep post)
  6. The Holly and Ivy Christmas Challenge #32 Anything Christmas 8/1
  7. Scrapy Land Challenges #93 AG dies SL sells (Tattered lace, Tonic, SB)
  8. Sweet Stampers #22 Christmas In July 8/10

Thanks for dropping by!
hugs,