My blog is called "Creative Smiles" because my designs are the result of incorporating mistakes. With fumble fingers that drop whatever they are holding - repeatedly, it takes a lot of giggles, smiles and creative patience during my crafting process. xx

Showing posts with label Ocean Life. Show all posts

Thursday, November 14, 2024

Serenity and Friends

Hello, sweet blogging friends! My versatile card today really is appropriate for nearly every occasion. A friend brought her Stampin' Up! stamps over, and I created the die cuts (etc) for a framed masterpiece. Together we came up with a beautiful card!

After die cutting SB Grand Decorative Labels One, I cut it in half to achieve two "border" pieces. I also cut a corner piece off to use on the top:


Each layer has distressed edges for a slightly vintage appearance, and added dimension.

Thanks for popping by today!


For new card makers - Directions to make the card:

  1. Cut card base for 5x7 card. Score at the 5" mark and fold in half.
  2. Place Spellbinders Grand Labels Four centered in a piece of card stock that is at least 5x7 and cut. 
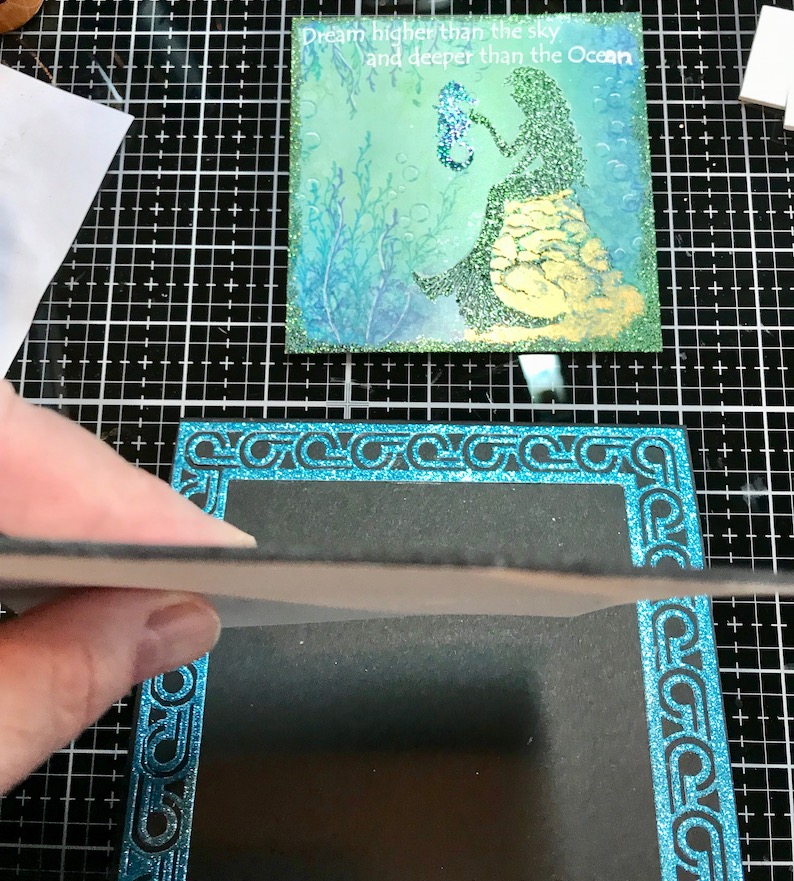
  3. Place Spellbinders Grand Dec Labels Four cut side down on top of the "frame" from step 2.
  4. Center the frame die so that the aperture is lined up at the four "points".
  5. Die Cut, then flip the base cut plate so that the die cut paper is still inside the die. Place the embossing mat on top (it seems like the die will cut through the embossing mat, but it does not). Then use your embossing plate on top of that, and run it through your die machine again. This will dry emboss the decorative die and bring out all the gorgeous details.
  6. Cut brown "mat" 3.75" x 5". Set aside.
  7. Cut white card for stamping 3.5" x 4.75". 
  8. Stamp white piece as desired using favorite inks, leaving room for sentiment. Set aside for ink to dry.
  9. Choose a border punch, border die, or a die with decorative edges and just cut the edge of the die (that's what I did, using SB Grand Decorative Labels One).
  10. Adhere part of the border to the back of the brown layer so just the pretty part shows. Cut a smaller portion or corner for the center of the top, and adhere to same layer.
  11. Stamp sentiment to white panel and apply embossing powder. Heat Set.
  12. Distress edge of white stamped card with complementary ink colors, applying the lighter color first, and then the darker color on the very edge. Adhere to brown panel.
  13. If desired, die cut or punch some "grass-like" pieces for the bottom center, to create visual interest.
  14. Order in which to assemble: 
        a) attach white decorative edges to brown panel.
        b) attach stamped white panel to brown panel.
        c) adhere panel from a&b to card base (centering top and bottom, and sides)
        d) adhere decorative frame panel.
        e) adhere grassy die cuts.

Products: Stamps: Stampin' Up!, Silver Fox Stamps "Always in my thoughts" (no longer in business), Impression Obsession B6061 Think of You Days, Dies: SB Grand Decorative Labels One, SB Grand Labels Four, SB 5x7 Elegant Labels 4, IO Die178C Small Grass, Inks: DI: tea dye and pumice stone, SU, VersaFine Clair, Clear Detail Embossing Powder (for sentiments)

May I please play in the following fine challenges?

  1. Sisterhood of Crafters November 13 - Landscapes 11/23
  2. Pammie's Inky Pinkies #2445 AG 11/17
  3. Dream Valley Challenges #325 Anything Goes 11/23
  4. Inkspirational Challenges #328 Layer It 11/15 sep post (layered panels, pieces, and layered stamps)

Stamping hugs, (wouldn't it be fun to jump out of the water like this dolphin?)


Monday, July 05, 2021

Treasures at Inspiration Station and a freebie

 Hello, Blogging Friends! Today we have a new Challenge happening at:

Inspiration Station


NOT just "another" inspiration board. 
It's entirely YOUR take as to what inspires you - 
it could be emotional, thematic, color, texture. 
What ignites your imagination today?

My memories wandered back to childhood days of warm sand, foaming ocean waves, and treasured shell hunts:

Stamped with VersaFine Clair Nocturne and heat set with clear detail EP, this shell collection was from a NBUS Inkadinkadoo wood mount Stamp from our local stamp store that went out of business in 2005. Using a blender pen and daubers, Pumice Stone, Black Soot, and Old Paper DIs were used.


Love all the shine in the embossing powder, making the shells and sand look wet.


Please join us this fortnight with your inspiration piece - remember, it's not just an "inspiration board". It's a board that inspires you in any way - emotionally, colors, themes, textures - whatever moves you!

Products:
Inkadinkadoo Sea Shells, Digital Sentiment, Clear EP, Nocturne Versafine Clair, Old Paper-Black Soot-Pumice Stone DI, Blender Pen, brads, vellum, white, black and kraft paper.
Dies: Sue Wilson Noble Ornate Pierced Design Dies.

My gift to you:

Please do not sell the Sentiment, but please Use on any of your projects, including projects involving any design teams you might be on.

Click on the image to bring it to full size. Because of the changes Google made, your image will appear to be solid black. Don’t panic. Right click and do a SAVE. Once it is saved on your hard drive, you can open it and it will have a transparent background. I create PNGs instead of JPGs so they can be placed anywhere on a scene or project, and so backgrounds can be made using them. Please let me know if you have any problems. I hope it serves you well!

Enjoy!


Challenges I'd like to play in please:
  1. NBUS #28 Never Before Used Schtuff - my Inkadinkadoo stamp and the printed vellum 8/1 (comment on 3)
  2. World Wide Open DT Challenge #6 (June 15) AG DT 7/15 (sep post)
  3. Dies R Us #172 "AG with dies DRU sells" (Sue Wilson Noble Ornate Pierced Design Dies)

  4. Pammie's Inky Pinkies #2127 "AG" 7/12

  5. Crafty Calendar Challenge (July 3) "AG" 8/7

  6. My Time to Craft Challenge #460 "All Things Beachy" 7/8


Stamping Hugs,


Thursday, April 09, 2020

Lavinia World 24 - Every Wish Begins With A Dream

Greetings, friends. Sending you wishes for peace and good health.
I am so grateful you are here, and that our paths have crossed.


It is time for our new
Lavinia World Challenge!

Store -- Facebook -- Challenge -- Instagram
Play in our Anything Lavinia Facebook Challenge
and/or our Anything Goes Challenge Blog


Today's story 

Surrounded by love, Guinevere Mermaid is spending time alone, 
using the days to expand her heart, 
and to discover dreams that will make her world more 
meaningful to herself and others, especially those in need.
After all, everyone is "needy" in one way or another.


Both cards are colored with the same inks,
but different die shapes and stencils were used.

Guinevere Mermaid is stamped with Cheerful Yellow Versafine Clair and heat set with white detail embossing powder. I wish Versafine Clair came in a white!


Mermaid Lagoon Distress Ink is the primary base, and is used in the foliage as well. The underwater foliage is done with the Spanish Moss Foliage set. 

A little Antique Linen Oxide provides a grounding for the rocks and sandy areas.


The glitter dots around the "wish" were done with my favorite detail adhesive - Quickie Glue Pen. It's my go-to product for certain intricate jobs, and I've used it for as long as it has been on the market.

The star brads are heated up and dipped into Cerulean Glitter EP, where the EP melts in place:


I used an Aqua Prismacolor Pencil in certain places to define shadows.
Unfortunately, I was a bit heavy-handed with the ink and stencils:


The Every Dream sentiment was stamped with Nocturne Versafine Clair onto vellum and heat set with clear detail EP.

Lavinia Products:


Products Used:


Challenges I would like to play in please:

  1. World Wide Open DT Challenge #3 AG DT 4/15
  2. The Fairy and The Unicorn Challenge (April 4) AG Fantasy 5/1
  3. Pammie's Inky Pinkies #2014 AG 4/13
  4. A Bit More Time to Craft #113 Anything Goes 4/15
  5. Classic Design Challenge #4 HAPPY FOURTH BIRTHDAY 5/1
  6. Aud Sentiments Challenge #248 AG+ Sentiment 4/15
  7. Penny's Paper Crafty Challenge #468 Anything Goes 4/15
Thinking of you fondly,

Thursday, November 07, 2019

Lavinia World - An Underwater Adventure

Hello, Blogging Friends!
Yesterday a Cold Front moved through our area, and the daily temps dipped down into the 70s (22-24C)! FOR ONE DAY.
laughing
Maybe Autumn will visit us later in the month.

Today begins a new Lavinia World Challenge!


Details of our Lavinia World ChallengeAn ANYTHING GOES theme using ANY brand clear or rubber stamp - no digitals. Winner receives
a $15 gift certificate to the Lavinia World store.

While "our" Lavinia World store is located in the US, it ships worldwide. In the US, a $25.00 purchase means free shipping! Lavinia World carries other crafting supplies for your convenience.
My card features Sebastian the Seahorse. Isn't he magical?
After die cutting the SW frame, the panel was dry embossed while still in the die, and then distressed with Blueprint and Chipped Sapphire ink, keeping the die itself in place.
Sebastian was stamped with VersaFine Clair Blue Belle and heat embossed with a clear embossing powder that also contained glitter. The photo gives you a glimpse of the sparkle:


Sea Bubbles and Sea Creatures were stamped off on scrap paper, and then stamped into the background with Weathered Wood Distress Ink. Shaded Lilac was distressed around the edges of the frame for a soft lavender cast. Then I used a cue tip applicator with Lavender Pearlescent Brilliance ink all around the Seahorse, achieving a textured shadow:


Uni-Ball Pen Signo Gel - white was used to add detail from Sebastian's snout to his forehead, and in lines along the front of his tummy area.

He is a gloriously mystical, magical creature!

The blue panel was adhered to a lavender panel to bring out the purple tones:

Available in the Lavinia World store:


Products Used:

  • Lavinia World Sebastian the Seahorse
  • Lavinia World Uni-Ball Pen Signo Gel - white (on nose and belly)
  • Lavinia World VersaFine Clair Blue Belle
  • Lavinia World Sea Bubbles (background)
  • Lavinia World Sea Creatures (fish in background)
  • Dies: Sue Wilson Spanish Granada (outline), Sue Wilson Spanish Seville (decorative frame)
  • Inks: Brilliance Ink Lavender Pearlescent, and Distress inks - Blueprint, Shaded Lilac, Weathered Wood, Chipped Sapphire
  • Other: Clear Detail EP that contains glitter, white, blue, lilac papers.

Challenges I'd like to play in please:

  1. Scrapyland #125 AG with SL dies (2 sets SW Spanish Collection) 11/21 (sep post)
  2. Crafty Animals #32 AG with an Animal (I used a seahorse and fish) 12/1 (sep post)
  3. World Wide Open DT Challenge #10 (technique- wet & dry embossing, distressing, glittering, stamping foreground and background) 11/15 (sep post)
  4. Artsy Stamper Digitals #3 Monochromatic 11/18 (sep post)
  5. The House that Stamps Built #N619 "Frame It" 12/4 (bottom of post)
  6. Addicted to Stamps #366 Anything Goes 11/12
  7. Country View Challenges Nov "Hand Stamped" 12/14


Stamping Hugs,


Thursday, August 01, 2019

Mermaids at Lavinia World

Hello, my friends and followers!
The first of August fell on a Thursday, so I have three DT posts this morning.
Please click here for 2 Crafty Critter Crazies with Sheepski Designs
and
click here for Moving Along With the Times - Bee Theme

My Lavinia World post today includes a little freebie digital gift to you,
and a PICTORIAL TUTORIAL.


Details of our Lavinia World ChallengeAn ANYTHING GOES theme using ANY brand clear or rubber stamp - no digitals. Winner receives
a $15 gift certificate to the Lavinia World store.

While "our" Lavinia World store is located in the US, it ships worldwide. In the US, buy $25 and get free shipping! Lavinia World carries other crafting supplies for your convenience.


Because I've received a few comments/e-mails asking how to use these amazing stamps, I've taken a pictures during my creative process, and hope it will encourage others to try any or all of these techniques:

STEP 1

If you don't really know how to ink up a background, or maybe don't have inks in your stash, try using printed paper, embossing folders and the lovely, inexpensive LAVINIA PAPERS. I was very pleased with the quality of the papers - light-weight, yet sturdy; coated, yet regular dye Distress inks dried on them; any stamp ink works on them; they are embossable.

I began with Spellbound #1 6x6 underwater theme paper AND CUT IT to fit my frame. (for another sample where I cut the Lavinia paper, click here).


2. Place your stamps on the panel to see what will fit, moving them until you have a pleasing scene:


3. Choose your colors (I used the one stringy stamp below to allow for more color options. You can see how fine the detail is in the stamps. At this point, a lovely sentiment would finish this card off perfectly!


4. Add Bubbles in two colors for texture and interest:


5. I use VersaFine Clair in all my embossing unless I need a translucent EP color.
Stamp and heat set sentiment:


6. Stamp Lavinia Guinevere Mermaid with VersaFine Clair Green Oasis. She has a lot of detail in her "scales" and hair.


7. I chose to heat emboss her with a highly glittered formula, and it covered up a little of the detail:


8. The coating on this paper does repel regular watercolor. I used Createx Pearlized Copper Acrylic Paint on the rocks, and lightly painted it so the outlines would still show. I also outlined some of the details with Uni-Ball Pen Signo Gel-white. Applying VersaMark to the edges, I heat set more EP the same color as the mermaid. This is where my boo-boo happened. I hadn't noticed that some stray EP heat set to the white "a and n" so I used my VersaMarker on those two letters, reapplied white detail EP, and heat set. Not perfect, but looks good:


9. Which to use? Black background or White? Straight panel, or make it crooked (crooked is my usual preference). Actually, this was a hard decision! giggle.


10. To pop up the mermaid panel, fun foam was used. Since I didn't have any black in my stash, a black alcohol marker was used to color the edges:


11. Place Double Sided tape on both sides of the fun foam. Adhere frame and fun foam to 6x6 black card base:
 

12. Emboss a scrap of card stock for die cut grass:


13. Add grass to the sides of the panel:


14. Add top panel and a few more grassy details:


Notice that there are white highlights and heat embossed areas in the rocks:


Showing a little of the glitter on this project:


Muting the glitter a bit so you can see detail:


Interior heat embossed and stamped with same colors:


And a little Humor:

Volcano Goddess - keeping a lid on the volcano so the rest of us are safe (giggle). Talk about a HOT SEAT! (more silly giggling) (photo taken without any lights)


Please scroll to the bottom for your digital gift.


Products Used:


Challenges I'd like to play in please:
  1. ScrapyLand Challenge #118 AG SL dies (IO and Tonic) 8/7
  2. Country View Challenges (Aug) Texture 9/1 (check 9/14)
  3. Classic DT Challenge #8 AG DT 9/1
  4. Craft Rocket Challenges #62 - Anything Goes 9/1
  5. Creative Fingers #168 8/8
  6. Love to Craft Challenge #37 Anything Goes 9/1 (check 9/5)
  7. World Wide Open DT Challenge #7 AG DT 8/15

A Digital Gift for You

It's a bit ornate, but here's a fun mermaid digital sentiment to use on your mermaid projects. This is for personal use only, and may be used on your design team creations. Click on the sentiment to make it full size. Then right click to download as a SAVE PNG. (not for commercial use). Enjoy!

A Freebie Gift PNG to my Followers-
NOT for commercial use:


PS - one of my followers said when she right clicked on the image to save it, the entire image was black except for the starfish and shell. But once you have the saved item on your hard drive, I promise the letters are black and the background is transparent.
Stamping Hugs,
de