My blog is called "Creative Smiles" because my designs are the result of incorporating mistakes. With fumble fingers that drop whatever they are holding - repeatedly, it takes a lot of giggles, smiles and creative patience during my crafting process. xx

Showing posts with label Birthday. Show all posts

Tuesday, January 13, 2026

"Friendship is Golden" Slim Line cards

 Happy New Year, friends! Before my six cards are shared, may I ask a big question?

Has anyone heard from Carol Hurlock? She is a fantastically gifted crafter/artist who is quite unique and prolific in her endeavors. She is awe-inspiring! Carol stopped posting in 2022 (during Pandemic). She is such a gracious, kind, beautiful soul who is wonderfully talented in every way, and I miss her. Please let me know if you have heard anything. Thanks!


Hoping your family is safe and healthy, enjoying all the good things Life has to offer. Yesterday at Dusk, we had several "dancing deer" skylarking across the front pasture. It's always fun watching them, especially when frolicking is the main activity at the moment! 😁

 Slow and steady eventually gets to the finish line, right? Today's share is six "skinny" cards 8.5" x 4", using Anna Griffin dies in the background and an assortment of patterned papers and vellums.

Three cards sport woven satin ribbon frames. This is one of my favorite techniques, especially if the ribbon is "puffy" and "imperfect" in its display of shiny fabric. I start in one corner, and slowly make my way around the frame:

Once the ribbon has traveled around the die cut, it is cut in the corner and "tucked under" to look finished:

The smaller, focal die images are mostly from Gold Glossy card stock, and shadowed with black card stock:


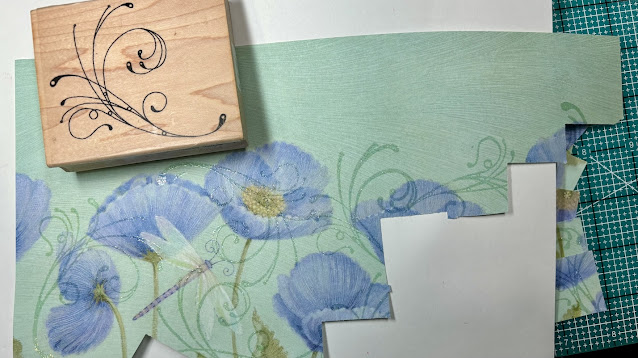
First, ink some of the background papers for better dimension and a more finished look:


For some of the shadows, I outlined the die with a light-colored pencil, and fussy cut them out. This made the black portion slightly larger than the die cut itself:


These two cards show off dimension and texture by using glitter on the leaves, dimension tape circles, and glitter behind the glossy card stock. The second card has three butterflies with three layers, each featuring vellum or patterned card stock. It also has printed vellum in the background.


The first card (also shown below) has glitter on the glossy card stock (in real life, it is quite shiny and sparkly). The "dots" are 1/8" high dimensional dots that have been dredged with glitter. Notice the butterfly on the right side has been dimensionalized a little differently, with the butterfly body glued flat to the base, puffed up in the middle, and then flattened again on the edges. Not sure how that will make it through the post office machines, so it may be hand delivered. 

sigh...


I long for the "olden days" post office when we could send anything through the mail as long as long as we put enough postage on for weight. (do you?).


Sometimes, less is more:


Alas, I decided MORE is more:
more sparkle
more glitz
more shine
more butterflies
more jewels...


This one escaped the glitter, but the vellum under the butterfly is shimmering gold with bejeweled brads, shiny ribbon, and a sentiment made on the label maker:


Layers include the base, printed Vellum card stock, gold Anna Griffin solid piece, an ivory filagree die cut, ribbon, Spellbinders glossy leaves, label maker sentiment, hand traced and cut black shadow, hand traced and cut sparkling vellum, and finally patterned paper, frilly butterfly die cut:


This card showcases textures:


The sixth card:


The interiors are just as unique:


The interior here is glittered on one side:


Thanks for wading through all the photos.

Thinking of you all, with gratitude. Thank you for your fabulous inspiration, and caring comments.

Products: Stamps A-Line Stamping F-487 (2000? or 2001?), Penny Black 1785E Lovely Day (2000),  Really Reasonable Satin Ribbon ButterCup 5/8", Dies: Anna Griffin AG-1239H-AS Slimline Concentric Die, IO Monarch DIE059-N, Cheery Lynn Butterfly, Tonic Studios Celebrate, Cardstock: pattern paper (REALLY OLD from a store in Tampa called "Tamp-a-Stamp" back in 2001.), Marcos Gold Glossy, Bright Ivory CS, Golden CS, Inks: Walnut Distress, VersaMark, Acorn VersaFine Clair, Other: (mixed gold and clear glitter). Dimensionals

Gratefully playing in the following fine challenges:
  1. A Perfect Time to Craft #1 (Jan 1) AG 2/1 (sep post 3/29)
  2. Crafts Galore Encore #143 (Jan 1) AG (sep post 2/1)
  3. Love to Craft Challenges #90 (Jan 1) AG 2/15 (nxt chal 3/1)
  4. Mix It Up Challenge #81 (Jan 1) AG with Ribbon  2/15 (nxt chal 3/1) 3 cards have ribbon woven in them.
  5. Moving Along With The Times #185 (Jan 1) AG us stencils and/or dies (several layers of dies on each card). 1/31 (sep post 1-2 weeks later)
  6. Paper Rocks Scissors Challenge #12 (Jan 2) AG using Paper and/or Scissors 1/31 (The shadows have been fussy cut, to make them slightly larger than the die itself. The Cheery Lynn butterfly die only had the frilly version, so the background vellum was fussy cut, then the shadow also had been fussy cut slightly larger. Several types of papers/card stock were used.
  7. A Cut Above (Jan 5) AG with die cuts (used multiple dies: Dies: Anna Griffin AG-1239H-AS three Slimline Concentric Dies, IO Monarch DIE059-N, Cheery Lynn Butterfly, Tonic Studios Celebrate 1/28 (sep post 2/1)
  8. Pammies Inky Pinkies Challenges #2602 AG 1/18
  9. Cut It Up Challenges #347 Favorite Dies 1/19 (Gosh! It was fun looking at everyone's favorites this time. My favorites are my butterfly dies, but I also love my Spellbinders foliage sets. Both are featured here. Are we allowed to have lots of faves? LOL Thank you for the fun challenge.
  10. Elliebelle's Garden Party #11 (Jan 8) Anything in or from a Garden 2/9

fondly,


Thursday, November 27, 2025

Winter Pink Birthday Card

Hello, everyone! It is my sincerest hope you are doing well this holiday season. 

Today's birthday card is for a very dear friend. Birthdays in December often mean "seasonal" themed cards, and this one is no different! Being a rather new stamper, my friend enjoys challenges with new techniques and products. It's fun seeing stamping "anew" through her eyes. I've always enjoyed making dimensional cards with flowers, embellishments and other themes. Like many of you, once the post office changed the "thickness" rules, I altered my style. But since this is being delivered in person, I took advantage of that by creating a "thick" card!

After taking over 20 shots, I gave up! The pure white feathers show up as a drab gray. I think maybe the tininess of each feather barb, and the thinness of the "afterfeathers" created a shadow beneath, making the white appear gray. Has that happened to you when photographing white feathers? 


Taking a cue from Leslie Miller, I've produced an "off-size" skinny (slimline) card 4.25" x 7.25". With several layers, lots of sparkle was added to match the sparkle of Ana's personality. I sure do wish the sparkle showed up better. From my "pieces box", I put together lots of odds 'n' ends. The poinsettia petals all have a thick coating of clear glue mixed with highly textured glitter and mylar glitter. The center is comprised of Prills (I have a ton of those in my stash from some 8-9 years ago in a host of colors!). The luster balls have florist wire and were purchased at least 10 years ago from Hobby Lobby's bridal section. There is a paper raffia piece which was inked in pumice stone, and metallic silver netting from a wire ribbon. 


The French background script is from a virginal SU 5x6 wood mount stamp at least 20 years old. This card was SO MUCH FUN to make, using stuff from my "unfinished box" stuff, and old crafting goodies crying to be used!

Inside:

On the inside is a pocket for a gift card, adorned with the same MS punch as used on the card front and on the borders of the interior sentiment. I really do love the old MS punches. To make the simple pocket, I cut cardstock one inch wider than necessary, scored the two sides at 1/2 inch, and the bottom at 1/2 inch. Niche the corners for the fold to fit neatly. Adhere the back so that the niched places are glued to one another rather than to the pocket itself, so the gift card can slide in and out easily. Wish I had taken a photo of that for posterity (giggle).

Products:   Dies: Sue Wilson Noble Dies Double Pierced Bkgrnd CED5512, SW Dandelion CED1434, IO Pine Branch DIE021, IO Pine Sprig DIE319, MS Floral Crochet PAP Punch, MS Holly Punch, Stamps: Freebie Sentiment (shared below), SU En Francais script background stamp, SU birthday Warmest Regards stamp, Cardstock: SU pink & Green, white, old designer paper, Vellum,  Inks: Pumice Stone, Shabby Shutters, Peeled Paint, Worn Lipstick, Spun Sugar, VersaMark, Other: Feathers, Chunky Clear Glitter, Clear Mylar Glitter, Silver ultra fine glitter, Green EP with Glitter, Lime Prills, embellishments from the bridal section of Hobby Lobby, Silver Metallic Ribbon Netting, Paper Netting inked with pumice stone.

My gift to you - Arrangements of the same sentiment - one for any day and one for birthday - for use on the inside or outside of your projects. Please do not sell these Sentiments. Use on any of your projects, including projects involving any design teams you might be on.

Click on the image to bring it to full size. Because of the changes Google Made with Blogger (June 2020), your image will appear to be solid black. Don’t panic. Right click and do a SAVE AS PNG. Once it is saved on your hard drive, you can open it and it will have a transparent background. I create PNGs instead of JPGs so they can be placed anywhere on a scene or project, and so backgrounds can be made using them. Please let me know if you have any problems. I hope they serve you well!

Enjoy!


Thanks for stopping by.


I'd like to support the following challenges by playing in them please:

  1. Fab 'n' Funky #626 All That Glitters 11/2 (sep post week later) (silver, clear, chunky, mylar glitters (inside and out).
  2. As You Like It Challenge Nov 27 "Gold, Silver or Glitter and Why" 12/11 If it is glittery, it's for me! This birthday card is made for Ana who LOVES glitter and glitzy things. Although the mylar and chunky clear glitters are not showing up very well in photography of the poinsettia flower layers, the sparkly silver glitter is merry sparkle for the season inside and out. Glitter is amazing in its many uses. Thanks for the fun challenge!
  3. Elliebelle's Garden Party #9 Anything from a Garden 12/8 (poinsettia flower) (FU #11)
  4. Pammie's Inky Pinkies #2547 AG 11/30
  5. Creations in Pink #87 AG in Mainly Pink 12/13 (sep post)
  6. Tic Tac Toe Challenge #284 (Using left to right diagonal - Embellishment, Free, Flowers) Several embellies feather, paper raffia, metallic net ribbon, prills, pearls. 12/11 sep post week later


Sunday, February 23, 2025

Remember Those Cute Bugaboo Characters?

Hello, my friends! Another post from me! (giggle)

Today's cards are doubly sweet - made with fond thoughts of Jodie (former owner of Bugaboo Stamps), and also for a dear friend who loves her little white mischievous puppies! Her birthday is drawing near, so it was the perfect opportunity to showcase Jodie's silly images for a person who will appreciate them. 

Copics, inks, paper-piecing techniques, and recycled ribbon comprise this 5 inch square card. 


Does anyone know the name of this fun fold card? 

I think it might be called the Triple Panel Pop Out Fold?

Anne Buckingham taught me the mechanics in making the fun fold last year, but I don't know the name of the fold. It's really simple to make. Cut a piece of cardstock that matches the card base - 4 inches wide by however tall your card is (in this case, it is 6" tall). Score the piece at one, two and three inches. Fold into a "square tube". Apply adhesive to the two ends of the "tube" - first and last segments - and adhere both on either side of the card base fold. Be sure to fold the card while your glue is drying to make sure you have placed it perfectly on either side of the card fold. NOTE: It was easier adhering the sentiments after the tube was in place. Decorate with all sorts of ephemera, images, sentiments, die cuts - so cute ~ !


Thanks for popping by!


Products: Baxter Puppy from Bugaboo, digital sentiments, Dies: Darice Nested Ornate Rectangles, Surprise Creations Large stitched rectangles, Tutti Stitched Rectangles, LaLaLand Flag Banner, Spellbinders Fleur de Lis, Embossing Folder: We R Memory Keepers Next Level Woven 2, Coloring: Copics and Distress inks, Patterned Papers and cardstock from stash, Glitter, Ribbon

ALWAYS THANKFUL FOR THE DESIGN TEAMS AND HOSTS OF ON-LINE CHALLENGES:

  1. Critter Crazy Challenges #95 (final challenge SOB!) AG with Featured Critter 2/25
  2. Pammie's Inky Pinkies #2508 AG 11/25
  3. CD Sunday Plus #152 Anything Goes (3 digital images, several digital sentiments as shown on the fun fold card - I hope it fits the rules of your challenge). 2/25
  4. Snippet's Playground Challenge #500 CELEBRATE 500! (in the fun fold card I used snippets for interest in the bottom portion of card front, and lots of snippets from scraps of designer papers in the flags/banners. The yellow glitter border is the "negative" left over portion of a die cut. The interior also uses several snippets of left over lengths of cardstock and pattern paper - thanks for the fun challenge! 2/25 (playing JFF for top 3 spot)
  5. Love those Pretty Papers (a D&D challenge) Feb 1 Use pattern papers 3/1
  6. Creative Fingers Challenge #295 Anything Goes 3/8 (products I used are listed above - hybrid layering. Thank you!)
  7. Heart's Quest Celebrations of Love Challenges Blog #2 (Feb2) BEWAS - using birthday cards, one is pop out. 3/2
  8. Halloween & Other Occasions Crafts Year Round (Feb 1) Birthdays and Dogs 2/28
Stamping Hugs,

Thursday, August 22, 2024

Dimensional Inchies on an Easel Card - and freebies


Hello, my friends! Hoping you are not uncomfortably dripping wet from the sweltering heat (here in the northern hemisphere) - I also hope that our friends Down Under are escaping the wrath of the current explosion of influenza cases. May you be well soon if the flu has come to your home.

Do you know what "inchies" are?

Before I became "house-bound", 20+ years ago, I had the pleasure of working in a brick and mortar store called THE PAPER PLAYHOUSE. There I taught classes and designed the free, weekly Make N Take, instructing about new products and how to use them. It was a great opportunity to meet people and enjoy our hobby!

Do you remember when...

In those days, designer paper was scarcely a "thing". So we stamped our own background papers, embellishing them with inks, glitters, embossing powders, etc. It was great fun cutting them for One Sheet Wonders or Inchies-Twinchies creations. 

 My card shares today involve some of the oldest designer papers of day - lovely K&Company designer paper, which was also VersaMark stamped with an Impression Obsession image and heat embossed with clear EP containing glitter, to give the paper some extra pizzazz. 


First up are some "Just A Note" cards - with die from Sue Wilson Script collection. Cut once on white cardstock, a lavender glitter layer was attached - it has been adhered to vellum for a bit of texture and mystique.


I was inspired by a friend recently who took an "Inchies Class" involving 3-D appearing shadows without actual dimensional adhesives:


The ribbon, also 25 years old, was fed through a slit in the vellum:


Has this ever happened to you? 

The "colored powder" of a die flaked off, onto the paper. It is deeply embedded in the white and is quite noticeable. It worsened with each pass through my Gemini Junior machine. If it happened to you, how did you remedy it? The folks at Creative Expressions told me to use wax paper, which Spellbinders always said not to do (at least when they were a new company) (you may have to click on the photo to enlarge it).


Two very special birthdays in blog land are soon coming! 

I'm all set for them:

flat for mailing:


Also a little sentiment on the card backs, which I've included as a gift to you below:


This project, while challenging for not-so-nimble fingers, was SO FUN, and brought back happy memories of laughter, fun and dear people in the classes!

Products: Die Sets: Sue Wilson Scripted Just a Note, Double Pierced Circles and Scripted Happy Birthday, Spellbinders Grand Nestabilities Scalloped Squares, SB Classic large scallop rectangles, Sizzis TH Garden Greens, Cottage Cutz Greenery 4x4, Papers: Lavender, Pacific Blue, White, Black, Purple, Green Glitter, Vellum, Lavender Glitter, K&C patterned papers, Inks: Pumice Stone DI, Fantasia VersaFine Clair, Versamark, Misc: EK Success 1-1/4" punch, Clear EP containing glitter, stamps: SU Elegant Greetings stamps, IO Alesa Baker Large Flourish Three E2036, my digital sentiment stamps

I'd like to play in the following challenges, please!

(many thanks to challenge owners and design team members who create fun for us!)

  1. The fabulous DOUBLE D CHALLENGES (Aug 21) Use Shapes (I used multiple 1.25" squares from an EK Success Punch, 1/2 circle scallop layers, circle sentiments on the back, and shaped rectangular layers) 9/1
  2. Darling "I Spy With My Little Eye" challenge #18 Something from the garden (flowers, leaves, dragonfly) 9/17
  3. Lovely Creative Inspirations Challenges #17 - Anything Goes 9/1
  4. Love Those Pretty Papers 8/3 Used the option anything goes 9/1
  5. Word Power #8 7-31 Sentiment is Focus of Card (words on front, sentiments on bottoms and backs) 9/1
  6. Paper Minutes #860 Birthday 8/27
  7. Creative Moments #261 Patterned Paper - inchies are punched from patterned paper. 9/5
  8. Creative Creases #89 Anything Goes with a Fun Fold Card 9/1

My gift to you - 


Arrangements of the same sentiment for use on the inside or outside of your projects. Please do not sell these Sentiments. Use on any of your projects, including projects involving any design teams you might be on.

Click on the image to bring it to full size. Because of the changes Google Made with Blogger (June 2020), your image will appear to be solid black. Don’t panic. Right click and do a SAVE AS PNG. Once it is saved on your hard drive, you can open it and it will have a transparent background. I create PNGs instead of JPGs so they can be placed anywhere on a scene or project, and so backgrounds can be made using them. Please let me know if you have any problems. I hope they serve you well!

Enjoy!


Sending you Joy,


Monday, June 10, 2024

LOST AND FOUND - MORE "unfinished stuff" from my old stash - freebie

I've been plugging away in my craft room, a little at a time and using more "stuff" discovered in my "unfinished projects" box. I love using my old stamps and papers from long ago. Do you?  Today, I am using previously cut out triangles of papers in the backgrounds of these cards.


I especially enjoy this Fred She Said stamp because it works for people from our past or present - still present in our lives, and/or having moved away until we next talk. I love hearing the stories about my friends' relatives and family stories. Those kinds of memories come alive when retold, and give us inspiration to live in a way that inspires others, too. On this occasion, the card was sent to a friend's husband who has been chronically ill, and fighting a terminal illness, for decades. His strength and influence have encouraged me. In the card, I shared that he and I are "aged to a perfection" only the two of us can appreciate (giggle).

Aged to Perfection - Fred She Said Old Trucks

Using the backgrounds from my unfinished box, with a little help from Fred She Said Old Trucks, I utilized an ancient (dare I say "vintage") technique. Some call it "Cracked Glass" and others call it "Cracked Ice". 


Using Sepia tones to further the vintage look, I die cut the images, inked them up, coated with several layers of clear EP, and put them in the freezer for about 30 minutes. Then the images were "cracked" before the EP could thaw:


I liberally smooshed Black Soot DI on top of the images, so the ink could get into the crevices. The rest comes off easily with paper towel. These cracked really well -- kinda like me! (giggle)

I tried to capture more detail in the photograph by removing the overhead light on my desk:


Products: Stamps: Fred She Said Old Trucks, Freebie Digital Sentiment below Dies: Surprise Creations Pierced Decorative Ovals, Sue Wilson Double Pierced Ovals, Sue Wilson Pierced Flags, Inks: Distress Oxides Vintage Photo & Brushed Corduroy, Distress inks Black Soot, Old Paper, VersaMark, Clear EP, other: Charcoal colored Vellum, FREEZER TECHNIQUE

FREEBIE SENTIMENT


My gift to you - Arrangements of the same sentiment for use on the inside or outside of your projects. Please do not sell these Sentiments. Use on any of your projects, including projects involving any design teams you might be on.

Click on the image to bring it to full size. Because of the changes Google Made with Blogger (June 2020), your image will appear to be solid black. Don’t panic. Right click and do a SAVE AS PNG. Once it is saved on your hard drive, you can open it and it will have a transparent background. I create PNGs instead of JPGs so they can be placed anywhere on a scene or project, and so backgrounds can be made using them. Please let me know if you have any problems. I hope they serve you well!

Enjoy!


Playing in the following challenges please:

  1. Perfect Time to Craft (June 1) #6 AG 7/1
  2. Classic Design Challenge #5 AG with masculine 6/15
  3. Lil Patch of Crafty Friends #231 AG 6/16
  4. The Alphabet Challenge (May 31) E is for Embossing 6/13 (one of the background triangles is dry embossed with dots - the main image has several coats of Clear Embossing Powder - wet embossing - was placed in the freezer, then cracked and distressed as mentioned above)
  5. Aloha Friday #11 Masculine 7/3
Stamping Hugs,