My blog is called "Creative Smiles" because my designs are the result of incorporating mistakes. With fumble fingers that drop whatever they are holding - repeatedly, it takes a lot of giggles, smiles and creative patience during my crafting process. xx

Showing posts with label Tattered Lace. Show all posts

Thursday, April 17, 2025

Left Over Pieces + New Pieces = Finally-Finished Cards

Welcome, Blogging friends! I have missed you!


Still plugging along in my "unfinished stuff" boxes, these creations have been in the works for the last 6 weeks. I came across some pink and white Spellbinders decorative squares elements already cut out - probably 15 years ago - they were crying out to put put on a project! So I added some Impression Obsession butterflies and Tattered Lace flowers, enjoying designing The Old dies with The Virginal dies. The designing was fun, too - especially with the addition of sparkle in one of my favorite colors PINK!

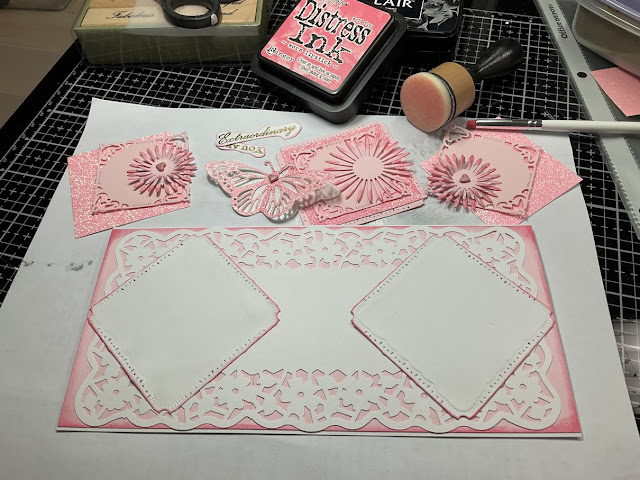
Here are some of the pieces I started with before adding the whimsy:


Because the bottom layers overlapped in some places, shims were needed:


With the shims prepared and glued in place, the diagonal square in the middle could be added:


Next... to adhere the fun die cuts:


To shade some of the pink areas (included the pink glitter paper), Worn Lipstick DI was applied. See the difference?


The vellum "butterfly shadow" is pearly, so it picked up the pink tones without coloring. The other butterflies with pink frames around them were "inked" with Worn Lipstick atop pale pink cardstock. The die cut sentiments were cut from pink glitter paper, darkened with Copic Marker RV32, and shadowed with a pale slate blue cardstock:


Two more cards, one using Ana Griffin's sentiment set:


Upon finishing the cards, I decided some pop up elements on the inside would be fun. It sure would have been easier had that been done before adhering all the layers! Front facing:


Top facing - notice the notched element under the butterfly to minimize the popup feature:


Thanks for visiting my little blog! Your encouragement and friendship means so much. I am permanently homebound, leaving only for medical appointments. Each excursion takes tremendous toll on my body, but I'm still able to do "small things with great love".  I'm so grateful to still be living in this wonderful world, surrounded by beautiful people!

Products: Anna Griffin "You Are" sentiment stamps (set of 9), Inks: VersaFine Clair Nocturne, Distress Worn Lipstick, Dies: Tattered Lace Michaelmas Daisy, Imp Obs Butterfly DIE059-N, SB Marvelous Squares, SB Adorning Squares, LifeStyle Nesting Frames 7, MS Floral Crochet PAP, MS lace heart edge punch, Die-Versions Express Banners "Happy Day" and "Make a Wish", Cardstock: pink glitter, pink, white, white glitter, slate blue (shadow on sentiment) Other: Gold Detail EP, Copic RV32, 

May I please play in the following challenges?

  1. Seize the Birthday #303 Layer it Up Birthday 4/2 (each card has multiple layers inside and out)
  2. Triple B Challenge (April 3) inspiration board for birds butterflies blooms 5-1
  3. Crafting A Cut Above (April 7) Spring Time with Dies 5/1 (Dies used: Tattered Lace Michaelmas Daisy, Imp Obs Butterfly DIE059-N, SB Marvelous Squares, SB Adorning Squares, LifeStyle Nesting Frames 7, MS Floral Crochet PAP, MS lace heart edge punch, Die-Versions Express Banners "Happy Day" and "Make a Wish")
  4. Colorful Options (April 1) choose color(s) from the inspiration photo. I chose pink. 5/1
  5. The Four Seasons Challenge (April 1) Anything Goes Spring 5/1
  6. Craft Rocket Challenges #124 "Layer it Up" 4/28 (each card has multiple layers inside and out)
  7. As You Like It Challenge (April 17) Fussy & Fancy and Why 4/30 (while CAS are amazing, I have trouble keeping it simple. It's always satisfying to add more layers, more sparkle, unexpected details, and products to cards, and see the faces of the recipients - or to hear their sweet voices - exclaiming "how did you do that?" giggle)
Thanks for stopping by!


Wednesday, December 12, 2018

Step Card - Christmas at Sweet Stampin'

Hello, dear friends!
Hoping your Advent Journey is enjoyable as you prepare for Christmas Celebrations!

With great pleasure, I've joined the talented designers at
I'm thrilled to team up with these marvelously brilliant crafters, and hope to see your imaginative artwork each month in our "Anything Goes Christmas" Challenges. The challenge is for ANY Christmas theme craft project. December's Challenge is open until January 8.

Christmas at Sweet Stampin' also has a DT Call out! Hope you can join us!

Recently I drooled over a Crafters Companion Gemini Christmas Tree on Sue Drees' blog. She generously gifted me with several versions of die cuts from the pretty set. My card uses the pink pearl background and the ornate, white glittered detail image on a center step card!


Using IO snowflake dies on brown cardstock, I then coated them with sparkling SNS Embers ultrafine glitter.


Cute little glittered hearts peek from behind the first step:


Wishing you a fantastic week, and hope you and yours enjoy a lovely season.

Products:
  • Dies: Crafters Companion Gemini Christmas tree gifted by Sue Drees, Snowflakes from IO, Step Template from Tattered Lace, Poinsettias from Poppy Stamps, 
  • Glitter: SNS Embers G1034
  • Paper: Bazzill Pale Pink, assorted pinks, white, brown
  • Inks: Raspberry DO, Old Paper D
  • Computer generated sentiments
Challenges I am Supporting:
  1. Allsorts Challenges #497 Christmas Flowers (3 layered poinsettias) sep post 12/14
  2. Scrapyland Challenge #103 AG with dies SL sells (Crafters Companion Gemini Christmas tree gifted by Sue Drees, Snowflakes from IO, Step Template from Tattered Lace, Poinsettias from Poppy Stamps) sep post 12/19
  3. Holly and Ivy #42 Christmas (sep post) 1/8
  4. Sparkles Christmas Challenge #95 Fancy Fold Christmas 01/01
Stamping Hugs,


Wednesday, July 11, 2018

Step Card with Back to Basics and Beyond Challenge

Hello, Blogging Friends and a warm welcome to my newest followers.


Today is my first post as a design team member for

Back to Basics and Beyond Challenges.

It's a challenge blog dedicated to... you guessed it... getting back to the basics.


For the next two weeks, join us by uploading an "Anything-Goes" challenge as long as a step card - center step or side step - is shown.

Mine is a vintage A7 size Center Step Christmas Card.

TIP: To make an enlarged step card, make the height 5 to 5.5 inches, and the width to whatever you like: 6 - 8.5 inches. You can also adjust the side panels (steps), but I recommend one inch, with the side panels at least one inch as well.


For an additional 10% off your SNS orders, please use the code during checkout:
DonnaDT10

Some products used on my card:

Often, I don't have a die that perfectly fits the layers in my card. That's when I pull out my punches and custom fit the borders. There are 3 pieces of punched border, like this on the back:


On the front, it looks like this:


The back of a step card is a great place to add a note or other sentiment. One of my favorite sentiments for the year from the Happy Holidays rubber stamp set, it was stamped in Acorn Brown Hybrid Ink to match the cardstock. Not just another pretty set of letters, the sentiment is just as lovely for the inside of a card, as well as a card front:
   
The snowflake was cut out 4 times in white cardstock. Two of the flakes were coated with Fantasy Gold Ultrafine Glitter. When dry, the white layers were adhered to the glittery layers, slightly offset. Vintage colors were used on the Christmas Skate Digital Stamp:


Side View:
Looking forward to seeing your step creations!


Products Used:

On a Personal Note:

We stepped outside early one morning to water the plants in the front, when several deer in the front pasture leapt away to a neighboring pasture. In front of the gate was a brown lump, and we worried it was an injured deer. Upon closer scrutiny, we noticed it was a newborn fawn, who did what came natural - be still in a down position until his mother returns. So we marched back up the hill and waited. Just a few minutes later, the mom came back and they left together.


Challenges I'd like to play in please:

  1. Crafter's Castle Challenges #7 AG + option Christmas 8/4
  2. Twelve Months of Christmas #43 Anything Christmas Goes 8/4
  3. The Merry Christmas Challenge #26 Anything Christmas Goes
  4. Christmas at Sweet Stampin' #? Anything Goes Christmas 8/11
  5. Pile It On Challenges #144 Vintage 8/5 (sep post)
  6. The Holly and Ivy Christmas Challenge #32 Anything Christmas 8/1
  7. Scrapy Land Challenges #93 AG dies SL sells (Tattered lace, Tonic, SB)
  8. Sweet Stampers #22 Christmas In July 8/10

Thanks for dropping by!
hugs,

Wednesday, November 15, 2017

The Merry Christmas Challenge #43 - My Besties Penny with Penguins

Good Morning, dear blogging friends!
Whew! Less than 2 months before the end of 2017. Is it possible?

I'm happy to share:
Today begins a new challenge at the Merry Christmas Challenge Group!


The theme is always ANYTHING CHRISTMAS GOES. This can include any type of crafting at all, so work on those decorations, tags, wreaths, sweaters, cards -- Anything Christmas Goes! Every week begins a new challenge.


My card features My Besties "Penny With Penguins"

Penny is penguin crazy, and enjoys basking in their company, and dressing them up to match her own outfits!

The light "snow-laden" frame (popped up with dimensionals) was created with two die sets, and then passed through an embossing folder. The embossed snowfall was lightly sanded.


I couldn't let this one go by without glitter, so I've used three kinds. The microfine glitter graces the strings holding the ornaments. Ultrafine glitter was adhered to the greenery, with more glitter tinsel applied on top of that. The tinsel sparkles lots in real life!


Penny was colored with Copic Markers.
The ornament die and greenery are pieces cut from the Tattered Lace Art Deco Baubles.


Products:

  • Sherri Baldy's My Besties "Penny With Penguins"
  • MISC: Copic Markers, Stampin Up! Elegant Cheer sentiment, SU punch, MS Stars Edge Punch, 
  • Dies: SB Mega Curved Rectangles Nestabilities, SW Double Pierced Rectangles, Tattered Lace Art Deco Baubles
  • Embossing Folder: Craftwell Delicate Dots
  • Sparkle N Sprinkle: Waterfall Ultrafine Glitter, Sonic Silver Mircofine Glitter, Moonrise Glitter Tinsel, Tonic Deluxe Adhesive, Tear-ific Tape

Challenges I'm entering:
  1. Classic Design Team Open Challenge #19 Anything Goes for a DT 12/1
  2. Coloring in Scrapland "Winter is Coming" 12/1 (sep post)
  3. Crafty Hazelnut's Christmas Challenge Extra - Nov 1 Anything Christmas 12/1 (sep post)
  4. Kerst/Christmas - Dec #12 - Anything Christmas 12/1
  5. My Besties Aussie Challenge #11 Layer It Up 12/1
  6. My Besties Colour It! Create It! Show it Off! (Nov) thank you or Anything Goes 12/1
  7. My Besties International Challenge (Nov 15) Anything Goes option Fall 12/1
  8. My Besties Spanish Challenge Blog (#41) Anything Goes 12/3
  9. Pammie's Inky Pinkies #1746 Anything Goes 11/19 (sep post)
  10. Scrapbook Stamp Society #129 Anything Goes 11/20 (sep post)

Lots of Hugs for you!

Thursday, August 11, 2016

It's all about the "B"s!

Welcome, sweet crafting friends!
Can you see me waving all the way from Florida, USA?
The children in our area returned to school on August 10!

Thanks for stopping by for a little Dies R Us Inspiration today!

Today's post is all about The "B"s!

Birds, Blues, Birthdays, Browns, Blooms, BFFs.
*
This birthday card is for a very special, dear friend!

click below for:
STORE

Let's begin by building a flat, but dimensional birdhouse:


After putting the tape on so the sticky side faces down...


To create flat flowers:


Pretty Pearly Vellum clouds were cut using the Cheery Lynn B320 Clouds and Rain set.


Side view of the center card set - it also folds flat for mailing:


Finally, the back is just as pretty as the front! 


It looks slightly different than the front, but the card could be shown either way!


Hope you enjoyed today's ideas.

On a personal note:

Time for Missy's annual immunizations, so off to the vet we go!

First, she needed to get weighed:


Notice the red basket in the corner, how tightly it hugs the walls:


With the weighing done, the vet left the room briefly.
Normally, I hold her, and reassure her that everything will be ok. But this time, before I could get up...
We heard a funny rustling noise, and I knew Missy was digging a hole:


Jack asked, "Where did she go?"
Missy made herself as small as possible:


As the vet re-entered the room, she looked in all the usual places kitties hide. 
We finally pointed out where she was. It was a first for the vet!


Products used:

Challenges I'd like to support:

  1. Artistic Inspirations Challenges #162 Anything goes 8/13
  2. Craft Your Passion #324 Anything Goes 8/13
  3. Crafting By Designs (Aug3) Anything Goes 8/26
  4. Crafty Sentiments Designs Challenges (Aug 9) "Use Dies" 8/17
  5. Inspiration Destination Challenges #98 Anything Goes 8/17
  6. The Paper Shelter  #259 "Punches and Dies" 8/17


Thank you for visiting me today!
hugs,