My blog is called "Creative Smiles" because my designs are the result of incorporating mistakes. With fumble fingers that drop whatever they are holding - repeatedly, it takes a lot of giggles, smiles and creative patience during my crafting process. xx

Showing posts with label Embossing Powder. Show all posts

Sunday, March 14, 2021

3-D Embossing Folder and Freebies

 Hello, dear Blogging Friends!

These cards are dedicated to my cherished friend CLARA, who passed away unexpectedly last month. 

I was recently inspired by a brand new blogger Shandy at MERMAIDS AND PAPER HEARTS, and blogging friends Leslie Miller and Connie Griffin, in making the following cards. Shandy inspired me via our conversation about colors and flowers, Leslie via Stencil Embossing (even though mine is with embossing folders instead), and Connie because she is always sharing techniques with us. So I've used VIRGINAL PRODUCTS from my stash! 


Having been hidden away in my stash for years, my Crafters Companion Ornate Lace 3D embossing folder finally felt paper!

After dry embossing, VIRGINAL Encore pigment ink was applied. Each card involves different Encore ink colors:

first, dry emboss:


Then smoosh with pad and/or fingers:


In this case, Encore Ultimate Metallic Teal was rubbed on the raised areas, and then coated with a clear detail embossing powder that contained microfine glitter. The Spellbinders Bitty Blossoms were rolled in the same cardstock as the 3D folder, however, distress ink and platinum pearlescent paints were applied for visual interest. The Silver leaves are from upcycled can lid of Whey Protein Powder LOL. If you're on my blog, click on the photo to enlarge to better see the details:


Whole card:

Black cardstock, VIRGINAL Encore Ultimate Metallic Gold was rubbed on the most raised areas. In the lesser raised areas, I finger rubbed Encore Ultimate Metallic Pink in order to provide a tiny bit of visual dimension. The roses were colored in the same fashion:


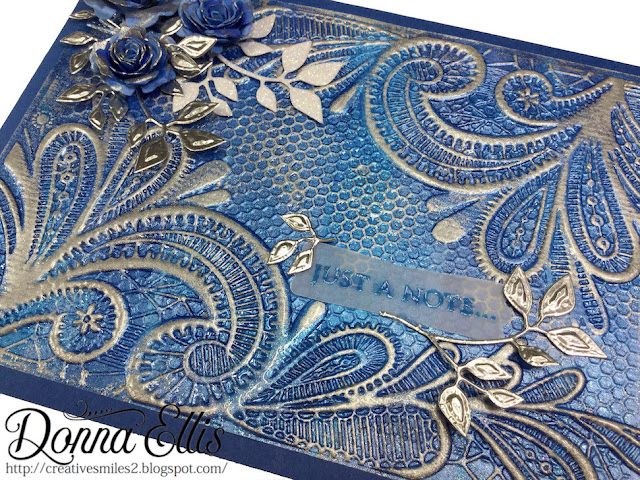
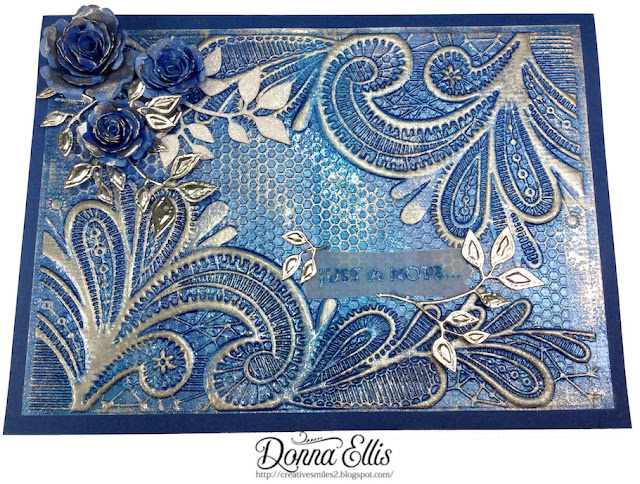
This bold blue background was fun and messy! On cardstock made for acrylics, I smooshed various acrylic paints up and down. With a very light brushing of wet glue, I then added tiny bits of blue and silver glitters into some areas. When the finished background was dry embossed, it looked pretty just as it was, but after adding VIRGINAL Encore Ultimate Metallic Silver to the top of the raised areas, it really brought out the glitz! 

TIP:

There are two coats of clear detail embossing powder on top of the silver ink. Her Virginal Inkiness was so wet, that it took two coats. I learned that highly metallic pigment inks retain their metallic qualities when used with CLEAR embossing powder, because the metallic components IN the ink rise to the surface of the clear embossing powder.


The next card uses the same aqua paper, but with VIRGINAL Encore Ultimate Metallic Silver applied to the top of the raised areas. This card was also "distressed" with the silver ink. How different it looks in comparison to the card using the Teal ink!


This card front was dredged with clear embossing powder, heat set, and then dredged again with clear detail EP mixed with microfine glitter. It's my favorite! Which is your favorite?


Lastly, is the card inspired by and made for Shandy. She likes the color turquoise (reminds her of mermaids) and she likes layered flowers. It was distressed and embossed with clear detail EP:


Thanks for stopping by! It was fun playing with goodies from my stash!

Products: Dies: Cottage Cutz Greenery 4x4, SU Modern Label Punch, TH Garden Greens, SB Carnations, SB Bitty Blossoms, Stamps: Hero Arts CL342 sentiment Inks: INKS & Mediums: assorted pearlescent acrylic paints, assorted pearlescent watercolors, assorted Encore Metallic inks, assorted distress and VFC inks, assorted embossing powders, Cardstock: acrylic paint paper, lavender, deep blue, pale blue, aqua, black, EMBOSSING FOLDER: Crafters Companion Ornate Lace 3D

Challenges I'd like to play in please:


  1. Just Us Girls Challenge #575 Trend Week Use An Embossing Folder 5/19 sep post
  2. Simply Create Too Challenge #168 Wet or Dry Embossing (I dry embossed the background, applied ink to the the dry embossed areas, then embossing powder and heat set. The sentiments are also heat embossed. 4/2
  3. Frilly and Funky (March 6) Something Vintage 3/17 sep post
  4. The Corrosive Challenge #3 Anything Goes 4/2
  5. A Bit More Time to Craft #135 AG 4/1
  6. A Perfect Time to Craft #3 AG 4/1
  7. Stamping Sensations Challenge (March) Monochromatic 4/5 (each card is monochromatic)

FREEBIE SENTIMENTS - my gift to you


My gift to you - Arrangements of the same sentiment for use on the inside or outside of your projects. Please do not sell the Sentiments. Use on any of your projects, including projects involving any design teams you might be on. Different shapes of sentiments work well for landscape or portrait shape cards.

Click on the image to bring it to full size. Because of the changes Google Made with Blogger in June 2020, your image will appear to be solid black. Don’t panic. Right click and do a SAVE. Once it is saved on your hard drive, you can open it and it will have a transparent background. I create PNGs instead of JPGs so they can be placed anywhere on a scene or project, and so backgrounds can be made using them. Please let me know if you have any problems. I hope they serve you well!

Enjoy!


Sympathy Verse:


Stamping hugs,

Thursday, June 06, 2019

Anything Goes at Lavinia World Challenge

Hi, everyone! Hope you are enjoying your summer!
It's Challenge time!


Details of our Lavinia World Challenge:
Every second Thursday a new Anything-Goes challenge will be posted with chances to win a $15 gift certificate to the store, and badges for your blog. Use ANY clear or rubber stamp - no digitals. If your project features Lavinia World stamps, your chances to win double.

While "our" Lavinia World store is located in the US, it ships worldwide. These delightfully sweet images are extremely detailed and reasonably priced. Even better, buy $25 and get free shipping! Lavinia World carries other coordinating products for your convenience (like Brushos, inks, highlight pens and more).

To make this fun card, I cheated by using one of the beautiful background papers called "Blue Sky" Laser Printed on high quality semi-glossy paper, it brought a richness and depth to my creation without extra effort on my part. Four papers come in each Paper Pack:


Because of the sheen on these papers, I had a bit of trouble photographing their true vibrant colors. I trimmed 1/4 inch off each side to make the paper a bit smaller. Here, I stamped the Aurora Fairy image with Nocturne VersaFine Clair ink and heat embossed with a black detail powder containing lots of glitter.


To give the trees their leaves, I took a tip from Darlene's gorgeous card.
Using Leaf Miniature 2 image, I stamped with black on the black trees, and Blue Belle VersaFine Clair on the blue trees. Both were heat set with black (or blue) detail powders containing glitter.


Here is the finished card after using the cute little Fairy Bugs (four to a set):


Please join us. If you've never tried Lavinia's very detailed stamps, you'll want to play for a chance to win and own a few. I'm addicted!

Thanks for visiting!


Challenges I'd like to play in please:

  1. Lil Patch of Crafty Friends #107 Anything Goes 6/16
  2. Pammie's Inky Pinkies #1922 Anything Goes 6/8
  3. Crafting from the Heart #244 Anything Goes 6/8
  4. 2 Sisters on the blog Challenge #28 Things With Wings 7/1
  5. A Bit More Time to Craft (June 2) #93 Anything Goes 6/15


Wednesday, October 03, 2018

Fairy Hugs and Sprinkles of Watercolor

Hello, Blogging Friends! Hoping this finds you doing well. Please know that if you are experiencing hardship of any kind, I am thinking fondly of you, sending love and prayers toward your dear home.

and now...

It's time for a brand new Back to Basics and Beyond Challenge!

For the next two weeks, join us by uploading an "Anything-Goes" project as long as a watercolor technique is used. The team has all kinds of inspiration and a variety of styles to view, so take a look! Hope to see yours there.

I am so enjoying this team - the themes help me play with lots of products in my stash and motivate me out of the usual styles I gravitate toward.


To see close ups, just click on any of the photos please.

I have used three types of watercolor techniques in this project.

  1. I started with watercolor paper and sprayed it with water, lightly saturating the paper. Then I softly "seasoned" the moist paper with Atlantis Burst Watercolor Shimmer Powder. Wish you could see this in person. If you enjoy playing with mediums, this is a must have for your stash! It's truly shimmery! After applying the powder, I spritzed a bit more, moving some of the color with my heat tool, and allowing the rest to dry on its own. 
  2. Then I inked up Stampendous 6x6 Blossom Scroll rubber stamp with Versafine Clair Pinecone ink and dredged with Gold Tinsel opaque embossing powder. I love the glittery sparkle! While you cannot see the defined outline of the stamp itself, I knew it would make a lovely mosaic of "uneven", sparkly color in the background:


Watercoloring the image:

  1. The darling fairies were stamped with VersaMark and heat set NOT with white embossing powder, but with Sparkle Semi Transparent embossing powder. Instead of being a plain white medium, the outline now has sparkle to it! 
  2. The watercolor resist technique was employed using Peacock Feathers and Mermaid Lagoon Distress inks applied as watercolor. 
  3. With Tombow Markers I scribbled a little pink and flesh colors onto an acrylic block and applied to the fairies with a water brush.  
  4. They were then die cut. I also used the silhouette as a halo on the left side (but isn't the silhouette adorable all on its own?):


This close-up shows the difference the Sparkle Semi Transparent embossing powder makes (check out the Starfire semi transparent ultrafine glitter on their little wings and skirt ruffle). 


And that Gold Tinsel opaque EP is amazing! 


Wish you could see it in real life. 


The Turquoise vellum was torn down one side and distressed with VersaMark ink before being heat set with the Gold Tinsel EP.

The brads were heat set with Melon Twist Semi Transparent. While still hot, I dipped the brads into more Starfire glitter. The glitter melted into the hot EP.


Even the sentiment is sparkly. It was stamped with Warm Breeze VersaFine Clair, dredged with Mediterranean Star opaque EP, and heat set. The Tuscany Star line's formulation is great for fine detail images, distressing, or bold image coverage. They are my favorite EPs in my stash:


I had fun using the vellum and punchinella in overlapping layers (is that a redundant statement?) giggle.
    Finished card is 6x6 at flat for mailing:


    thanks for stopping by today!

    Some SNS Products used on this project:


    Products Used:


    Challenges I'd like to play in pretty please:

    1. Scrapy Land Challenge #98 "AG Dies SL Sells" (Tonic, Cheery Lynn)
    2. Always Fun Challenges #78 "Dies and Punches" 10/8
    3. Pammie's Inky Pinkies #1839 AG 10/8
    4. International Art and Soul #43 NOT CAS, layer it up! 10/15 (sep post)
    5. Do-A1(1) Kreatives #22 Design Your Own Background (used paints, inks, shimmer paints, embossing tinsel) 11/1
    stamping hugs,


    Wednesday, September 19, 2018

    Hooting it Up With Inky Backgrounds

    Greetings, Wonderful Blogging Friends!
    It's time for a brand new Back to Basics and Beyond Challenge!


    For the next two weeks, join us by uploading an "Anything-Goes" project as long as an inky background is used. The team has all kinds of inspiration and a variety of styles to view, so take a look! Hope to see yours there.

    My inky rendition depicts that period of time just after dusk. I can hear softly hooting owls in the trees talking to one another, the chirping of happy insects announcing the full moon, croaking toads and frogs in search of goodies, and perhaps even some "night owls" doing their crafting!


    I printed out The Great Horned Owl digital set TWICE. (Psst! This is my very own set, and I hope you enjoy the sentiments that accompany it!)

    One owl was fussy cut to make a mask. The other was colored with Copic Markers. This is one of the colored images you will receive in the digital set.
    After die cutting a circle and placing it on top of the owl mask, I used distress inks in Black Soot, Blueprint, and Stormy Sky to create a night sky.


    The frame process:
    (if you are reading this on my personal blog, click on the photos to enlarge)


    1. Applied Super Adhesive Sheet to black cardstock, leaving "rough" protective layer in place.
    2. After die cutting shape, I removed the protective layer and burnished in Black Diamond Microfine Glitter. (if you prefer, use black glittery EP instead)
    3. I distressed with VersaMark Ink here and there and applied Fleur de Lis Chunky Opaque embossing powder.  After the fact and Because I'd forgotten how golden it is, I added a bit of Super Thick Black embossing powder on top of the Fleur de Lis color, to tone down the gold. Glittery Radiant Moss Green embossing powder was also used in the distressing process. Heat a little at a time so it does not melt the super adhesive sheet.
    4. I die cut some white fun foam in the same shape, and edged it with a black Sharpie marker. The black frame was then adhered to the fun foam for dimension, using 1/4" Double Sided Tear-ific Tape.


    I thoroughly enjoy "distressing" with glitters and embossing powders!
    frame close up:

    The set comes with a leafy twig - great for framing or using around the branch. Here I used it in rubber, embossing with more Radiant Moss Green embossing powder to give the leaves a night time appearance. 

    The sentiment was stamped with Nocturne VersaFine Clair and heat set with Black Detail embossing powder. It was distressed with the same colors as the sky background.


    The Tonic Handmade paper was distressed with 3 colors of mousse.


    Finished Card:


    Products Used:


    Challenges I'd like to participate in please:


    1. Tuesday Throwdown #410 Add Some Texture (background paper, layers of glitter and embossing powders) 9/25
    2. Always Fun Challenges #76 Fall Colors 9/24
    3. Pammie's Inky Pinkies #1837 Anything Goes 9/24
    4. Crafty Cardmakers #218 Autumn Colors (C15) 10/2
    5. International Art and Soul #42 Nature 10/1
    6. Crafty Animals #18 Anything Goes with an Animal 10/1
    7. Crafty Gals Corner #174 "3 or more layers" (6 layers of paper plus the frame which also has a die cut piece of fun foam under it) 9/26
    8. Crafty Girls Creations #50 AG 10/1
    9. Morgans Artworld Open Challenge #9 AG 10/1
    10. World Wide Open DT Challenge #9 AG DT 10/15 (used special effects in frame and paper)


    Stamping Hugs,


    Thursday, March 29, 2018

    Friends are like Fine Wine {Sparkle N Sprinkle}

    Hello, Blogging Friends! Welcome to today's fruitful post. I hope you enjoy it.


    Featuring the pretty Wine Tableau stamp set, the sentiments are perfect for most all-occasion greetings.

    republished from 12-27-11
    It's a gorgeous stamp set by artist Rosiland Solomon. Lovely sayings made it impossible to choose just one for my card, so I slightly altered the oval triplet aspect of the sketch to rectangles, accommodating as many of the sayings as possible.

    Stunning and easy to color, these images avail themselves to any coloring medium! Are you wondering why the background of the image seems muted? It's stamped on kraft cardstock, outlined with white Prismacolor pencil.


    This time I used yet another neglected art supply. High on the top shelf the Derwent Water Color Pencils were "whining" (sorry, couldn't resist the play on words). Popped open the large tin of beautiful colors, and decided to make things easy by using a blender pen instead of water for control on kraft cardstock.

    The image is heat embossed with Cerulean embossing powder, part of the Shades and Stars of Tuscany EP collection.

    A strip of ribbon is shown on each panel - one with a strip of Tear-ific Tape holding Navy Glitter. Clear EP has been applied to the cheese knife, wine glass, vase and wine bottle.


    Have you checked out Sparkle N Sprinkle's monthly Face Book Challenge?

    SNS Products Used:
    Stamps: Wine Tableau rubber stamp set 00-449P4
    Embossing Powders: Cerulean embossing powder, Shades and Stars of Tuscany EP (excellent for detail work)
    Glitter: Navy Ultrafine Opaque Glitter G1079
    Dies: Creatopia by Xyron and Spellbinders exclusive Badge Nesting Dies frames the scene, Spellbinders Petite Scalloped Rectangles


    Thanks for taking time to visit my blog today!
    Stamping Hugs,
    de