My blog is called "Creative Smiles" because my designs are the result of incorporating mistakes. With fumble fingers that drop whatever they are holding - repeatedly, it takes a lot of giggles, smiles and creative patience during my crafting process. xx

Wednesday, August 14, 2019

Christmas at Sweet Stampin' Snow People

Hello, everyone!
Thank you for dropping by.
Today, I'm cooling off from our very hot and humid Florida temperatures with a fun-loving Snow Person who is making Snow Angels!
Ahhhh, cools me off just thinking about it.


Today begins a new challenge at 
Christmas at Sweet Stampin'!


My brilliant teammates have fantastic samples to share! The challenge is ANYTHING GOES for ANY Christmas theme craft project. August's Challenge has an optional theme of Snow People!


My project features SheepSki Designs "Snow Happy" image!
This digi stamp makes me laugh! Can you picture it animated? I can!


"Happy" was colored with Caran d'Ache Luminance 6901 Color Pencils and Gamsol, and then he was die cut:


I wanted to distress the interior of the panel without any of the embossed detail around the edges have blue on it. So Post-It Tape came to the rescue:


Double Sided Tape was placed on the under side of the frame, and dredged with clear glitter from the top:


The panel behind was dry embossed and distressed with the same two distress ink colors. An old Martha Stewart Starlight edge punch was used on one side. Again, on the underside, double stick tape was applied to the star edge, and dredged with navy glitter.


He is so cute!


Some Products Used:
  • Stamps: Andrea Norris SheepSki Designs "Snow Happy", Hero Arts Seasonal Sentiments CL722
  • Dies: Sue Wilson Ornate Pierced Design CED5507, MS Starlight Punch
  • Colored: Distress Inks (BluePrint and Mermaid Lagoon) and Caran d'Ache Luminance 6901 Color Pencils with Gamsol (in blues and turquoise blends)
  • Clear Glitter (for border), Blue Glitter for stars
Challenges I'm submitting this card to:

  1. The Holly and Ivy Christmas Challenge #54 AG Christmas 8/25
  2. Cute N Crafty Christmas #16 Anything Christmas Goes 8/25
  3. ScrapyLand Challenges #119 AG SL Dies (Sue Wilson) 8/17
  4. Merry Little Christmas Challenge #13 Anything Christmas Goes 9/1 (check 9/5)
  5. SheepSki Designs Facebook Challenge #38 Fave Embellishments - (my favorite embellishments are to put glitter or embossing powder on die cuts, creating dimension on a flat card using that glitter and/or embossing powder) 8/19
  6. 52 Christmas Card Throwdown color challenge 8/17 (sep post)
  7. Dream Valley Challenges #207 Hand Coloured Image 8/25 (sep post)
  8. Sparkles Christmas Challenge #103 "It's Snowtime!" 9/1

Stamping Hugs,


Friday, August 09, 2019

My Besties - Get Well

Waving "Hello" to each of you, and wishing you a great week.
Today's card share is a sweet image from the Get Well Besties line, for a card swap - theme was to have a person on the front.


The card is 5.5" x 7" with a woven die cut frame and glittered leaves:


She is so cute! I also colored this image in bright green and pink on an oval shaped card here.

The sentiment is heat embossed. A rectangle containing the image was distressed and then popped up on another distressed die cut:


Thanks for stopping by!

Products:

  • Dies: SB Bow Elegance S6-017, SB Mega Class Long Scallop Rectangles Nestabilities, SB Leaves So Very Gorgeous S5-353,
  • Stamp: Get Well Besties, SU Sweet Little Sentiments set
  • Ink: Distress Milled Lavender and Spun Sugar, VersaFine Clair Monarch
  • Coloring Medium: Caran d'Ache Luminance 6901 Color Pencils with Gamsol and  Copic Markers
  • Satin Ribbon, Flower, Glitter, Clear embossing powder

Challenges I'd like to play in please:

  1. Mybesties3DdecoBlog Challenges #8 AG with a Bestie 9/1
  2. My Besties Aussie's Challenge #8 AG with a Bestie 9/1
  3. My Besties International Challenge (Aug 1) 
  4. Pammie's Inky Pinkies Challenges #1931 Anything Goes 8/11
  5. Crafty Gals Corner #197 More than 3 layers (2nd entry) has 5 layers 8/14


Stamping Hugs,


Thursday, August 01, 2019

Mermaids at Lavinia World

Hello, my friends and followers!
The first of August fell on a Thursday, so I have three DT posts this morning.
Please click here for 2 Crafty Critter Crazies with Sheepski Designs
and
click here for Moving Along With the Times - Bee Theme

My Lavinia World post today includes a little freebie digital gift to you,
and a PICTORIAL TUTORIAL.


Details of our Lavinia World ChallengeAn ANYTHING GOES theme using ANY brand clear or rubber stamp - no digitals. Winner receives
a $15 gift certificate to the Lavinia World store.

While "our" Lavinia World store is located in the US, it ships worldwide. In the US, buy $25 and get free shipping! Lavinia World carries other crafting supplies for your convenience.


Because I've received a few comments/e-mails asking how to use these amazing stamps, I've taken a pictures during my creative process, and hope it will encourage others to try any or all of these techniques:

STEP 1

If you don't really know how to ink up a background, or maybe don't have inks in your stash, try using printed paper, embossing folders and the lovely, inexpensive LAVINIA PAPERS. I was very pleased with the quality of the papers - light-weight, yet sturdy; coated, yet regular dye Distress inks dried on them; any stamp ink works on them; they are embossable.

I began with Spellbound #1 6x6 underwater theme paper AND CUT IT to fit my frame. (for another sample where I cut the Lavinia paper, click here).


2. Place your stamps on the panel to see what will fit, moving them until you have a pleasing scene:


3. Choose your colors (I used the one stringy stamp below to allow for more color options. You can see how fine the detail is in the stamps. At this point, a lovely sentiment would finish this card off perfectly!


4. Add Bubbles in two colors for texture and interest:


5. I use VersaFine Clair in all my embossing unless I need a translucent EP color.
Stamp and heat set sentiment:


6. Stamp Lavinia Guinevere Mermaid with VersaFine Clair Green Oasis. She has a lot of detail in her "scales" and hair.


7. I chose to heat emboss her with a highly glittered formula, and it covered up a little of the detail:


8. The coating on this paper does repel regular watercolor. I used Createx Pearlized Copper Acrylic Paint on the rocks, and lightly painted it so the outlines would still show. I also outlined some of the details with Uni-Ball Pen Signo Gel-white. Applying VersaMark to the edges, I heat set more EP the same color as the mermaid. This is where my boo-boo happened. I hadn't noticed that some stray EP heat set to the white "a and n" so I used my VersaMarker on those two letters, reapplied white detail EP, and heat set. Not perfect, but looks good:


9. Which to use? Black background or White? Straight panel, or make it crooked (crooked is my usual preference). Actually, this was a hard decision! giggle.


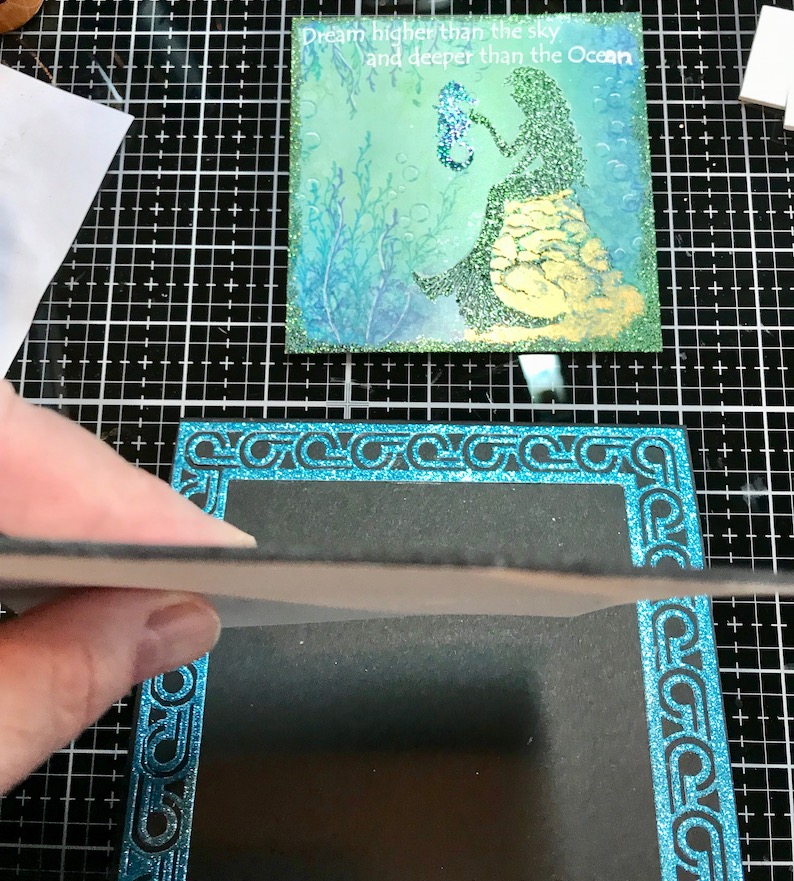
10. To pop up the mermaid panel, fun foam was used. Since I didn't have any black in my stash, a black alcohol marker was used to color the edges:


11. Place Double Sided tape on both sides of the fun foam. Adhere frame and fun foam to 6x6 black card base:
 

12. Emboss a scrap of card stock for die cut grass:


13. Add grass to the sides of the panel:


14. Add top panel and a few more grassy details:


Notice that there are white highlights and heat embossed areas in the rocks:


Showing a little of the glitter on this project:


Muting the glitter a bit so you can see detail:


Interior heat embossed and stamped with same colors:


And a little Humor:

Volcano Goddess - keeping a lid on the volcano so the rest of us are safe (giggle). Talk about a HOT SEAT! (more silly giggling) (photo taken without any lights)


Please scroll to the bottom for your digital gift.


Products Used:


Challenges I'd like to play in please:
  1. ScrapyLand Challenge #118 AG SL dies (IO and Tonic) 8/7
  2. Country View Challenges (Aug) Texture 9/1 (check 9/14)
  3. Classic DT Challenge #8 AG DT 9/1
  4. Craft Rocket Challenges #62 - Anything Goes 9/1
  5. Creative Fingers #168 8/8
  6. Love to Craft Challenge #37 Anything Goes 9/1 (check 9/5)
  7. World Wide Open DT Challenge #7 AG DT 8/15

A Digital Gift for You

It's a bit ornate, but here's a fun mermaid digital sentiment to use on your mermaid projects. This is for personal use only, and may be used on your design team creations. Click on the sentiment to make it full size. Then right click to download as a SAVE PNG. (not for commercial use). Enjoy!

A Freebie Gift PNG to my Followers-
NOT for commercial use:


PS - one of my followers said when she right clicked on the image to save it, the entire image was black except for the starfish and shell. But once you have the saved item on your hard drive, I promise the letters are black and the background is transparent.
Stamping Hugs,
de

Moving Along With The Times Challenge - Anything With Bees

Greetings, friends!
Apologies that there are three posts this morning.


It's time to share a Project for the new Moving Along With The Times Challenge!

Challenge #103's theme is ANYTHING TO DO WITH BEES - for the next 2 weeks upload your creations featuring bees! 


My project features a precolored freebie from The Graphics Fairy called Vintage Bees - Blossoms. The papers are from Linda Simpson Designs from two collections. One is blue-ivory colors and the other is green-tan-brown colors. The quality is beautiful.

Even though the papers and topper are digital, they have been used traditionally, with layers, ribbon (trim), inks, and punching.


Products Used:

Challenges I'd like to play in please:

  1. Crafty Gals Corner Challenges #197 3+Layers (5 layers, plus the punched layer and fabric trim) 8/13
  2. Crafting by Designs AG 9/1 


Hugs to my friends,