My blog is called "Creative Smiles" because my designs are the result of incorporating mistakes. With fumble fingers that drop whatever they are holding - repeatedly, it takes a lot of giggles, smiles and creative patience during my crafting process. xx

Sunday, April 14, 2013

Wanna See My Blob?

Hello~ It's not a typo! 

Wanna See My Blob (not blog) is exactly right!

Originally titled "Recycled and Deconstructed Christmas"

... but... 

"Wanna See My Blob?" 

is much more appropriate at this point.


blob    BLOB   blob    Blobbbbbbbb


but first --
my card is created with a pretty recycled image from a store-bought Christmas card, and then a few enhancements, including... The Blob!


Isn't this sketch so pretty?

I'm delighted to play in The Deconstructed Sketch Challenge for the first time!

soooooooo...........


Want to see my blob?  


To achieve this blob look, apply glue to back of bow, then accidentally drop the bow (due to fumble fingers) onto your project.

Carefully pick the bow up, only to drop it a second time FACE DOWN on top of the glue which just transferred from the bow!

Next, attempt to mask the glue blobs now on the bow, with a little red glitter. But drop the spoon first, so that the glitter falls on top of the white glitter, right where the glue transfer took place from dropping the bow the first time.


Then, after trying to brush off the unwanted red glitter, 
just recognize that the situation is hopeless, adhere the bow, and let it go! After all, it's still a pretty card 
<giggle> 

here is a better view of The Blob

Welcome to my life with every layer and embellishment I add to a card and now you know why Fumble Fingers is my middle name.

Do you see the several other blunders on this oh-so-pretty Christmas card? If you can find them, point them out to me in a comment, and I'll put your name in another time for this month's blog candy drawing.


TIP: With a VersaMarker, I covered the white area around the reindeer, coated it with Sparkle Embossing Powder and heat set.

TIP: The red glitter is adhered with SNS Brushable Glue in the scallop area, and with SNS Tear-ific Tape on the inside of the card.

TIP: To camouflage the shiny "sticker" part of the gold rhinestone flourish, SNS Golden Rod Velvet Glitter was applied, and then gently brushed off.

The ribbon is adhered with some Fabric Glue, and, inadvertently, so is some of the red glitter.

The poor, dear (now battered) bow was created on the Craft-dee Bowz tool.


Fabulous Challenges this card is submitted to:


Supplies Used in this project:

Recycled store bought Christmas Card (reindeer image)
CB Holly Ribbons 5x7 embossing folder
IO Pine Branch die
SB Fleur de Lis die
MS Scallop Punch
Adhesives: SNS 1/2 inch Tear-ific Tape, Aileen's Quick Dry, Dimensionals, regular tape
Paper: White, Red, Green, Gold Glossy cardstock
Wine Satin Ribbon, Sticker flourish,
VersaMarker
SNS Fire Engine Red ultrafine glitter
SNS Sparkle Embossing Powder EP107
SNS Brushable Glue
SNS Golden Rod Velvet Glitter
SNS Fabric Glue


Thanks for stopping by to enjoy my blob today! Remember, find some other boo-boo's on this card, leave them in your comment (along with a little sugar, of course), and have your name submitted another time for April's blog candy (a Papertrey Ink set).

PS - this card was also shown as inspiration on the 4-25 Jingle Bells inspiration moment post.

Stamping hugs,

Friday, April 12, 2013

Wee Winged Little Sister Besties

Note: April's Blog Candy Question can be found here. Deadline is April 30.


Aw...

  aren't we just too,

         TOO
                 sweet?

      and too cute?

             and OH SO darling?

Aren't we?

Introducing Sherri Baldy's new creations

"Wee Winged Besties" 

There are several images for this set - click here to view them all and get your daily dose of adorable-ness.


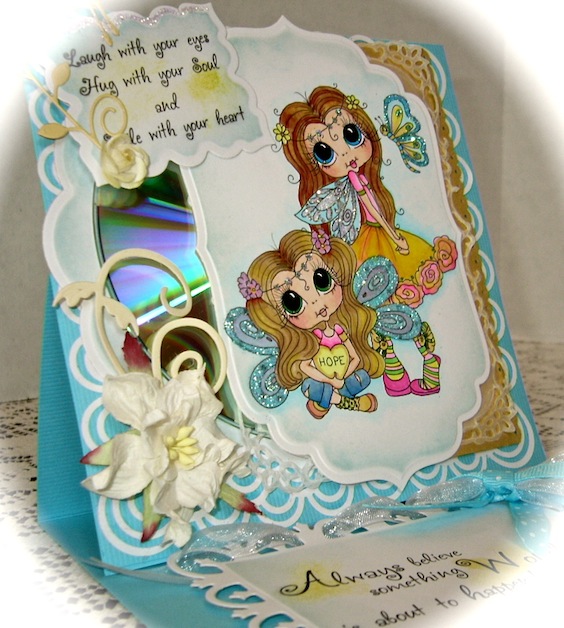
Each month, the design team at Scrapbook Stamp Society is given a challenge. This month, we are to create cards utilizing embellishments not commonly seen on cards. I was given this adorable image called Wee Winged Little Sister Besties.


It was then that I noticed Big Sister was actually posing in front of a mirror so she could admire her pretty little self, 
          and to make sure her perfect little wings were on straight and had just the right amount of glitter,
                     and that her tights were properly pulled up.
                                 And... you know how big sisters are...


It was difficult keeping my reflection out of the "mirror" while photographing

The CD is both her mirror AND my uncommon embellishment for the card.


Fumble Fingers here used the Craft-dee Bowz to make the little bow. Two layers of organza white, and one layer of poke-a-dotted grosgrain aqua ribbon.


The sentiments for this 6x6 easel card are computer generated.


one more view of the "mirror"


This card is submitted to the following fabulous challenges:

The Besties Challenge- #14 - Use Flowers (flowers as embellishments and in her dress)
Artistic Inspirations- #38 - Anything Goes
The Crafty Bloggers Network- #10 - Anything Goes
NEW - The Paper Girls #1 - Anything Goes
Paper Take Weekly - Bingo - (first column, Glitter, Die Cuts, Blooms)
Tuesday Throw Down - #142 Fancy Folds (easel card)
Creative Moments - #14 Things With Wings (two little fairy sisters)
Digi Stamps 4 Joy - #64 Anything Goes
Fab N Funky Challenges - #166 Spring Colours
Brown Sugar Challenge - #37 Step or Easel Card (easel card here)

Products Used:

*NEW* Wee Winged Little Sister Besties by artist Sherri Baldy
Sentiments are computer-generated
Sparkle N Sprinkle Waterfall Glitter G1071
Sparkle N Spirnkle Waterscape Glitter G1108
Sparkle N Sprinkle Silver Dreams Glitter G1002 (forehead jewelry)
Sparkle N Sprinkle Silver Pearl embossing powder (over the copics on little sister's wings)
EK Success scallop border punch
MS  Punch around the page
SB Grand Big Scallop Circles
SB Decorative Labels Eight
SB Labels 23 Nestabilities
SB Grand Nestabilities Labels Four
SB Fleur de Lis Rectangels S4-317
Cardstock: White, Gold, Aqua, Vellum
Ink: Sunny Yellow, Aqua
Copic Markers
Flowers, CD, Ribbons

Thanks for dropping by today!
hugs,

Wednesday, April 10, 2013

Morphed Butterfly

Note: April's Blog Candy Question can be found here. Deadline is April 30.


Have you ever met one of those
special 
blogging buddies 
who almost instantly becomes not just a friend, 
but a Muse as well? 

Shirley Deatcher and I have long enjoyed visiting each another's blogs. 

Recently, we exchanged butterfly cards as well. 

Today I made another butterfly card, courtesy of seeing Shirley's inspiring card hanging on the bulletin board over my computer.

Shirley sent this gorgeously shimmering, textured butterfly card. (just click on her card to find out how she created the effects). It became my inspiration in using a pretty new Inkadinakadoo butterfly stamp which was feeling sadly neglected.

The only similarity in these two cards is that both have large, heat-embossed butterfly images.

That's 'cuz mine morphed. Without any planning. It just happened.

That means I had no forethought except I wanted to use the new image (smile). This week's Sketch N Stash challenge inspired my background. The hosts at Sketch N Stash provide an awesome sketch, and then challenge us to use new or neglected Stash.

In this case, the Bazzill Bling cardstock is at least 6 years old, the green Stardream CS is 4-5 years old, the  Radiant Moss Embossing Powder is at least 2 years old, the ribbon is a good 3-4 years old, but the butterfly is only a month old! (hoping to redeem myself). All these items had never been used (hanging head in shame).


My photographs do not capture the card correctly, as is frequently the case with blingy stuff like embossing powder and glitter (this is glitterfied embossing powder - it actually looks more like glitter than EP).

The green powder has been combined with gold and green glitters, to produce a spectacular effect.

Depending how the card is held, the glitter sparkles green or gold, but not both at the same time.

The cardstock is also blingy except for the white, which is matte. The Bazzill Bling has been distressed and inked with Meadow dye ink and heat set. VersaMark was smooshed in areas of the four panels and glittery embossing powder heat set, to produce a lovely effect. Wish you could see it!


and I thought, 

"How Perfect!" 

Two virginal embossing folders from Couture Creations and SNS Embossing Powder were readily available.


This card is submitted to these great challenges (thank you Challenge hosts!)

Sketch N Stash #111 - see paragraph in blog post (cardstock, EP, ribbon, butterfly image)
Creative Moments - #14 Things With Wings (butterfly)
Whimsical Designs - Emboss It - (2 embossing folders, 1 embossing powder)
Artistic Inspirations - #36 Anything Goes
Card Mania Challenge - #18 punches or die cuts (2 SB dies Fleur de Lis)
Crafty Bloggers Network - #10 Anything Goes
LEJ Designs Challenge - #48 Show us your Ribbons (green & gold in the middle)
Flutterby Wednesday - #235 must have butterfly or fairy
Rhedd and Rosie's Challenge - #4 Monochromatic (all green - except white panel)
2 Sisters Challenge - #138 Anything Goes


Products Used:

Inkadinkaclings Butterfly
Sparkle N Sprinkle Radiant Moss Green embossing powder EP271
Inks: VersaMark, Ranger Meadow dye ink
Cardstock: Bazzill Bling green, White, Stardream Green
Die Cuts: SB Fleur de Lis embossing dies
Ribbon
Embossing Folders: Counture Creations Tied Together and Venus Crest
Adhesives: Quick Dry Glue, SNS 1/2" Tear-ific Tape, Dimensionals

Thanks for stopping by (and thanks for inspiring me AGAIN today, Shirley!)

hugs,

Wednesday, April 03, 2013

Glitter and My Spring Time Blonde-Blue Butterfly

Note: April's Blog Candy Question can be found here. Deadline is April 30.


Yippee! Here in Florida we are receiving a very welcome deluge - the rain is needed as we are in our Fire Season. But this post is about Glitter and Butterflies!

and

er...

HOARDED SUPPLIES (oh the horror of it all!)


Using Sparkle N Sprinkle's Cloud Nine Velvet Glitter is probably my favorite technique at the moment because it's so EASY to achieve beautiful results.


(see this butterfly's sisters at Velvet Glitter Butterflies and Sparkly Pink Butterflies for the same technique, and more ideas).

This project is a combination of two techniques found on the


  • Cover White cardstock with Super Adhesive Sheets (or any ultra sticky double-stick tapes)
  • Cut the white panel to the size/shape desired.
  • Pull off the protective top sheet of the sticky paper and apply a little Cloud Nine Velvet Glitter.
  • Rub glitter into Adhesive Sheet, tap off excess.
  • Burnish remaining glitter, to bring out the sparkle.
  • Apply any outline style sticker on top of the Velvet Glitter.
  • Press firmly so sticker is firmly adhered.
  • Use regular markers, watercolor pencils or watercolor crayons to color (Copics can also be used).
  • (With a Dove Blender pen, I pulled the color directly off the crayons and blended on top of the glitter, within the lines of the sticker. The middle of the butterfly has some "smudged" blue just above and below the body to add "dimension" to the sticker.
  • That's all there is to it!

The Shimmer semi-transparent embossing powder offers a chance to DISTRESS with sparkling, silvery-blue-pink glitter encased in clear EP. (on Cheery Lynn tropical flourish die cut)

For more dimension, the pearl stickers and tropical flourish die cut are woven so that they are partly beneath each other, and partly on top.

The pearl stickers are pretty, but sometimes that "sticker-stuff" shows between the rhinestones or pearls, and detracts from the card. Sprinkle on matching glitter to make the clear, shiny sticker part invisible. 

TIP: If your background is not glittered, try using any color complimentary glitter between your pearls or rhinestones. The effect is still pretty. There is an example here, (5th photo from the bottom, using white pearl flourish with green glitter between the pearls).


The Cheery Lynn Fanciful Flourish die on the inside, is also inked with VersaMark and heat embossed with the same gorgeous Shimmer EP from Sparkle N Sprinkle.

Do you ever hoard your supplies without meaning to

I KNOW you do!


This particular hoarded supply has now been shared with several friends - it is years (and years and years) old - it is the pretty Butterfly Sticker - I had about 10 sheets of it in gold, and another 10 in silver (grin) - I really am not tired of it - because I love the sticker, and I love the technique.

Mostly, it was hoarded because I forgot about the stickers until December - and I've been trying to use them up (smile)


Products Used:

Words Had Wings 3575-451B
Memento's Paris Dusk Dye Ink (inside sentiment)
Staz-on Ultramarine Solvent Ink Pad (cover sentiment)
SNS Cloud Nine Velvet Glitter (microfine) GM2000
SNS Super Adhesive Sheets SAS02 (double sided)
SNS Brushable Glue #540
SNS Double Sided Tear-ific Tape SAT01
Dove Blender Pen
VersaMark Ink
SNS Shimmer EP
SB Embossing Folder (M-Bossibilities EL-002 )
SB Grand Nestabilities Labels One
CL Tropical Flourish Die
CL Fanciful Flourish Die (inside)
Lyra Aquacolor Crayons
Class A Peel Stickers (any stickers having an outline, open interior)
Cardstock: Chiffon Yellow, Pale Blue, Blue, White
Recollections pearl stickers
Biblical Impressions sentiment stamp

This card has been entered into the following fabulous challenges:

Creative Moments Challenges #14 - Things with Wings
Whimsical Designs Challenges - Shaped Cards
Everybody Art Challenge - #230 Shaped Cards
Cheery Lynn Designs - Back to Nature (Butterfly) - dies are on outside and inside of card
Papertake Weekly Challenge - Anything Goes
Through the Craft Room Door - Anything Goes
Use it Tuesday - #52 All About Spring
Vickie's Challenges - April's Anything Goes
NEW A Little Bit Crafty - First Challenge - Anything Goes
NEW Emmas Cards UK - #15 Butterflies

Thank you for stopping by!
Hugs,