My blog is called "Creative Smiles" because my designs are the result of incorporating mistakes. With fumble fingers that drop whatever they are holding - repeatedly, it takes a lot of giggles, smiles and creative patience during my crafting process. xx

Friday, March 10, 2017

A Sunny Hello

Greetings, Sweet Blogging Friends!
If you are following me via e-mail, apologies for the duplicate post.

I clicked the wrong button (PUBLISH) prior to writing parts of my post.
So this could be called "Post of Blunders" but it's not (giggle)

Today's post could be called:

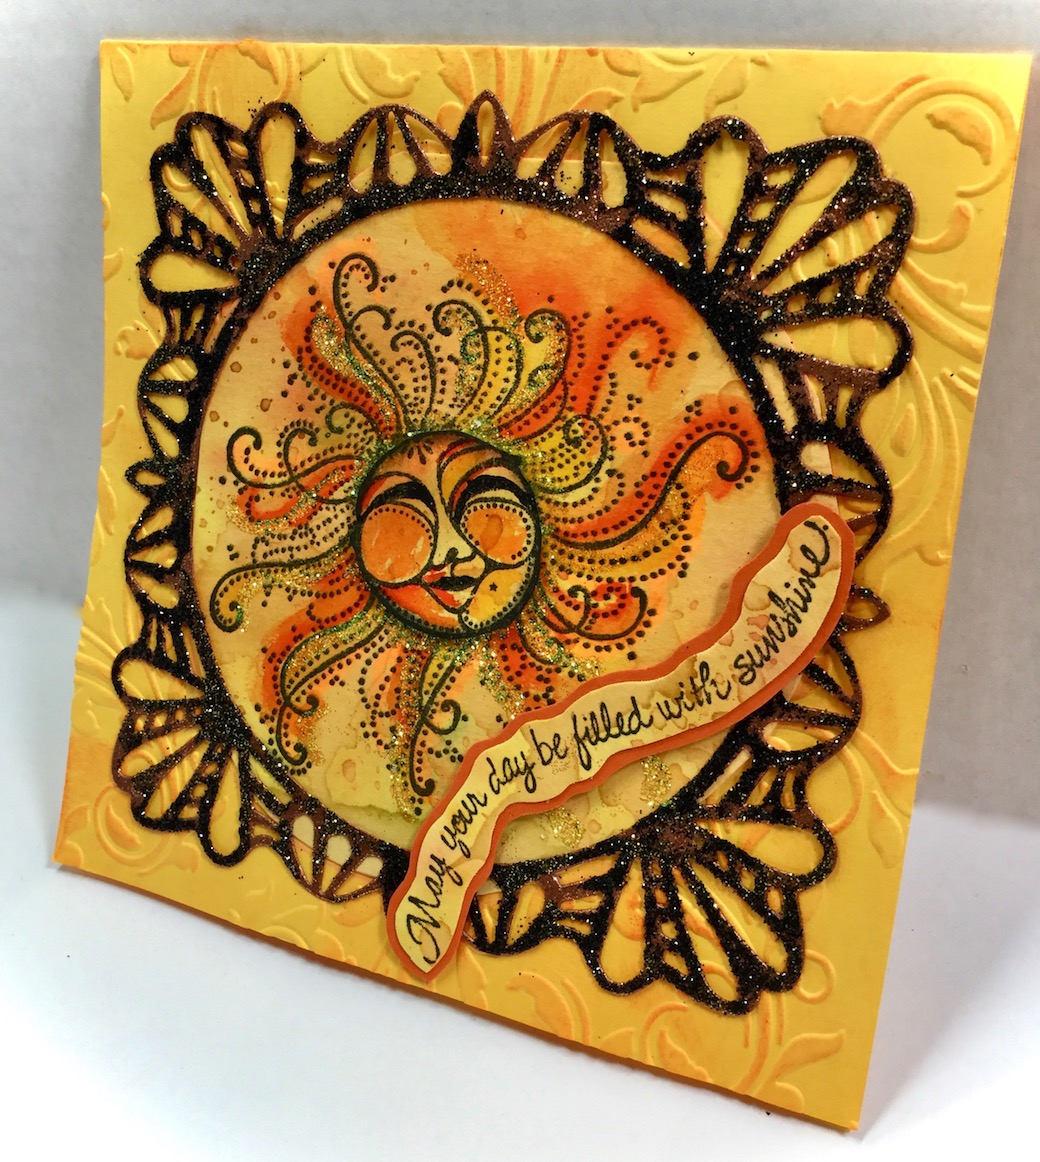
DISTRESSING with Glitter

(can there BE such a thing?)

This beautiful, glitter-full, sparkly copper frame provided lots of fantastic sparkly effects, but was not dark enough for the project, so I decided to distress the EP with two more colors of glitter:


Final Frame (try to ignore the yellow glitter in the middle - that's not what it really looks like LOL):


The frame is truly sparkly, and has fantastic texture - I just could not get it to sparkle the way it really is. (and of course, the transparent yellow in the sun looks like an unwanted opaque gold in the photo).
I can't win with cameras.

This is more how the transparent Sunny Daze glitter actually looks, only sparklier:


Cute Sentiment:


The Sun's Friendly Face was stamped twice on the watercolor background. The 2nd image was fussy cut around his crinkled eyes, colored with Zig's and distressed around the edges with Memento ink. It was then popped up for dimension and added depth.

The background for the sun was done with Color Burst watercolors.
The image is slightly highlighted using Zig Watercolor markers:


Should brighten someone's day!


Products Used:
Images: Stampendous Sun and Sunny sentiment stamped in black
Memento Tuxedo Black Ink
Copper Dreams (glittery) Embossing Powder distressed with Midnight Gold Glitter and Black Ice Glitter
Sunny Daze Glitter around sun
Color Burst Watercolors, Zig Watercolor markers

Challenges:

  1. 613 Avenue Create "Anything Goes: twist - no digitals" 4/1
  2. Cards und More - MUST STAMP - #179 Friendship (my sentiment says "May Your Day be filled with Sunshine" stamped in black ink 3/16
  3. Craft Rocket Challenges #34 "No Patterned Paper" (used watercolor paper with Color Burst powders) 3/17
  4. Crafting With An Attitude #25 Anything Goes 3/26
  5. Crafts Galore Encore Challenge (March) Anything Goes 4/1


Thanks for stopping by today!
hugs,

Tuesday, March 07, 2017

TWO BLOGGER TIPS - ENABLING E-MAIL AND CHOOSING BLOGS TO SHOW

This is updated from the February 24, 2014, original post due to Blogger/Google + changes.
Since a few people each week still ask about this, the blog post is being republished.


BLOG TIPEnable email address

Why would you want to do this?

Do you have Email notification set for your Blogger Blog? If so, you know that each time someone leaves on comment on your blog, an email notification is sent to you.

Sometimes it is nice to “reply” via the email, like when someone asks a question. Unfortunately most people do not have their email address “enabled” so that an email can be sent. It might show up as DonnaEllis@no-reply.blogger.com

Not having that email address makes it difficult for anyone who owns a blog and wants to respond.

Sometimes, we don’t want people to have our email address. But mostly, it is a case of not knowing how to enable our email address.

To correct this, go to your dashboard.

IF YOU ARE USING BLOGGER WITH A GOOGLE + ID:

*NEW* Because some Blogger users (like me) have enabled a Google + ID, but NOT a Google+ Blog format, the Blogger User/ID information is no longer in the top right corner.

For Blogger Blogs using Google+ IDs in addition to Blogger ID, instead, do the following:

  1. Go to Dashboard
  2. Go to SETTINGS (left column)
  3. Go USER SETTINGS
  4. On the right side of the page are some options. 
  5. Under GENERAL, select USER PROFILE.
  6. Make sure that BLOGGER is selected and NOT Google+ :


Click on EDIT (directly under the BLOGGER selection):


A new window pops up:

NOTE:

  • if you are reading this on my blog, please click on the photo below so you can see the full size photo completely, and the writing on the right will not interfere with the photo. 
  • if you are reading this via email, I'm hoping it already is at full size for your viewing. If it is not, please click on the title of my blog post in the top of your email, and it will take you to my blog post so you can read it there.

IF YOU DO NOT HAVE A BLOGGER ID, THE FOLLOWING SHOULD WORK:


In the top right (where your name and picture are), click on Blogger Profile.

On the right is a button to Edit User Profile. Click it.

The EDIT USER PROFILE page pops up.

Under the section for PRIVACY, click on SHOW MY EMAIL ADDRESS. Add the address you’d like to have people respond to. This does NOT “advertise” your email address. It merely shows up when people hit “reply to email” when you have left a comment on their blog.

Be sure to click on SAVE!

If it does NOT have a Blogger option in the top right corner of your dashboard, simply follow the directions above for Blogger users who have a Google + ID.

________________________________________________

BLOG TIPChoose which blogs to show in blogger

Why would you want to do this?


Do you contribute to several Blogger Blogs? The default setting is to show all the blogs you contribute to. This means when people visit your profile (as in returning a comment from their blog), they will see all the blogger blogs you are affiliated with, and have to choose which of the blogs they want to take the time to visit trying to locate your personal blog.

It's frustrating to want to return a comment, only to have 7 or more blogs pop up, forcing you to hit or miss which blog might be the author's personal blog.

To correct this, go to your dashboard. In the top right (where your name and picture are), click on Blogger Profile.

On the right is a button to Edit User Profile. Click it.

The EDIT USER PROFILE page pops up.

Under the section for PRIVACY, click on

SHOW MY BLOGS, select the blogs you want displayed, and UNCHECK any blogs you don’t want to show up. This helps visitors who look at your profile trying to locate your personal blog(s) in response to your comments left on their blogs. Be sure to click on SAVE.

For example: I contribute to NINE blogger blogs. I don’t want people to wonder which of those blogs are mine, so only 2 of my blogs are checked.

Be sure to click on SAVE!

________________________________________________
hope this helps someone today!
hugs,
de


Friday, March 03, 2017

Google IDs

Hi! Most of us use Google's Blog format. Some of us use a Google + ID, and others use a Blogger ID.

Did you know you can use both, whether you have Google + or not?

Trying to find an email address or personal blog link on a person's Google+ ID can be frustrating at times if the proper information has not been added.

So this is how you can add it to your own ID. Why should you do this? It will increase the number of return visits and comments on your blog.

Go to your Google+ Profile page.

You will see a boldly colored graphic at the top of the page, with your photo in a little circle at the bottom left of that graphic, with your name. Tot the right, in white letters, it says “ABOUT” and then has three dots and then has a white button that says EDIT PROFILE.

Click on EDIT PROFILE.

A smaller window opens up. It says EDIT PROFILE. Directly under it is the small graphics logo with your photo. Just to the right of your photo is a circle with the letter "i" in it. Click that.

Another window opens that says ABOUT ME - CONTROL WHAT PEOPLE SEE ABOUT YOU.

Where it says PERSONAL CONTACT INFO, put in your email address (that will allow people to hit reply to your comments on their blog, and reply to you via email if they want to)

To the right is a square that says SITES.

Click the pencil to edit.

A small window pops up.

You should be offered several options I believe. One should be CONTRIBUTOR TO. Click on the plus sign and paste your blog link into it. Be sure to check mark CURRENT. Then click OK on the bottom right.

Hope that helps!

You deserve to have people find your blog and return the favor of comments, right? 

hugs,
de

Thursday, March 02, 2017

Embossing Powder and Butterflies {Cardz 4 Galz}


What a joy to see you here!
Thanks for taking time to visit.

It's time for the 42nd Cardz 4 Galz challenge!


Badges are awarded for the Spotlight Winner and Top Picks.

Challenge #42 is hosted by ME! (giggle) -and the theme is:  Embossing Powder.
You may have 3 separate submissions, and have as many cards as you like on each submission.  

Show us your cards using embossing powder in any way! 
Challenge ends on March 15.

Taking the easy way out, I smeared VersaMark ink on die cuts, dredged in glittery embossing powder and heat set. The Gold Tinsel EP actually looks like a rich ultra glitter in person - the EP actually does not show up over the glitter. In this way, I was able to create a sparkly frame without having to wait for messy glue to dry. The butterfly is also embossed:


After adhering the four-layered butterfly from Impression Obsession, I carefully spooned a little EP onto the center area to distress the project for visual interest  and heat set from under the cardstock - to add even more sparkle:


Here is a peek at the card prior to the distressing with just lightly heat embossed sentiment in the background:


It is always a pleasure seeing your artful treasures,
so please come play with us.


Tuesday Throwdown is having a WINGS challenge, so I created a pairing card for that as well using the same dies and similar color scheme - one is with embossing powder, the other is with glossy cardstock and Parisian Mist Glitter!


I used Super Adhesive Sheets (double stick sheets) to die cut the butterfly, and burnished the glitter into the top layer.

1/2" Tear-ific Tape is on the back of the smaller frame, so that the glitter could be burnished into the openings on the front side, and then peeled, to adhere the small frame directly to the card on the backside:


In real life, both cards are equally sparkly whether just glitter was used, or the embossing powder - Neither required the use of glue.

Products Used:
Sparkle N Sprinkle:

Impression Obsession Butterflies Dies
Sue Wilson Butterfly Frame Dies
Vellum (gold and white for butterfly layers)
Gold Glossy and brownish-gold cardstock (for under the EP)

Challenges I would like to support please:

  1. Classic DT Open Challenge #12 "Anything Goes for a DT" 4/1
  2. Craft Rocket Challenges #34 - No Designer Paper" 3/17
  3. Crafting by Designs "March" - "Anything Goes" sep post 3/31
  4. Crafts Galore Encore Challenge "Anything Goes"  4/1
  5. ScrapyLand Challenges #61 Anything Goes with Dies SL Sells 3/13
  6. Tuesday Throwdown #332 "Things with Wings"  3/6
  7. World Wide Open DT Challenge #19 "Anything Goes for a DT" 3/15


Thanks for popping by!
hugs,