My blog is called "Creative Smiles" because my designs are the result of incorporating mistakes. With fumble fingers that drop whatever they are holding - repeatedly, it takes a lot of giggles, smiles and creative patience during my crafting process. xx

Saturday, March 16, 2013

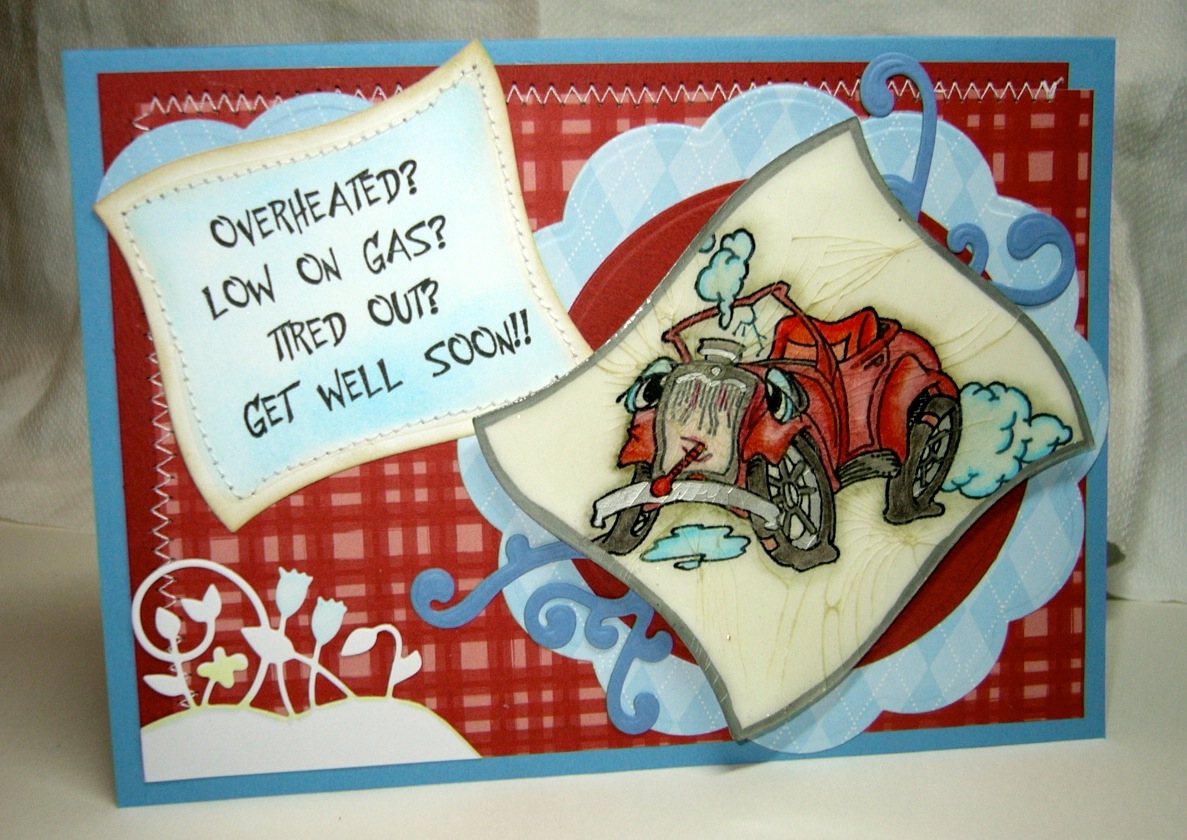
Overheated? Low on Gas?

Blog Candy Offer Deadline March 31 - three Sparkle N Sprinkle Sets - please click here and scroll down for details.

Happy Saturday! Today's card share is very simple. I needed a masculine 'get well' card in a hurry. (for complete directions to make this card, please click here.)


Both stamps are part of this adorable Sparkle N Sprinkle set:


I actually made this in one day - no small feat for fumble fingers here.  

If you enjoy breaking things, or need a little therapy, the technique can be very satisfying. 


The "Cracked Glass/Ice" technique is perfect for this Get Well card - contributes to that "run down" feeling. The "cracks" seem to radiate from poor old Henry.


This fun technique also covers up mistakes made while coloring. :-)  

To the left is a close up of the cracked ice.

A shiny close up is shown below.
Video and written tutorials can be found in the SNS Tips and Techniques section. Samples of other styles of cards using this technique are available, too, at the bottom of the page.

There is also a hint of color on the little white flowers die cut. The stitching adds a bit more texture to this card.

One of my favorite new challenges: Use It Tuesday, encourages us to use our old stash. This week it is Diecuts, Punches, Cutouts. The two Abstract Shapes dies have never been used, and the two Flourish Accent dies have never been used. Both designer papers by DCWV and  SU are old, and have never been used.

The Spellbinders Abstract Shapes is so old, that the item number is S4-001 - SB's first nesting set. I had purchased it when buying the Wizard machine some (six?) years ago? AND... I have never used it until this card (hanging head in shame). 


Products Used:

Sparkle N Sprinkle - Henry (lg) 0122-251M
Sparkle N Sprinkle - Overheated? 0433-251E
     (or adorable set #251 Cars) 00-251P4
Sparkle N Sprinkle - Super Thick Clear embossing powder EP230
Inks: Tuxedo Black Memento, Cloudy Blue dye base, Tea Dye dye base, VersaMark
Cardstock: DCWV and Stampin' Up!
Spellbinders:
  Flourish Accent Shapeabilities S4-198
  Shapes - Abstract Nestabilities - S4-001
  Grand Scallop Circles LF-124
  Standard Circles - Nestabilities - S4-116

This card is entered in the following awesome challenges:

Anything Goes Challenges - #88 "Seeing Double" (2 stamped images, inside 2 identical die cuts from nestabilities, and 2 flourishes from the same die cut set, 2 layers in red panel, 2 layers behind Henry the car, 2 types of stitches).
Use It Tuesday - #52 Diecuts, Punches... (4 Spellbinders dies)
Crafty Boots - "Old, New, Borrowed OR Blue" (everything on the card is old, white die cut is "borrowed", dies, images, papers all have never been used so they are new even tho they are old, blue cardstock)
Make It Monday - #131 Always Anything Goes 
Make My Monday - Heat Embossing (clear EP in cracked ice)

Warm Hugs Always,


Wednesday, March 13, 2013

Just Dreamin'... (and blog candy)

Let's go sailing - with the wind in our hair, and the fresh smell of the ocean filling our lungs, I can almost feel it...

This will be our journey on a fantasy sail boat. Wanna come?

I've been cleaning out and reorganizing my craft room, including some of the older boxes stuffed way in the back that were housing... who knows what?

In cleaning out one box (novel idea, yes?) "a something" which had been die cut and covered with SuperAdhesiveSheets was discovered.

So I peeled away the protective covering to see what the image was. It was this fantasy, stained-glass sail boat from Sparkle N Sprinkle colored with Prisma Color pencils. Immediately I covered the now ultra-tacky surface with those tiny little clear beads everyone has in their stash. That took care of the exposed ultra sticky stuff.

Now what? Should I just throw the thing away?

As long as the ride is a fantasy, I experimented with a few techniques, once again allowing my distraction to keep me from finishing the task at hand -- to clean and reorganize the craft room.

Are you easily distracted, too?

(Can you see the little beads covering the sail boat image?)


Here, maybe this photo is better:


 First...

Using my old stash of virginal supplies, (hanging head in shame) I broke out:

Spellbinders Grands Big Scallop Ovals, and Big Scallop Ovals Nesties
Adirondack Lights Salmon (still had the wrapping on it)
My Mind's Eye Twine (still in the wrapping)
Brass Sea Horse Charm (still in the wrapping)

Colors and Layers:


It's fun finally using goodies purchased so long ago.

(the rest of the products are listed at the bottom of this post)

BUT BUT BUT - then, here is something new!

Will you come Dream Away with me as we sail?

Wonderful dreamy sentiment including phrases which allow us to sail away into the past, present or future:
"Cherish yesterday, Live today, Dream for tomorrow"

The sentiment is on this beautiful new Spring Florals set currently on sale at SNS.

A little about creating the dimensional glitter panel for this card:

Using white cardstock (CS), cut a panel with a fantasy scalloped "port hole".

Another "ring" of scallops was die cut from yellow CS. Because the glitters are semi-transparent, the yellow panel slightly shows though.

The yellow scallop ring was glued onto the white CS to create a tad of color and lots of dimension.

With Brushable Glue paint a ray of glue across the white and yellow panels and coat with Sunny Daze glitter.

Leave a space, and paint another ray, covering it with Sunny Daze glitter, and so forth. Allow to dry thoroughly, then go back and paint rays for the Orange Crush glitter in the spaces left between.)

Tip: hold the handle of your paint brush between your teeth while applying glitter between brushing the glue stripes (LOL)

Tip: have coffee filters available to catch the excess glitter. Very easy to pour back into jar.

Once dry, apply brushable glue to inner port hole and sprinkle on the Laser Blue glitter.

Customizing the charm: Lightly paint seahorse charm with Versamarker so the brass metallic essence will still shine through. If it is completely coated with VersaMark, then the EP will also cover all the brass. Apply By The Lake embossing powder (this glittery, pearly EP is awesome). Heat set. Stamp sentiment with same EP and heat. Smoosh white CS with VersaMark ink and apply matching embossing powder. Punch out scallop circle from that swatch. Assemble card.

Here is a close up of the textures and layers:


The best part of this card is the dreamy sailing trip with you, my dear blogging friends.


So where is the blog candy? Three Sparkle N Sprinkle stamp sets to the winner whose name is pulled out of the hat (because I have not figured out random.org yet). Just leave a comment answering the question about getting distracted: When in your craft room, regardless of what you are doing, do you sometimes become distracted, putting off another project already begun? If the winner's e-mail address is available through their blogger account or left in the comment, or even e-mailed to me, I will notify them, so you do not have to become a follower. Just have fun! Deadline is March 31.

Note: winner was announced on April 1 here, it is Cammy.
Products used:


Sparkle N Sprinkle Laser Blue Glitter, Sunny Daze Glitter, Orange Crush Glitter
Sparkle N Sprinkle By The Lake embossing powder
Adhesives: SNS Brushable Glue, SNS Super Adhesive Sheets, Dimensionals
Cardstock: White, yellow, aqua
Prismacolor Pencils
Spellbinders Grands Big Scallop Ovals
Punches: EK Success 1.5" round, SU scallop round
inks: Adirondack Lights Salmon dye ink, VersaMark ink, Weathered Wood dye ink, VersaMarker
My Mind's Eye Twine, Brass Sea Horse Charm 

This card is submitted to the following awesome challenges:

Sparkle N Sparinkle - Use Glitter
Crafty Boots - "Old, New, Borrowed OR Blue" (blue - CS, glitter, embossing powder; 4 old virginal items (so they are actually new as well) new sentiments from set 490.
Critter Challenge - #155 Use Twine (twine holds charm)
Make It Monday - #131 Anything Goes
Stamptacular Sunday Challenge - #206 "To Die For" (used 5 SB Scallop Oval Dies)
Sunday Stamper - #248 "Use Something You have had for Yonks and never used" - (SB dies, ink pad, charm, twine)
Stamping with the Dragon - Anything Goes
Papertake Weekly - 1-2-3 - (one charm, two stamp images, three colors of glitter)
Use It Tuesday - #52 Dies, Punches, Cutouts - (SB large scallop reg diecuts and grand diecuts)
Vickie's Challenges - Anything Goes -


Thanks for checking in!
hugs,

Thursday, March 07, 2013

Sweet As Can Be

Happy Thursday! Today's card share is way different for me, and has a lot of "firsts".


What are all my firsts?


It is my first "Cutesy" card. I will make more. (smile)


It is my first card with a Digi Image: Have you been putting it off? It was not nearly as difficult as I made it out to be. (do you ever make things more difficult than they really are?)


Over on the Besties' Site, this adorable freebie "Tiffany and Squeek" was offered so that everyone could participate in her weekly challenge.


Squeek reminds me of the Blue Bird Of Happiness - they are so sweet together.

It is my second time for using Copic Markers in this manner. Is there a trick to staying in the lines? Or is it my fumble fingers which don't cooperate?


Another first- Sneak peek for the sentiments.


They are part of the new Sparkle N Sprinkle Spring Floral #490 set designed by Beccy Muir.


Sparkle embossing powder and Copic markers also from SNS.


The Sparkle EP is used on the dryer sheet, blue panel, and Decorative Labels Eight in order to provide depth to the distress color, and some sparkle, too, of course.


More - It is my first easel card (wonder why I waited so long?

Another first - One blogger mentioned she die cut used dryer sheets for her flowers.

I tried it with Spellbinders dies, but they would not cut through the dryer sheet.

So I stitched the dryer sheet between the lace and blue panel to add some body and fru fru.

I will use more dryer sheets in cardmaking. :-)

It is also the first time my Labels Eight and Decorative Elements Labels Eight have been used - they are beautiful dies!

Thanks for popping by to share my day of "firsts".

Products:
Besties Tiffany and Squeek
Spellbinders Labels Eight Nesties
Spellbinders Decorative Elements Labels Eight
Cheery Lynn Fanciful Flourish
MS PAP Deep Edge Floral Crochet
MS Lace Doily border punch
Copic Markers from Sparkle N Sprinkle
Sparkle embossing powder from SNS
Cardstock: White, Bazzill Pink, SU Pink, Bazzill Yellow, Blue
Inks: Shell Pink dye ink, Versafine Olympia Green pigment ink, VersaMark pigment ink, Sky Blue Brilliance pigment ink
Lace, Dryer Sheet, white flowers

This card has been submitted to the following challenges:

Besties Challenge - #8 - Lace (fabric lace, 2 lace punches)
Cuttin and Stampin - #9 - Use Flowers
Oldie But A Goodie -  Feeling Floral (Labels 8 dies are more than 6 months old)
Paper Take Weekly - Anything Goes with femininity
Party Time Tuesday's - #110 Die Cuts (badge is at top in tab)
Shopping Our Stash - #92 Border Punches (2 MS border punches)
Through the Craft Room Door - Anything Goes
ABC Challenges - Anything Goes
Artistic Inspirations - #31 Things with Wings (girl holding blue bird)
Crafty Bloggers Network - #9 Spring or Pastel

Stamping Hugs,


Friday, March 01, 2013

Blog Candy Winner!

Today is the drawing for the blog candy!

Sue of Sue's Stamping is the name which popped out of the basket. I e-mailed Sue so she can send her mailing address.

Thanks to each of you who played by answering the relevant question. Promises, too, for there to be more candy in about a month.

To win blog candy, you do not have to follow my blog (though I love it if you do LOL), and as long as your contact information is available via blogger, (or through a personal e-mail from you), then I can contact you to let you know you have won.

No card share today, but may I share our Cheesy Squash Casserole recipe instead of a card?


Jacky’s Cheesy Squash Casserole

Ingredients:
  • 8 cups cubed squash (yellow and/or zucchini)
  • 1 medium onion, chopped
  • 3/4 cup sour cream (or plain greek yogurt)
  • 1 cup grated cheddar cheese
  • 2 tbsp butter
  • 1/2 cup crushed Ritz crackers (or Panko Crumbs)
  • salt and pepper to taste
Method:

1. Chop Squash and boil (about 20 minutes) until tender. Place towel in colander and pour squash into towel until it cools. After squash cools, squeeze to get excess water out of it. Put into bowl.

Note: squeezing out moisture prevents a watery casserole

2. Saute onion in fry pan with butter until translucent.

3. Add onion and remaining ingredients (except Ritz crackers)  into bowl, and combine. After mixing thoroughly, place into casserole dish.

4. Top with crushed Ritz crackers or Panko Bread Crumbs. Bake at 350 for 25 minutes, until cheese and sour cream have heated well.


(this meal is shown with steamed asparagus and grilled chicken breast)


Thanks for stopping by today!