Waving a hearty welcome to you, lovely crafting friends!
Hoping you and your special loved ones are doing well.
Alas, this is my final post for the DRU team - I'm sad to leave my very talented teamies,
but...
looking forward to sharing wonderful news with you next month!
(It is always difficult to sit on a secret for several months, don'tcha think?)

Hoping you and your special loved ones are doing well.
Alas, this is my final post for the DRU team - I'm sad to leave my very talented teamies,
but...
looking forward to sharing wonderful news with you next month!
(It is always difficult to sit on a secret for several months, don'tcha think?)

Several layers of the same die cut can achieve texture, richness and color.
Here's what I did:
 |
click below for:
STORE |
Spellbinders Classic Circles
Die Versions "Snow Flurries" DWP-004 (I love these snowflakes!)
The glittery full moon has a piece of sticker paper behind (hand cut after adhering it).
The glitter is sparkly in person, but on camera, Velvet (Microfine) glitter is more like a velvety with only a little glitter showing.
TIP:
The larger the glitter grain size, the more area for the light to reflect the sparkle.
The smaller the glitter, the more "movement" of the card is needed to show the glitter.
In this instance, I wanted the reindeer details to show up clearly, and not be covered up with the sparkly glitter to which we are all accustomed. SO--
I HAVE LEARNED--
The larger the glitter grain, the more likely to get a blurry photo, or have part of the card elements/details covered up by the grains.
Hence, SNS Cloud Nine Velvet Microfine glitter was my choice:

The square card sports a timeless white embossed Anna Griffin sentiment:
Tip:
To grace your projects with unexpected elegance and use the "left-overs" in your stash:
1. Use opulent scraps of paper in the layers.
2. Wet emboss sentiments, background panels, or layer edges.
3. Find that odd, left-over brad, eyelet (remember those?) or other metal embellishment. Heat it up, dip it into your embossing powder, and make it new for your current project:
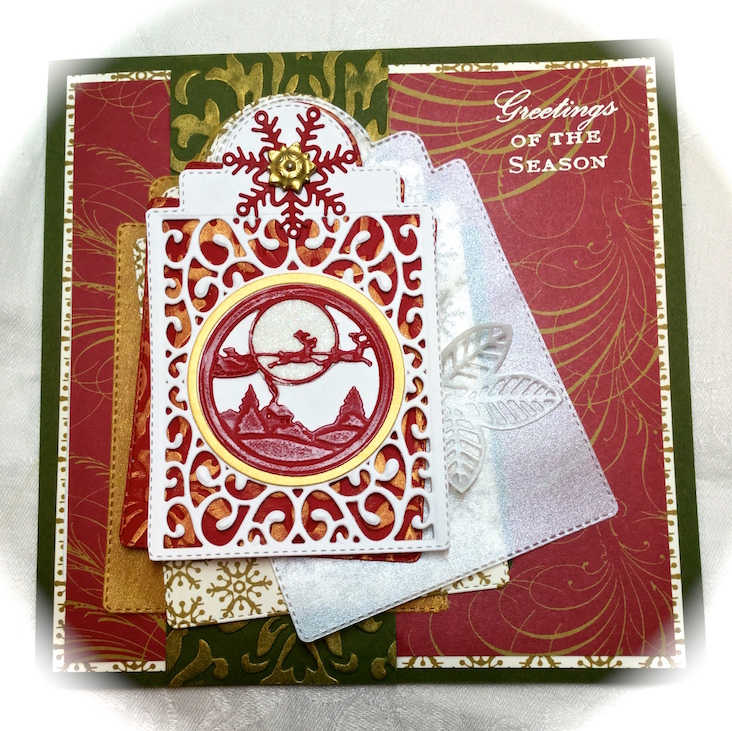
Love the detailed stitching on the Poppy Stamps Main Street Stitched Tags:

The Pearly Vellum in gold and white lends an unexpected elegance!
Wishing the photos showed it better (sigh):
Wishing the photos showed it better (sigh):

Tip:
Use tones of the same color that work well together, without clashing.
In this case, it was all about the golds:
Use tones of the same color that work well together, without clashing.
In this case, it was all about the golds:
- The heavier pearlescent circular frame is beautifully crisp - it was made by using the round die that came with the Sue Wilson Mini Christmas Scene Background set, and a Spellbinders Classic Circle that was just a tad larger.
- The intricate brad has been heated and dipped into Detail Gold embossing powder.
- Non-metallic, true-gold-hue printed in the pretty in the Anna Griffin papers sets the stage for the other golds, not taking away from their textures.
- The Gold Galaxy Brilliance Ink accentuates the dry embossed green panel, and red tag under the white.

Hope you enjoyed today's ideas.
If you did not notice, I have a little gift offering for my followers.
Just click on the link under the "tabs" of my blog photo for details.
If you did not notice, I have a little gift offering for my followers.
Just click on the link under the "tabs" of my blog photo for details.
Products:
- Sue Wilson Mini Christmas Scene Background
- Sue Wilson's Faux Quilled Leaves
- Poppy Stamps Main Street Stitched Tags
- Spellbinders Classic Circles
- Die Versions "Snow Flurries" DWP-004 (I love these snowflakes!)
- Anna Griffin Christmas Stamp Set
- Anna Griffin Christmas Papers
- Papers: Pearly Gold Vellum, Pearly White Vellum, Pearlescent Gold cardstock, White, Red, Mossy Meadow
- Sparkle N Sprinkle: VersaMark Ink, White Detail embossing powder #298, Gold Detail EP (on brad), Cloud Nine Velvet Microfine glitter, Sticker Paper
- Craftwell Sophisticated embossing folder (on green panel, red tag)
- Brilliance Galaxy Gold ink
My card is supporting the following challenges:
- A Snowflake's Promise #28 "Anything Christmas Goes" 9/21
- Christmas Card Challenges #40 "Anything Christmas" (hanging head in shame that I did not use the optional challenge). 9/18
- Christmas at Sweet Stampin' Challenges (Sept 14) Christmas Dies 10/15
- Classic Design Team Open Challenge #6 (Sept) Anything from a DT 10/1
- Crafty Gals Corner Challenges #89 - Freestyle! 9/21
- Crafty Hazelnut's Christmas Extra (Sept) Anything christmas 10/1
- Crafty Hazelnut's Patterned Paper (Sept) Anything with PP (my background) 10/1
- Merry Monday Christmas Challenge #213 Inspiration Board - I was inspired by the red and white color combination, the snowflakes, the opulent setting, the magical decor for the meal) 9/19 (sep post)
- Paper Creators Crafts Challenges #51 Christmas 10/1
- ScrapyLand #49 Anything Goes with dies 9/19
- The Twelve Months of Christmas Link Up #21 Anything Goes with Optional Theme Nature of Christmas - I'm not sure if the icy white leaves count as flora or not LOL 10/1 (sep post later)
- World Wide Open Design Team Challenge Blog #14 (Sept 15th-Oct 15th) Anything from a DT
happy hugs,