

To see larger photos, please click on the photos to enlarge.
My first tutorial uses smaller flowers here.
WARNING: the glue DOES get all over your fingers and under your finger nails, but just wash it off afterwards.
These flowers (courtesy of Terry) are about 1.5" (3.75cm).
This is very basic and easy - no inking, glittering, etc to make them look even prettier!
The buttons don't even have threads or twine tied through them.
There are 3 flower types being shown all from one layer flowers.
SIMPLE DOUBLE LAYER FLOWERS
(WITH OR WITHOUT CRUMPLED PETALS)
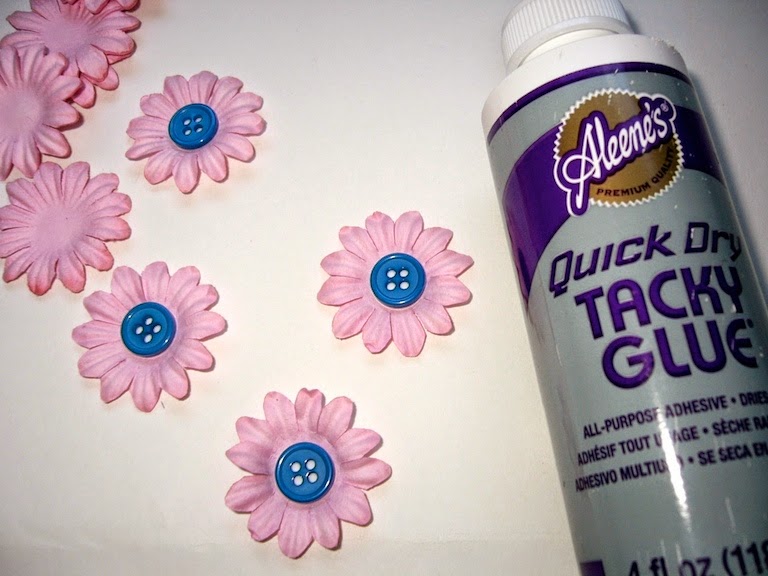
Items needed:
Larger prima flowers
Buttons
Aileen's Quick Dry Tacky Glue
Put a drop of glue in the center of the flowers for the buttons. (or sew through holes if you'd like the thread to show).

Place buttons on glue droplets.
Place another flower layer UPSIDE DOWN and add a drop of glue.

Place button layer on top. Allow to dry.
Use as is, or crumple the petals to your taste.

Now you have lots of dimension without any manipulating, and it probably will go through the mail if a sheet of text weight paper is placed on top of your card before putting it in your envelope.
DIMENSIONAL FLOWERS USING THREE PRIMA FLOWERS
Items needed:
Larger prima flowers
Buttons
Aileen's Quick Dry Tacky Glue
Put a drop of glue in the center of the flowers for the buttons. (or sew through holes if you'd like the thread to show).
Place buttons on glue droplets.
Fold Flower in Half.

Fold in half again.

Open the 2nd half and round it around a pencil, or just manipulate it with your fingers so that it will fit around half of your button on the original layer.
Apply glue to folded half (sorry for the gloppy drop there, it takes a while for my hands to not shake, while I photograph with one hand and hold with the 2nd hand LOL)

Attach it around half of the button. The glue will dry clear. Because the flower is folded in half, the petals actually face away from each other, creating more dimension.

Open the 2nd petal, leaving it only folded in half. Apply glue to folded edge and apply to other side of button. "Crunch" the two half together until you are happy with the shape.

Here is "The Before", with a single layer, and "The After" with 2 halves glued around the button.

DIMENSIONAL FLOWER BUDS USING ONE FOLDED PRIMA FLOWER
Items needed:
Larger prima flowers
Aileen's Quick Dry Tacky Glue
Fold a single flower in half, and in half again (making it 1/4 fold).

Insert droplet of glue (which will dry clear).
Hold the bud while the glue sets a little (about 60 seconds).
You can shape the bud at the same time.
If making for scrapbooking and cards, try to keep one side fairly flat for adhering to your project.

Top left: plain prima flowers
Next: several single flower buds.
Front Right: 3 double flower buds. (two flat, front one is crumpled)
Back Right: two triple flower creations for more dimension.

SAMPLE CARD: using all three styles.
The double layers were crimped to look like buds.

hope you enjoyed my easy-peasy tutorial - it was even simpler than the first!
hugs,
de

10 comments:
Wow wow wow, thank you so much Donna for this awesome tutorial. I have loads of these flowers in my stash and am definitely going to give this a go.
Hugs Desíre {Doing Life}
What a wonderful tutorial !!! You are always thoughtful ans so helpful with your tutorials !!! This is great !!!
Hugs,
Mayra
Your flowers are gorgeous Donna and your tutorial is fabulous. Your card is beautiful too, I love the sweet image, pretty colours and wonderful detailing.
hugs Sue xx
Another fab tutorial on these gorgeous flowers Donna.
Hugs Sharon. x
Thank you Donna, another great flower tut.
pam
Tried these already from your first tutorial - love them - and naturally, I had bunches laying around LOL
What gorgeous flowers! Thank you so much for the wonderful tutorial! And I love your card as well! Hugs Julie xox
Fabulous tutorial with some great ideas. Like the last one the best - it reminds me of a mum for some reason.
Lovely tutorial ! I loved the dimensional one more :) !
Soooooooo pretty. And very real looking...
Post a Comment